That surprisingly high water bill might have a simple explanation. The culprit is often a silent toilet leak. While some running toilets hiss, others quietly drain water from the tank into the bowl without making a sound. This slow leak can waste thousands of gallons of water over time. The good news? A simple food coloring test can reveal the problem in minutes. This guide will walk you through the test and what to do with the results. We’ll explore common causes and give you clear steps for a successful running toilet repair, so you can decide if it’s a quick DIY or a job for a pro.
Key Takeaways
- Identify the source of the sound: That constant hissing is usually a sign of a faulty flapper, a misaligned float, or a worn-out fill valve. A few drops of food coloring in the tank can quickly confirm a silent leak into the bowl.
- Simple adjustments often solve the problem: Before buying new parts, check the flapper chain for proper slack and adjust the float to lower the water level. These two-minute fixes are often all you need to stop the leak.
- Don’t hesitate to ask for help: If you’ve tried the common fixes and the toilet still runs, or if the repair feels beyond your comfort zone, calling a professional is the smartest move. It ensures the job is done right and prevents a small leak from becoming a big mess.
What’s Causing My Toilet to Run?
That constant hissing or trickling sound from your toilet isn’t just annoying; it’s a sign that water and money are going down the drain. A running toilet is one of the most common household plumbing issues, and it can waste thousands of gallons of water every month if left unchecked. The good news is that the cause is often a simple, inexpensive part inside the tank that you can identify yourself.
Most of the time, a constantly running toilet points to one of four culprits: a worn-out flapper, an improperly set float, a faulty fill valve, or a problem with the flapper chain. Understanding what these parts do is the first step toward a quiet bathroom and a lower water bill. Before you get overwhelmed, remember that figuring out the “why” is half the battle. Once you pinpoint the problem, the fix is usually straightforward. If you find the issue is more than you’re comfortable handling, our team is always ready to help with professional toilet repair and replacement.
Is Your Flapper Worn Out?
Think of the flapper as the drain plug for your toilet tank. It’s the rubber or plastic seal at the bottom that lifts when you flush and then drops back down to hold water in the tank. Over time, this little part can degrade. Hard water minerals can build up on it, or the rubber itself can warp and become brittle. When this happens, it can no longer create a watertight seal. Water will slowly leak from the tank into the bowl, and your toilet will run intermittently to refill the tank. A bad flapper is often the number one suspect, so it’s a great place to start your investigation.
How to Test for a Leaky Flapper
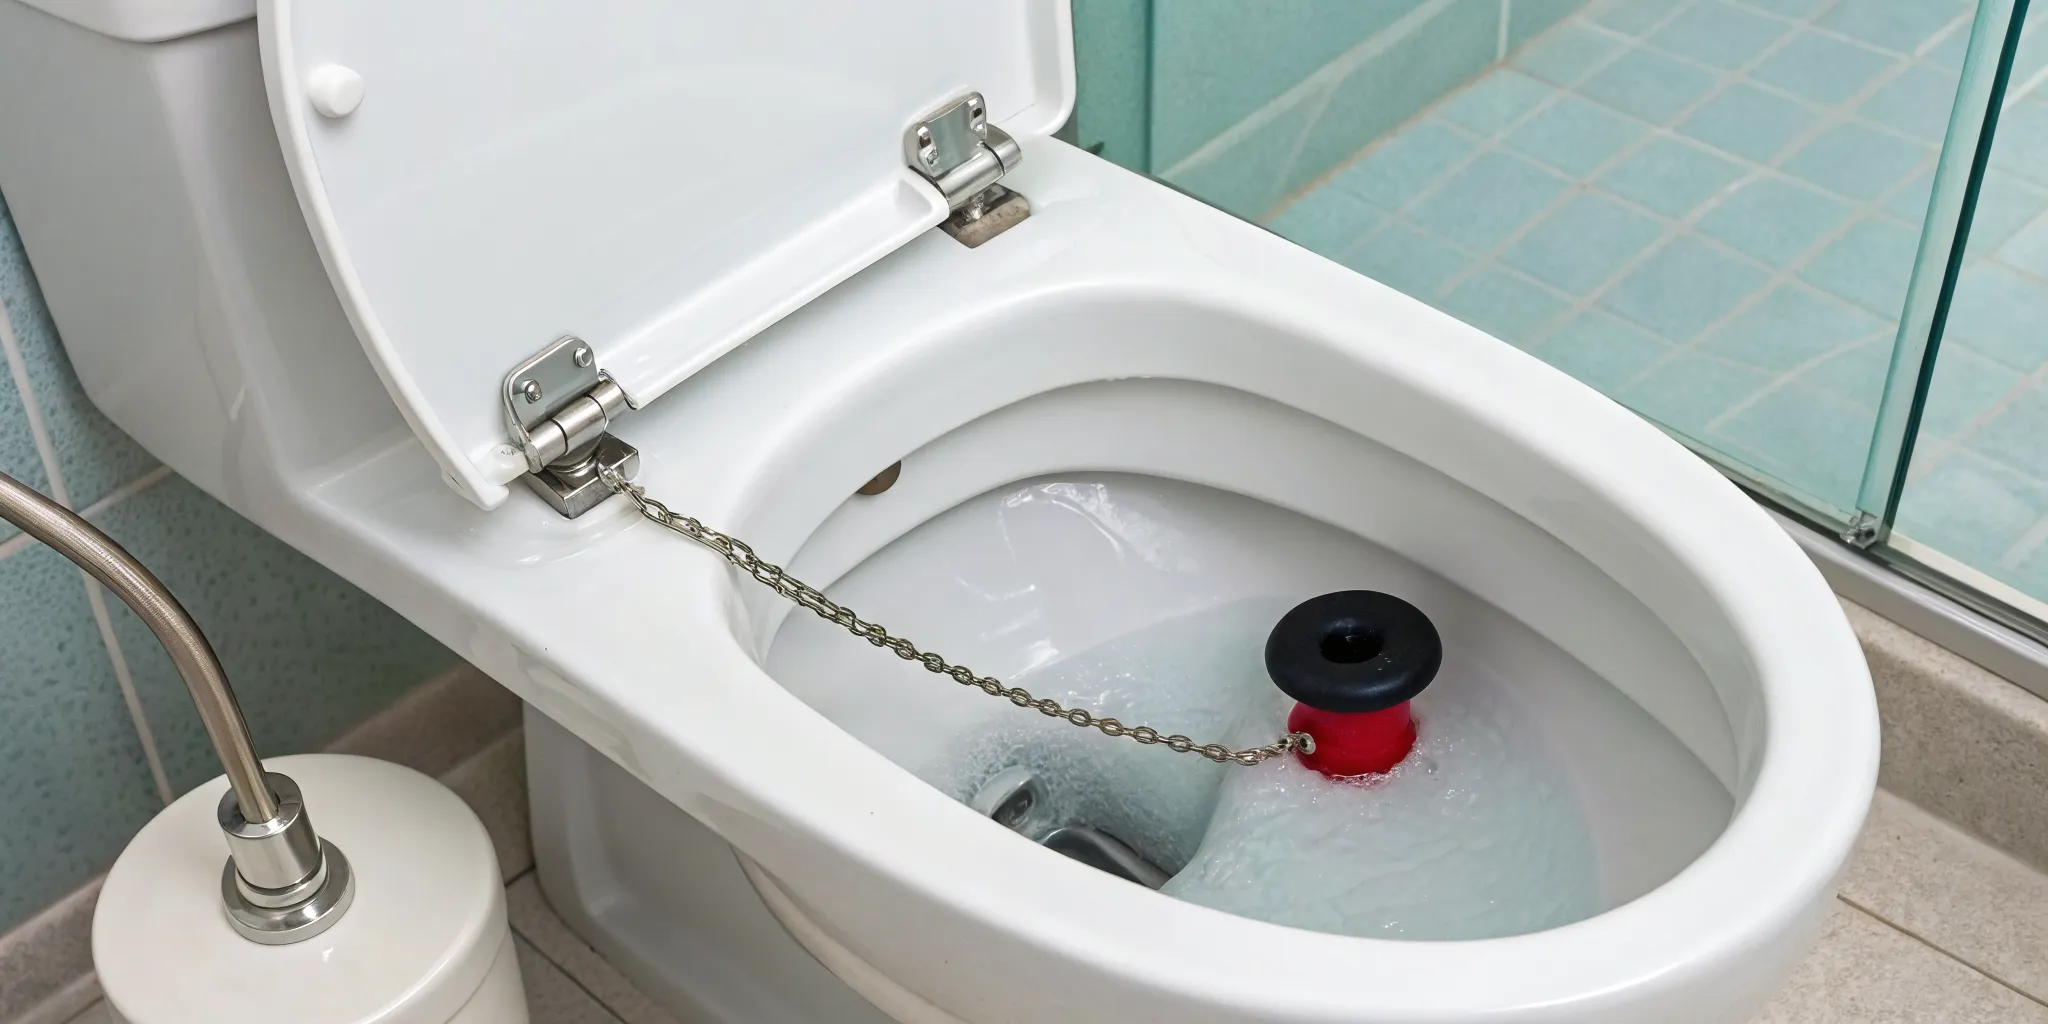
To find out if your flapper is the problem, you can use a simple trick with food coloring. First, take the lid off your toilet tank and add a few drops of dark food coloring into the water. Now, the important part: don’t flush! Just walk away for about 20 to 30 minutes. When you come back, take a look inside the toilet bowl. If you see any of the colored water in the bowl, you’ve found your culprit. A leaky flapper is allowing water to seep from the tank, which is why your toilet keeps refilling itself. While replacing a flapper can be a quick DIY project, if you’re not comfortable or if the problem persists, our team is always here to help with expert toilet repair.
Is the Float Height Incorrect?
The float is the part in your tank that rises with the water level. Its job is to tell the fill valve when to stop filling. If the float is set too high, the water level will rise above the overflow tube before the fill valve gets the signal to shut off. As a result, water constantly spills down the overflow tube and into the bowl, and the fill valve never stops running to compensate. It’s a cycle that wastes a tremendous amount of water. Whether you have a classic ball float or a more modern cup-style float, checking its height is a key diagnostic step.
The Float Arm Lift Test
Here’s a quick way to see if the float is your culprit. It’s called the Float Arm Lift Test, and it takes less than a minute. First, take the lid off your toilet tank so you can see the inner workings. Find the float—it’s either a ball on an arm or a cup that slides up and down the fill valve pipe. Now, gently lift up on the float arm. If the sound of running water stops, you’ve found your problem! This means the float is set too high, causing the water level to spill into the overflow tube. Adjusting the float height should fix it. If the water keeps running even while you’re lifting the arm, the issue is likely with the fill valve itself. If you’ve tried this and are still stumped, it might be time for a professional to take a look. Our team can quickly diagnose the issue and handle any toilet repair you might need.
Could You Have a Faulty Fill Valve?
The fill valve is the tall assembly that brings fresh water into the tank after you flush. Like any part with moving components, it can wear out or get clogged with sediment over time. A faulty fill valve might fail to shut off completely, allowing water to seep into the tank continuously. You might hear a faint hissing sound long after the tank should have been full. If you’ve already checked the flapper and adjusted the float but the toilet still runs, the fill valve is the next likely cause. When a simple fix doesn’t solve the problem, it might be time to contact a professional.
Is the Flapper Chain the Wrong Length?
The small chain connecting the flush handle to the flapper plays a surprisingly important role. An incorrect flapper chain length can easily cause a running toilet. If the chain is too short, it will hold the flapper slightly open, preventing it from sealing properly. If it’s too long, the excess chain can get caught underneath the flapper, also breaking the seal. The ideal length allows for just a little bit of slack when the flapper is closed. It’s a quick and easy thing to check and adjust, and it can often be the simple solution you’re looking for.
Does Jiggling the Handle Temporarily Fix It?
If you have to jiggle the handle to stop your toilet from running, you’ve stumbled upon a classic plumbing clue. This temporary fix works because the jiggle likely shifts a faulty flapper or a tangled chain back into place, allowing it to seal the tank drain for a moment. However, this is a clear signal that a part is failing. It usually means the flapper is warped, worn out, or the chain is the wrong length and gets caught, preventing a consistent, watertight seal. While the jiggle might buy you some peace and quiet, it’s not a long-term solution. The underlying problem will continue to waste water until it’s properly addressed through a simple adjustment or a professional repair.
Is the Fill Tube Siphoning Water?
Take a look inside your toilet tank and find the small, flexible tube that runs from the fill valve to the center of the overflow pipe. This is the fill tube, and its purpose is to refill the bowl with water after a flush. This tube should always be positioned above the water line in the tank. If the tube is too long and hangs down inside the overflow pipe below the water level, it can create a siphoning effect. This process continuously pulls water from the tank and sends it straight into the bowl and down the drain, causing the fill valve to run nonstop. This is a sneaky cause of a running toilet, but it has a simple fix: just ensure the tube is clipped to the side of the overflow pipe, well above the water.
Is Your Toilet Secretly Running? Here’s How to Tell
A running toilet is more than just an annoying sound in the middle of the night. It’s a silent money drain, wasting hundreds of gallons of water and driving up your utility bills. The good news is that diagnosing the problem is usually straightforward. Here are three simple checks you can perform to confirm your suspicions and figure out what’s going on.
Listen for Hissing or Gurgling Sounds
The easiest way to tell if your toilet is running is to simply listen. After you flush, your toilet should stop making noise once the tank is full. If you hear a constant hissing, gurgling, or the sound of water running long after the flush cycle is complete, you likely have a leak. This phantom flushing sound often points to an internal issue. A toilet that keeps running can be caused by a few things, like a worn-out flapper or mineral buildup. These persistent sounds are your first clue that it’s time to call for a toilet repair.
Look for Ripples in the Toilet Bowl
Sometimes a running toilet is nearly silent, but a quick visual check can reveal the problem. Look closely at the water in the toilet bowl. Do you see any movement or subtle ripples on the surface, even when the toilet hasn’t been flushed recently? This is a sure sign that water is leaking from the tank into the bowl. A toilet that runs constantly can waste thousands of gallons of water a month. For a foolproof test, add a few drops of food coloring to the tank. Don’t flush, and wait about 20 minutes. If you see colored water in the bowl, you have a leak.
Check the Water Level in Your Tank
If you’ve heard the sounds and seen the ripples, your next step is to look inside the tank. Carefully lift the lid and set it aside. The water level should be about half an inch to one inch below the top of the overflow pipe (the tall pipe in the middle of the tank). If the water is spilling into that pipe, you’ve found your problem. This means the fill valve isn’t shutting off properly, causing the tank to overfill and constantly drain. This is often due to an improperly set float. Keeping an eye on your toilet’s internal parts is a key part of maintaining your home’s plumbing systems.
Understanding the Overflow Pipe
Let’s talk about that tall, open pipe in the middle of your toilet tank—that’s the overflow pipe. Its name gives away its purpose: it’s a crucial safety feature designed to prevent the tank from overflowing and spilling water all over your bathroom floor. If the water level rises too high, usually because the fill valve fails to shut off, the excess water safely drains down this pipe and into the bowl. While this prevents a flood, it also creates a constant running sound and wastes a significant amount of water. If you see water trickling into this pipe, it’s a definitive sign that your water level is too high. This is often caused by an improperly adjusted float, which isn’t signaling the fill valve to stop in time.
Your Guide to Running Toilet Repair
That constant hissing or trickling sound from your toilet isn’t just annoying; it’s a sign that water and money are going down the drain. The good news is that most running toilets are caused by a few simple, easy-to-fix issues inside the tank. With a little guidance, you can often solve the problem yourself in under an hour. Let’s walk through the process together, step by step.
Step 1: Turn Off the Water & Grab Your Tools
Before you do anything else, you need to stop the water flow to the toilet. Look for the small shut-off valve on the wall or floor behind the toilet and turn it clockwise until it stops. Next, flush the toilet to drain the tank. You’ll want to have a few old towels or a sponge handy to soak up any remaining water at the bottom of the tank. This simple prep work prevents a small repair from turning into a big, wet mess. Taking a moment to prepare makes the entire process smoother and stress-free.
Step 2: Inspect and Adjust the Flapper
With the tank empty, take a look at the rubber flapper at the bottom. This part is supposed to create a tight seal to keep water in the tank until you flush. Over time, flappers can warp, crack, or get covered in mineral buildup, which prevents them from sealing properly. Gently run your finger along the edge of the flapper and the valve seat it rests on. If you feel any bumps or see visible damage like cracks or corrosion, it’s time for a replacement. A faulty flapper is one of the most common culprits behind a running toilet, but luckily, it’s an inexpensive and easy part to replace.
Step 3: Set the Correct Float Height
The float is the part that tells the fill valve when to stop filling the tank. If it’s set too high, water will continuously spill into the overflow tube, causing the toilet to run. The water level should be about one inch below the top of the overflow tube. If you have an older toilet with a ball float on a metal arm, you can gently bend the arm downward to lower the water level. For newer toilets with a column-style float, you’ll likely find an adjustment screw or clip that you can turn or slide to lower the float and, in turn, the water level in the tank.
How to Adjust the Fill Valve Screw
If your toilet has a modern, column-style float, you’ll likely find an adjustment screw on top of the fill valve. This little screw is your key to setting the right water level. To lower the float, simply turn the screw counterclockwise. This adjustment tells the fill valve to shut off sooner, preventing the water from reaching the top of the overflow tube. Make small adjustments—a half-turn at a time—and then turn the water back on to check the new level. If the water still runs or this adjustment doesn’t seem to solve the issue, the fill valve itself might be faulty. In that case, a professional toilet repair can get things working perfectly again.
Step 4: Examine the Fill Valve
If you’ve checked the flapper and adjusted the float but the toilet is still running, the fill valve might be the problem. This is the tall mechanism that refills the tank after a flush. Sometimes, debris can get stuck in the valve, preventing it from closing completely. You can try cleaning it, but if the valve is old or visibly worn out, it may need to be replaced. Replacing a fill valve is a bit more involved than changing a flapper, and if you’re not comfortable with the task, our team is always ready to help with any toilet repair needs you might have.
How to Clean the Fill Valve
If you hear a faint hissing sound long after the tank has filled, debris inside the fill valve is a likely culprit. Before you replace the whole unit, try giving it a good cleaning. First, make sure the water is turned off and the tank is empty. Remove the fill valve’s cap—you can usually do this by pressing down and twisting it counter-clockwise. Before you turn the water back on, place an upside-down cup over the open valve to prevent a geyser in your bathroom. Briefly turn the water on and off a few times to flush out any sediment. Rinse the cap, reassemble the valve, and turn the water back on. If the hissing stops, you’ve solved it! If the problem continues, the valve’s internal seals are likely worn out, and it’s time for a replacement. This can be a tricky job, and if you’d rather leave it to an expert, our team is here to help with any toilet repair needs.
Step 5: Fix the Flapper Chain Length
The small chain connecting the flush lever to the flapper can also cause issues. If the chain is too short, it will pull on the flapper, preventing it from creating a proper seal. If it’s too long, it can get caught underneath the flapper, with the same result. The chain should have just a little bit of slack when the flapper is closed, about half an inch. You can easily adjust the length by moving the clip to a different link on the chain. This is a quick adjustment that can make a huge difference and instantly solve your running toilet problem.
Quick Safety Tips for Your Repair
Before you begin any work, always remember to turn off the water supply valve behind the toilet. After the water is off, flush the toilet to empty the tank completely. This ensures you won’t have any unexpected gushes of water while you’re working. It’s also a good idea to place a few old towels on the floor around the base of the toilet just in case of any drips or spills. If a simple fix turns into a bigger problem, don’t hesitate to call for emergency plumbing services to prevent water damage.
Don’t Worry, the Tank Water Is Clean
Before you lift the lid off the tank, let’s clear up a common misconception. Many people are hesitant to look inside their toilet, but you can rest easy knowing the water in the tank is completely clean. It’s the same fresh water that comes out of your sink faucet, fed directly from your home’s supply line. This water hasn’t been in the bowl yet. The whole reason your toilet is running is because one of the internal parts, like the flapper or fill valve, is allowing this clean tank water to constantly leak into the bowl. So, don’t be shy about taking a peek inside to diagnose the problem. If you’re still not comfortable, or if the issue seems complex, remember that a professional toilet repair is always a quick and easy option.
How to Replace Common Toilet Parts
If you’ve tried adjusting the components in your toilet tank and the water is still running, it might be time to replace a part. Don’t worry, this is usually a straightforward job that you can handle with a little patience and the right instructions. Replacing a worn-out flapper or a faulty fill valve can solve the problem for good and is much cheaper than ignoring the issue. A constantly running toilet can waste a significant amount of water, leading to a higher water bill. Let’s walk through how to replace the most common culprits so you can get your toilet back in working order.
How to Replace a Toilet Flapper
The flapper is the rubber seal at the bottom of your tank that lifts when you flush. Over time, it can warp or degrade, preventing a tight seal. To replace it, start by turning off the water supply to the toilet and flushing to drain the tank. Hold the handle down to get as much water out as possible. Next, unhook the old flapper from the two pegs on the overflow pipe and detach its chain from the flush lever. Take the old flapper with you to the hardware store to find an exact match. Once you have the new one, simply clip it onto the pegs and connect the chain to the lever, leaving just a little bit of slack. If you run into trouble, our toilet repair services are always here to help.
How to Install a New Fill Valve
The fill valve is the tall assembly that refills the tank after a flush. If it’s broken, your toilet might run constantly or not fill at all. To replace it, turn off the water and empty the tank. Use a sponge to soak up any remaining water. Place a bucket under the tank and disconnect the water supply line. Then, unscrew the locknut on the underside of the tank to remove the old fill valve. Slide the new one into place, tighten the locknut by hand, and give it a final quarter-turn with a wrench. Reconnect the water line, turn the water back on, and adjust the float so the water level stops about an inch below the top of the overflow tube.
Consider a Complete Toilet Repair Kit
If you’ve played detective in your toilet tank and you’re still not sure which part is the culprit, or if the internal components just look old and worn out, a complete toilet repair kit is your best bet. These kits are a lifesaver, bundling all the essential parts—like the fill valve, flapper, and new hardware—into one convenient package. This saves you the guesswork and multiple trips to the hardware store. For a relatively small investment, you can essentially give your toilet’s insides a complete refresh, ensuring all the parts work together seamlessly. It’s a smart, cost-effective fix that can solve the problem for good. If tackling a full kit feels like a bit much, remember that a professional toilet repair is always a quick and reliable option to get the job done right.
What Tools Will You Need?
You don’t need a professional-grade toolbox to handle most basic toilet repairs. In fact, you probably already have everything you need. Before you start, gather an adjustable wrench for loosening and tightening nuts, a pair of pliers for the flapper chain, and a sponge and bucket to manage any leftover water in the tank. It’s also a good idea to have some old towels on hand to protect your floor from drips. With these simple tools, you’ll be well-equipped to tackle these common fixes. For more complex issues, Mr. Pipey offers a wide range of expert plumbing solutions.
Common DIY Mistakes to Avoid
A few common missteps can turn a simple repair into a bigger headache. One of the most frequent mistakes is buying the wrong replacement part, so always bring the old component with you to the store. Another error is setting the float too high, which causes water to constantly spill into the overflow tube, defeating the purpose of your repair. Finally, be careful not to overtighten plastic fittings, as this can crack the parts or even the toilet itself. If you’ve replaced the parts and the toilet still runs, it might be time to contact a professional to diagnose the underlying issue.
When Should You Call a Professional Plumber?
Tackling a home repair project on your own can be incredibly satisfying. But even the most dedicated DIY-er knows that some jobs are best left to the experts. When it comes to plumbing, knowing your limits can save you from a major headache and a much more expensive repair down the road. While many running toilet issues are simple fixes, certain signs indicate it’s time to put down the wrench and pick up the phone. If you find yourself in one of the following situations, calling a professional is the smartest and safest next step. It’s not about giving up; it’s about protecting your home and getting the job done right.
The Toilet Still Runs After Your Repair
You’ve replaced the flapper, adjusted the float, and double-checked the fill valve, but your toilet is still running. It’s a frustrating spot to be in, but it’s also a clear sign that the problem is more complex than it seems. Continuing to tinker with it might not solve the issue and could even make things worse. A persistent leak after you’ve tried the standard fixes could point to a less obvious problem, like a hairline crack in the tank or a faulty flush valve seat. Rather than risk a bigger disaster, this is the perfect time to get a professional opinion. Our team can quickly diagnose the root cause and provide expert toilet repair to stop the leak for good.
You’ve Spotted Other Plumbing Problems
Sometimes, a running toilet isn’t just a running toilet; it’s a symptom of a larger issue within your home’s plumbing system. Pay attention to what else is happening in your house. Are other drains gurgling when you flush? Is your shower backing up? Do you notice a sudden drop in water pressure at your sinks? These are red flags that you might be dealing with a clog or a problem in your main sewer line. A constantly running toilet combined with other plumbing oddities requires immediate professional attention to prevent a messy and potentially hazardous situation. If you suspect a bigger problem, our emergency plumbing services are available to help.
You’re Not Confident in the DIY Fix
Online tutorials make repairs look simple, but bathroom plumbing can be more complicated than it appears on screen. If you open the tank and feel overwhelmed, or if you’re just not confident in what you’re doing, it’s always best to call a professional. There’s no shame in asking for help. A small mistake, like over-tightening a connection or installing a part incorrectly, can easily lead to a flood and significant water damage. Trust your gut. If the repair feels beyond your skill level, putting the tools down is the right call. We’re always here to help, so feel free to contact us and let our experienced plumbers handle it for you.
How to Prevent a Running Toilet in the Future
Now that you’ve fixed your running toilet, let’s talk about how to keep it from happening again. A little proactive care can save you from future phantom flushes and surprise water bills. By paying attention to your toilet and performing a few simple checks, you can catch small issues before they turn into bigger, more expensive problems. Think of it as simple home wellness that keeps your plumbing in top shape and gives you peace of mind.
Set a Schedule for Regular Maintenance
Just like any hard-working appliance in your home, your toilet benefits from a little routine attention. Making maintenance a part of your regular cleaning schedule is a great way to stay ahead of potential issues. When you clean, take a moment to check that everything inside the tank looks right. Make sure water isn’t constantly flowing into the overflow tube and that the parts move freely without getting stuck.
Every six months, do a quick inspection of the flapper, fill valve, and float. Look for signs of wear, like cracks in the rubber or mineral buildup. These simple checks help ensure your toilet runs smoothly and efficiently, reducing the chances you’ll need a costly toilet repair down the road.
Learn to Spot the Early Warning Signs
Learning to recognize the first signs of trouble is your best defense against a running toilet. Often, your toilet will give you clues that something is off long before it becomes a major leak. The most common sign is that faint, hissing sound of water running in the tank long after you’ve flushed. You might also notice small, constant ripples in the toilet bowl water.
Being aware of these early warnings can help you identify problems like a worn-out flapper or an improperly set float before they escalate. If you hear or see anything unusual, take a peek inside the tank. Catching these issues early often means you can handle it with a quick, simple adjustment instead of a more involved repair.
Why You Shouldn’t Ignore a Running Toilet
It can be tempting to ignore that quiet hissing sound, but addressing a running toilet right away is one of the smartest things you can do. A constantly running toilet can waste hundreds of gallons of water a day, leading to a significant spike in your utility bills. A quick fix saves you money and conserves water.
Beyond the cost, a persistent leak puts unnecessary strain on your toilet’s components, causing them to wear out faster. In some cases, a small leak can worsen and lead to water damage on your floor. Taking a few minutes to fix the problem promptly protects your home and prevents a minor annoyance from turning into a major headache. If a problem seems too big to handle, our emergency plumbing services are always available.
The Hidden Costs of a Running Toilet
That constant trickle isn’t just a nuisance; it’s a direct hit to your wallet. A single running toilet is one of the most common household plumbing issues, and it can waste thousands of gallons of water every month if left unchecked. To put that in perspective, research shows that even a small, silent leak can waste over 6,000 gallons monthly. That can easily add up to hundreds of extra dollars on your water bills over the course of a year. It’s one of the most frequent reasons for a surprise spike in your utility costs, and it’s literally money going down the drain. Ignoring it is like leaving a faucet running around the clock.
Beyond the sticker shock of your water bill, ignoring the problem creates more wear and tear on the toilet itself. The internal parts, like the fill valve and flapper, aren’t designed to run 24/7. This constant use puts unnecessary strain on them, causing them to wear out much faster and potentially leading to more costly issues. What starts as a simple, cheap fix can turn into a more complex and expensive toilet repair if left alone. Addressing the issue quickly is a smart move for your budget and helps conserve a significant amount of water, which is a win-win for both your finances and the environment.
Related Articles
- Toilet Button Flush Running? Here’s How to Fix It
- How to Fix a Toilet Running When Not in Use
- Toilet Keeps Running After Flush? 5 Easy DIY Fixes
Frequently Asked Questions
How much water is a running toilet really wasting? It’s easy to underestimate, but a constantly running toilet can waste a surprising amount of water, often more than 200 gallons every single day. That adds up to thousands of gallons a month, which will definitely show up on your water bill. Addressing the issue quickly not only saves you money but also conserves a significant amount of water.
I’ve tried the simple fixes, but my toilet is still running. What’s next? It’s frustrating when the usual solutions don’t work. If you’ve already replaced the flapper and adjusted the float and chain with no luck, the problem might be more complex. The issue could be a faulty fill valve or even a crack in the overflow tube. At this point, your best bet is to call a professional plumber who can accurately diagnose and fix the underlying cause without risking further damage.
How often should I be checking the parts inside my toilet tank? A great habit to get into is giving the inside of your toilet tank a quick look every six months. You don’t need to do a deep dive, just lift the lid and check for obvious signs of wear and tear. Look for mineral buildup on the parts or any discoloration on the flapper. This simple check-in can help you catch a problem before it starts, saving you from a future leak.
Is it safe to use those drop-in bleach tablets in my toilet tank? While they promise a clean bowl with no effort, those chemical tablets can do more harm than good. The harsh chemicals can speed up the breakdown of the rubber and plastic parts inside your tank, especially the flapper. This can cause leaks and lead to you needing to replace parts much sooner than you normally would. It’s better to stick to cleaning the bowl directly.
Can I really fix this myself, or should I just call a plumber right away? For many people, fixing a running toilet is a totally manageable DIY project. Issues with the flapper, chain, or float are often simple and inexpensive to correct on your own. However, you should trust your gut. If you open the tank and feel unsure, or if the problem continues after you’ve tried a few fixes, calling a professional is the smartest move. It ensures the job is done right and prevents a small issue from becoming a big, wet mess.