That soggy patch in your yard that never seems to dry out? It’s a classic sign of a cracked underground water line, especially here in Metro Detroit where our weather puts plumbing to the test. From summer downpours to winter freezes, the shifting ground can be tough on PVC. But don’t worry, this is a fix you can likely handle yourself. Knowing how to repair PVC pipe is a game-changer for any homeowner. I’ll walk you through the entire process, from pinpointing the leak to making a durable repair that stands up to our Michigan seasons.
Key Takeaways
- Confirm the leak and call 811 first: Before grabbing a shovel, use your water meter to verify a leak exists. Your next step should always be calling 811 to have utility lines marked; this simple, legally required call prevents dangerous accidents.
- Proper prep creates a permanent seal: A lasting repair depends on careful preparation. Ensure your pipe ends are clean, dry, and smooth before applying both primer and cement, as this combination creates a strong chemical weld that prevents future leaks.
- Recognize when a pro is the right choice: A DIY fix isn’t always the best solution. If the damage is extensive, located near other utility lines, or has become an emergency, calling a professional plumber ensures the job is done safely and correctly.
Is Your Underground Pipe Leaking? Here’s How to Know
An underground pipe leak can be a sneaky problem, quietly causing damage before you notice it. The good news is your home and yard usually send out warning signals. Catching these clues early can save you from a waterlogged lawn and a sky-high water bill. Before you can repair it, you need to confirm a leak exists and figure out where it might be.
Watch for These Telltale Signs of a Hidden Leak
Some signs of a hidden leak are obvious, while others are more subtle. The clearest indicator is having unexplained wet spots in your yard when it hasn’t been raining. You might also see a sudden spike in your water bill. Inside your home, be aware of musty odors, soft floors, and bubbling paint on walls. Outside, look for patches of grass that are unusually green or areas where the soil is eroding. If you spot several of these signs, you may have an emergency plumbing situation on your hands.
Use Your Water Meter to Confirm a Leak
Your water meter is a great tool for leak detection. To perform a simple test, first make sure all water is turned off inside and outside your house, including all appliances and sprinklers. Next, find your water meter and write down the number on the dial. Wait for about 30 to 60 minutes without using any water, then check the meter again. If the reading has changed, you almost certainly have a leak somewhere in your system. At this point, it’s a good idea to contact us so we can help you find the source.
How to Pinpoint the Leak’s Location
Once you suspect a leak, walk around your property to look for more specific clues. Follow the general path of your water line from the meter to your house, looking for pooled water, soggy ground, or eroded soil. If you have large trees nearby, their roots could be the culprit, as they can crush pipes over time. While these visual checks can help you narrow down the general location, finding the exact spot often requires professional equipment. A professional plumber can provide comprehensive plumbing solutions to accurately locate and fix the leak with minimal disruption to your yard.
Common Causes of PVC Pipe Damage
PVC pipes are tough, but they aren’t indestructible. Over time, a few common culprits can lead to cracks, leaks, and a whole lot of headache. Understanding what causes this damage can help you spot potential problems early and even prevent them from happening in the first place. Here are a few of the most frequent reasons we see PVC pipes fail here in the Metro Detroit area.
Aging and Accidental Damage
Like anything else, PVC pipes have a lifespan. Over many years, especially with our dramatic Michigan temperature swings from hot summers to deep freezes, they can become brittle and crack. But age isn’t the only factor. Sometimes, the problem starts right at installation if joints aren’t glued correctly. Other times, damage is purely accidental—think of a misplaced shovel during a gardening project or heavy equipment rolling over the ground. As experts at Piperelining Solutions note, extreme temperatures can cause PVC to warp or crack, which is why proper installation and knowing where your lines are buried is so critical.
Sunlight (UV) Exposure
While most of your PVC pipes are safely buried, any sections exposed to the elements face a different kind of threat: the sun. Prolonged exposure to UV rays can seriously degrade the plastic, making it brittle and prone to cracking over time. As many homeowners have discovered, outdoor PVC pipes can become very brittle from sunlight, especially those used for sump pump discharge or pool equipment. The good news is there’s a simple, proactive fix. A quick coat of light-colored, exterior-grade latex paint acts as a shield, protecting the pipe from UV radiation and extending its life significantly. It’s a small step that prevents a future headache.
Improper Installation
A plumbing system is only as good as its installation. If PVC pipes aren’t installed correctly from the start, you’re likely looking at future problems. Leaks and cracks often stem from poor workmanship, such as joints that weren’t properly cleaned, primed, and cemented, or pipes that weren’t adequately supported in their trench. As plumbing professionals often point out, improper installation can lead to issues that create weak points that fail under pressure or as the ground shifts. This is why professional installation is so important; it ensures every connection is secure and the system is built to last. A job done right the first time saves you from costly and stressful emergency plumbing situations down the road.
Gathering Your Tools and Materials for the Job
Before you grab a shovel, let’s get your toolkit ready. Having everything you need on hand will make this repair go much more smoothly and help you avoid extra trips to the hardware store. Think of it like prepping your ingredients before you start cooking; it just makes the whole process easier. A little preparation now saves a lot of frustration later. If you find this list a bit overwhelming, remember that our team is always ready to handle any plumbing project, big or small, so you never have to tackle more than you’re comfortable with.
Essential Digging and Cutting Tools
First, you’ll need to access the pipe. A sturdy shovel is your best friend here for carefully digging around the damaged area. Once you’ve uncovered the pipe, you’ll need a tool to cut out the broken section. A simple hacksaw works well for this, but a reciprocating saw will make the job much faster if you have one. The key is to make your cuts as clean and straight as possible. Ragged edges can prevent the new fittings from sitting flush against the old pipe, which is a critical step for creating a watertight seal. Take your time to ensure the cut is perpendicular to the pipe.
Ratcheting PVC Cutters for Clean Cuts
For an even better result, I recommend using ratcheting PVC cutters. These specialized pliers are designed to make perfectly clean, square cuts and can help prevent the pipe from shattering, especially if it’s older or brittle. A clean cut is non-negotiable for a successful repair because it ensures the new fitting will connect flush against the existing pipe. This tight fit is essential for the primer and cement to create a strong chemical bond, which is what ultimately stops the leak for good. While a hacksaw gets the job done, ratcheting cutters give you a professional-grade finish that significantly reduces the risk of future leaks at the connection point.
Sandpaper or Emery Cloth for Deburring
After you’ve made your cuts, you’ll notice little plastic shavings, or “burrs,” around the edges. It’s tempting to ignore them, but this is a step you can’t skip. You need to deburr the pipes by removing any of these rough bits from the cut ends to prevent obstructions and ensure a perfect fit. Simply take a small piece of sandpaper or emery cloth and smooth out the inside and outside edges of the pipe until they feel completely clean. This quick step allows the new fittings to slide on smoothly and sit securely, creating the ideal surface for a permanent, leak-free seal. It’s one of those small details that makes all the difference in our comprehensive plumbing solutions.
Choosing the Right PVC Pipe, Fittings, and Cement
For the repair itself, you’ll need a new piece of PVC pipe that’s the same diameter as your existing pipe. You’ll also need two slip couplings, which are the connectors that will join the new pipe section to the old one. To bond everything together, you’ll need PVC primer and solvent cement. The purple primer is essential; it cleans and softens the plastic, preparing it for a strong chemical weld. The cement is what creates the actual seal. Make sure you get the right type for your pipe (usually Schedule 40 for residential plumbing). Don’t skip the primer, as it’s a crucial step for a durable, long-lasting repair.
How to Identify the Pipe Schedule
When you’re at the hardware store, you’ll see PVC pipes labeled with a “schedule,” most commonly Schedule 40 or Schedule 80. This number just refers to the pipe’s wall thickness. For most residential plumbing here in Metro Detroit, you’ll be working with Schedule 40, which is typically white. Schedule 80 has thicker walls, is usually gray, and is built for higher-pressure applications. The easiest way to know what you have is to look for markings printed on the pipe itself—you should see “SCH 40” or “SCH 80” stamped in ink. If the markings are gone, color is a good clue. Getting the right schedule is critical for a secure, leak-proof seal. If you’re unsure, it’s always best to avoid guesswork. Our team can help you identify the right parts or handle the entire pipe repair for you.
Don’t Skip the Safety Gear
Safety should always be your top priority. Before you start, make sure you have a pair of heavy-duty work gloves to protect your hands from blisters and cuts, and safety glasses to shield your eyes from flying dirt and debris. Working with PVC primer and cement also requires good ventilation, so be mindful of the fumes, especially if you’re working in a deeper trench. If the repair feels more complicated than you expected or you’re just not comfortable handling it, it’s always better to be safe. A simple fix can quickly become a major headache, so don’t hesitate to call for emergency plumbing help if you need it.
How to Safely Access the Damaged Pipe
Once you’ve pinpointed the leak and gathered your tools, the next phase is physically getting to the pipe. This part of the job requires patience and a focus on safety. Rushing through the digging and cutting process can turn a small repair into a major headache. By taking a careful, step-by-step approach, you can expose the damaged section without creating new problems. Here’s how to do it right.
Pre-Repair Checks to Perform First
Before you grab your shovel and start digging, it’s a good idea to do a little detective work first. What might look like a serious underground crack could be a much simpler problem that you can solve in just a few minutes. Taking the time to run through a couple of quick checks can save you a ton of effort and frustration down the line. These initial steps help confirm you’re addressing the right issue and prevent you from starting a major project when a minor tweak is all that’s required. It’s the classic “work smarter, not harder” approach to home plumbing repairs.
Check for Loose Joints and Gaskets
Start by checking the pipe’s connections, especially if any are accessible without digging. Here in Michigan, the constant freezing and thawing of the ground can cause joints and fittings to shift and loosen over time. Look closely for any drips or moisture right where the pipes connect. If you spot a loose slip nut, you might have found your culprit. Try giving it a gentle turn with pliers, but be careful not to overtighten, as too much force can crack the plastic PVC fitting. Often, a simple tightening is enough to stop a minor leak. If that doesn’t work, the gasket inside might be worn, but replacing it is still far easier than cutting out a section of pipe.
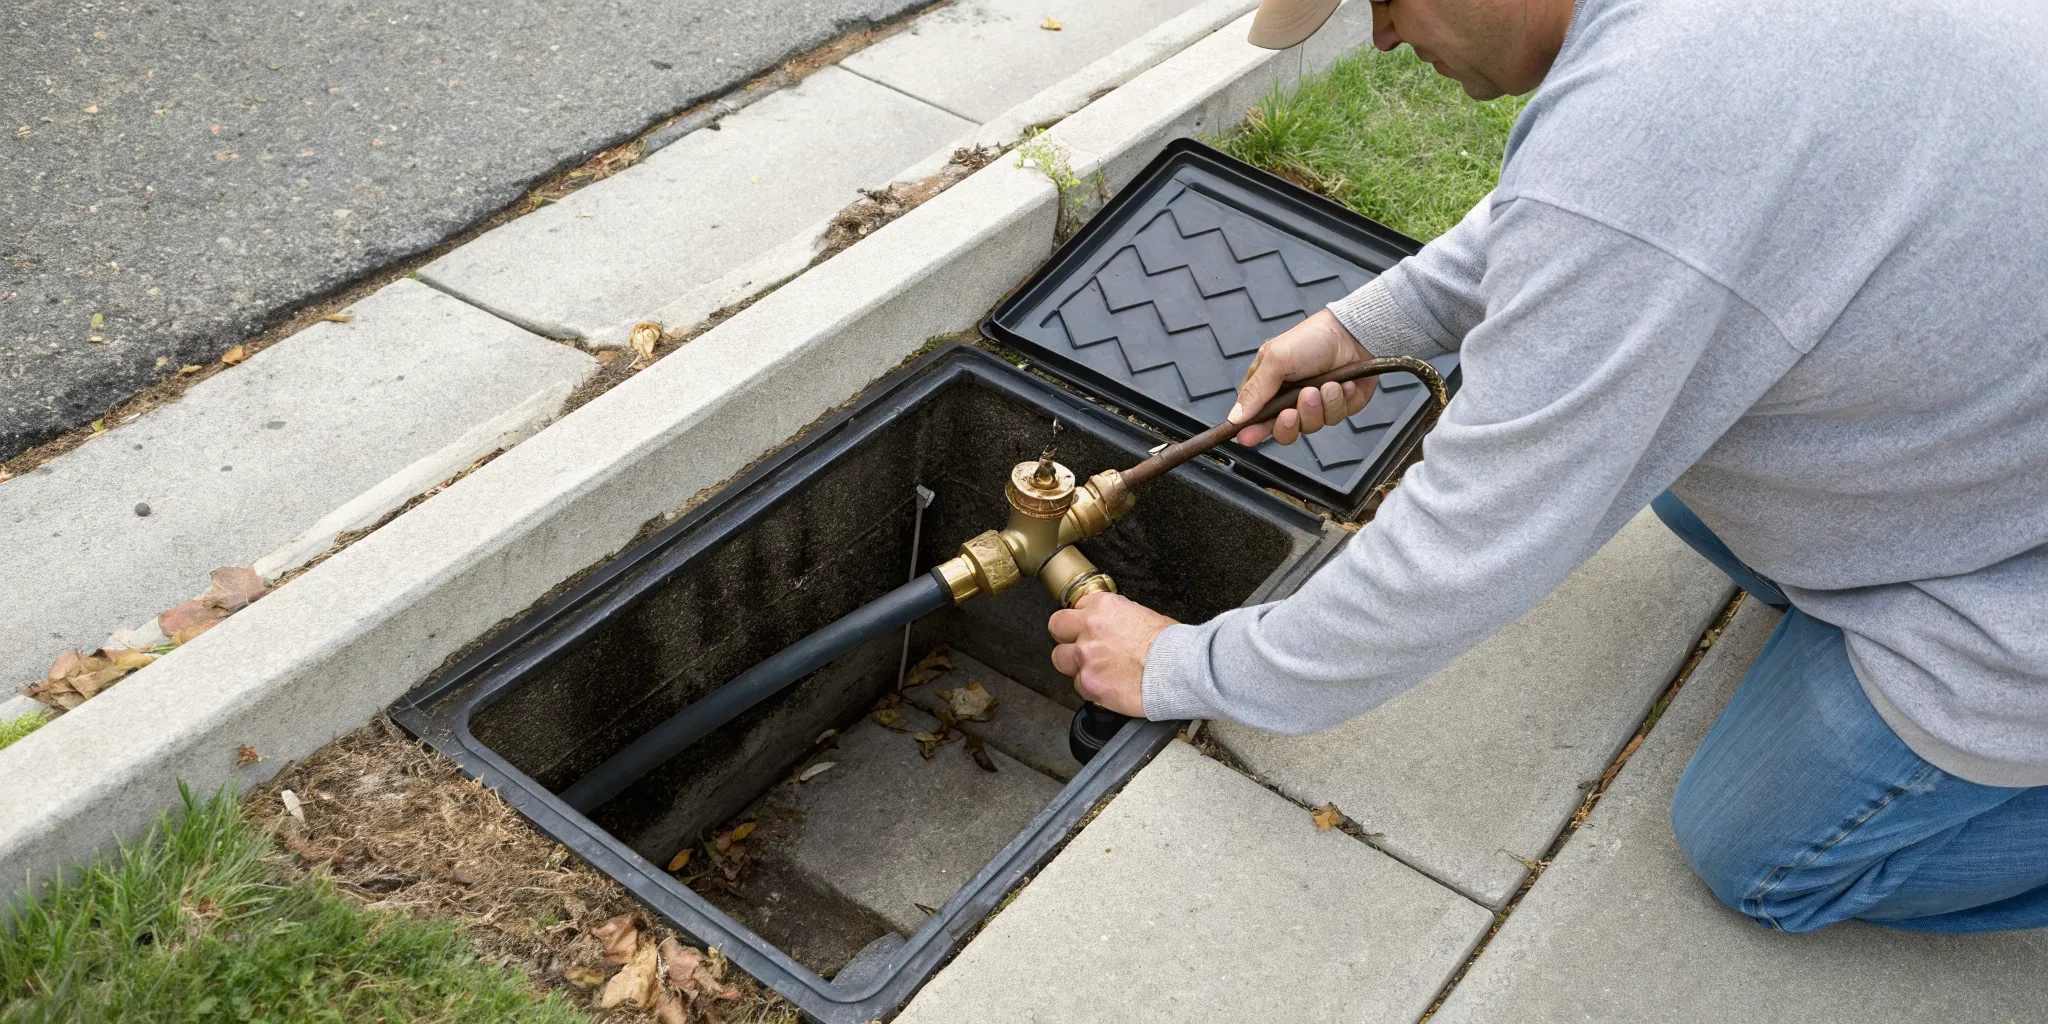
First, Call 811 Before You Dig (It’s the Law!)
Before you grab a shovel, your first step is to call 811. This free, nationwide service sends a crew to mark the location of underground utility lines on your property. Hitting a buried gas, water, or electrical line is incredibly dangerous and can lead to costly repairs and serious injuries. It’s not just a good idea; it’s the law. Once you call, they’ll give you a timeframe for when the lines will be marked. Don’t start digging until you see those flags or paint. This simple phone call protects you, your property, and your community.
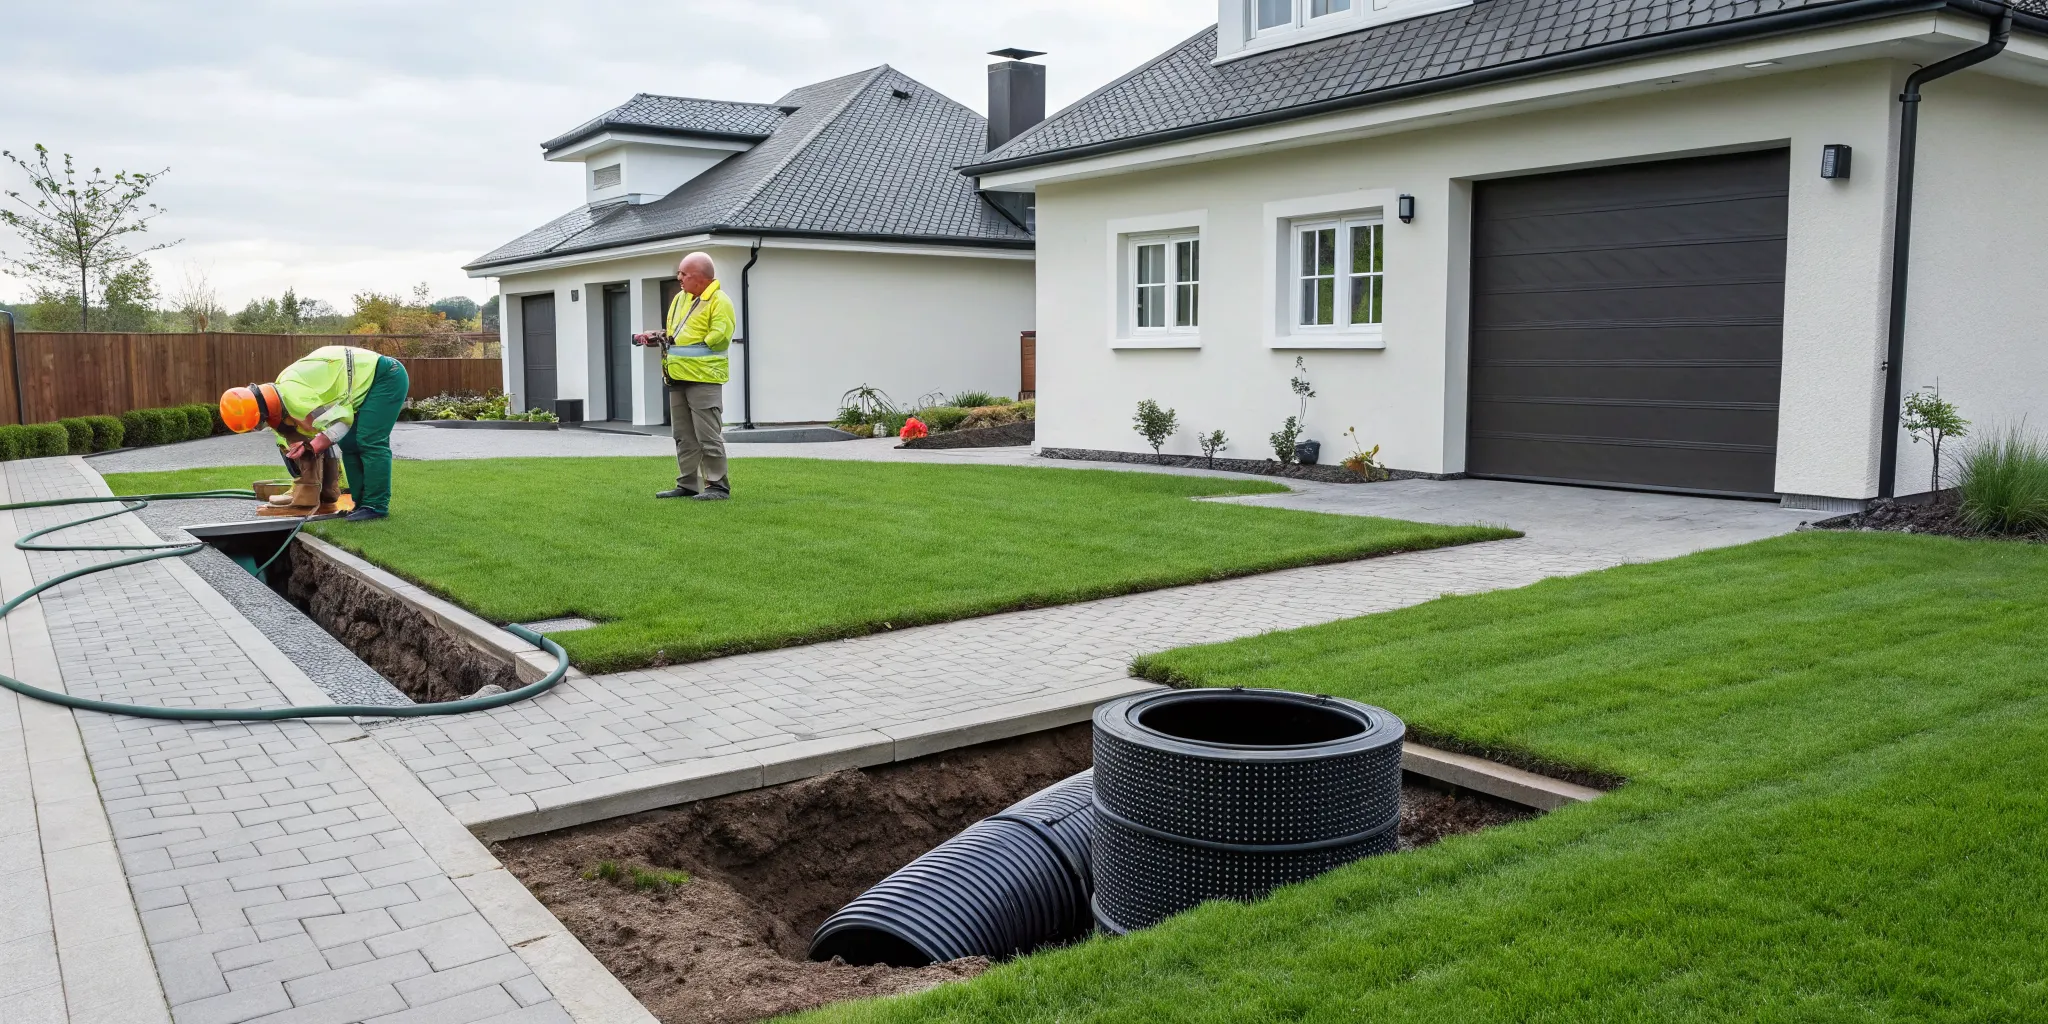
Carefully Digging to Expose the Pipe
With the utility lines clearly marked, you can start digging. Begin carefully around the area where you suspect the leak is. The goal is to create a trench around and over the pipe, giving yourself enough room to work without causing more damage. Use a shovel for the top layers of soil, placing it on a tarp to make backfilling easier. As you get closer to the pipe’s estimated depth, switch to a smaller spade or your hands to avoid accidentally striking the PVC. Expose a few feet of the pipe on either side of the damaged area so you have a clear view.
Ensure You Have a Large Enough Work Area
Once the pipe is exposed, your next goal is to give yourself enough elbow room to work effectively. You’ll want to widen the trench to about 18 to 24 inches on all sides of the break. This might feel like extra work, but it’s a critical step. A cramped workspace makes it difficult to handle tools properly and increases the risk of accidentally cracking the pipe further. Having that extra space allows you to maneuver easily, get a good look at the damage, and perform the repair without fighting against a collapsing wall of dirt. If digging becomes difficult due to rocky soil or nearby roots, it might be time to consider professional help for a more complex emergency plumbing situation.
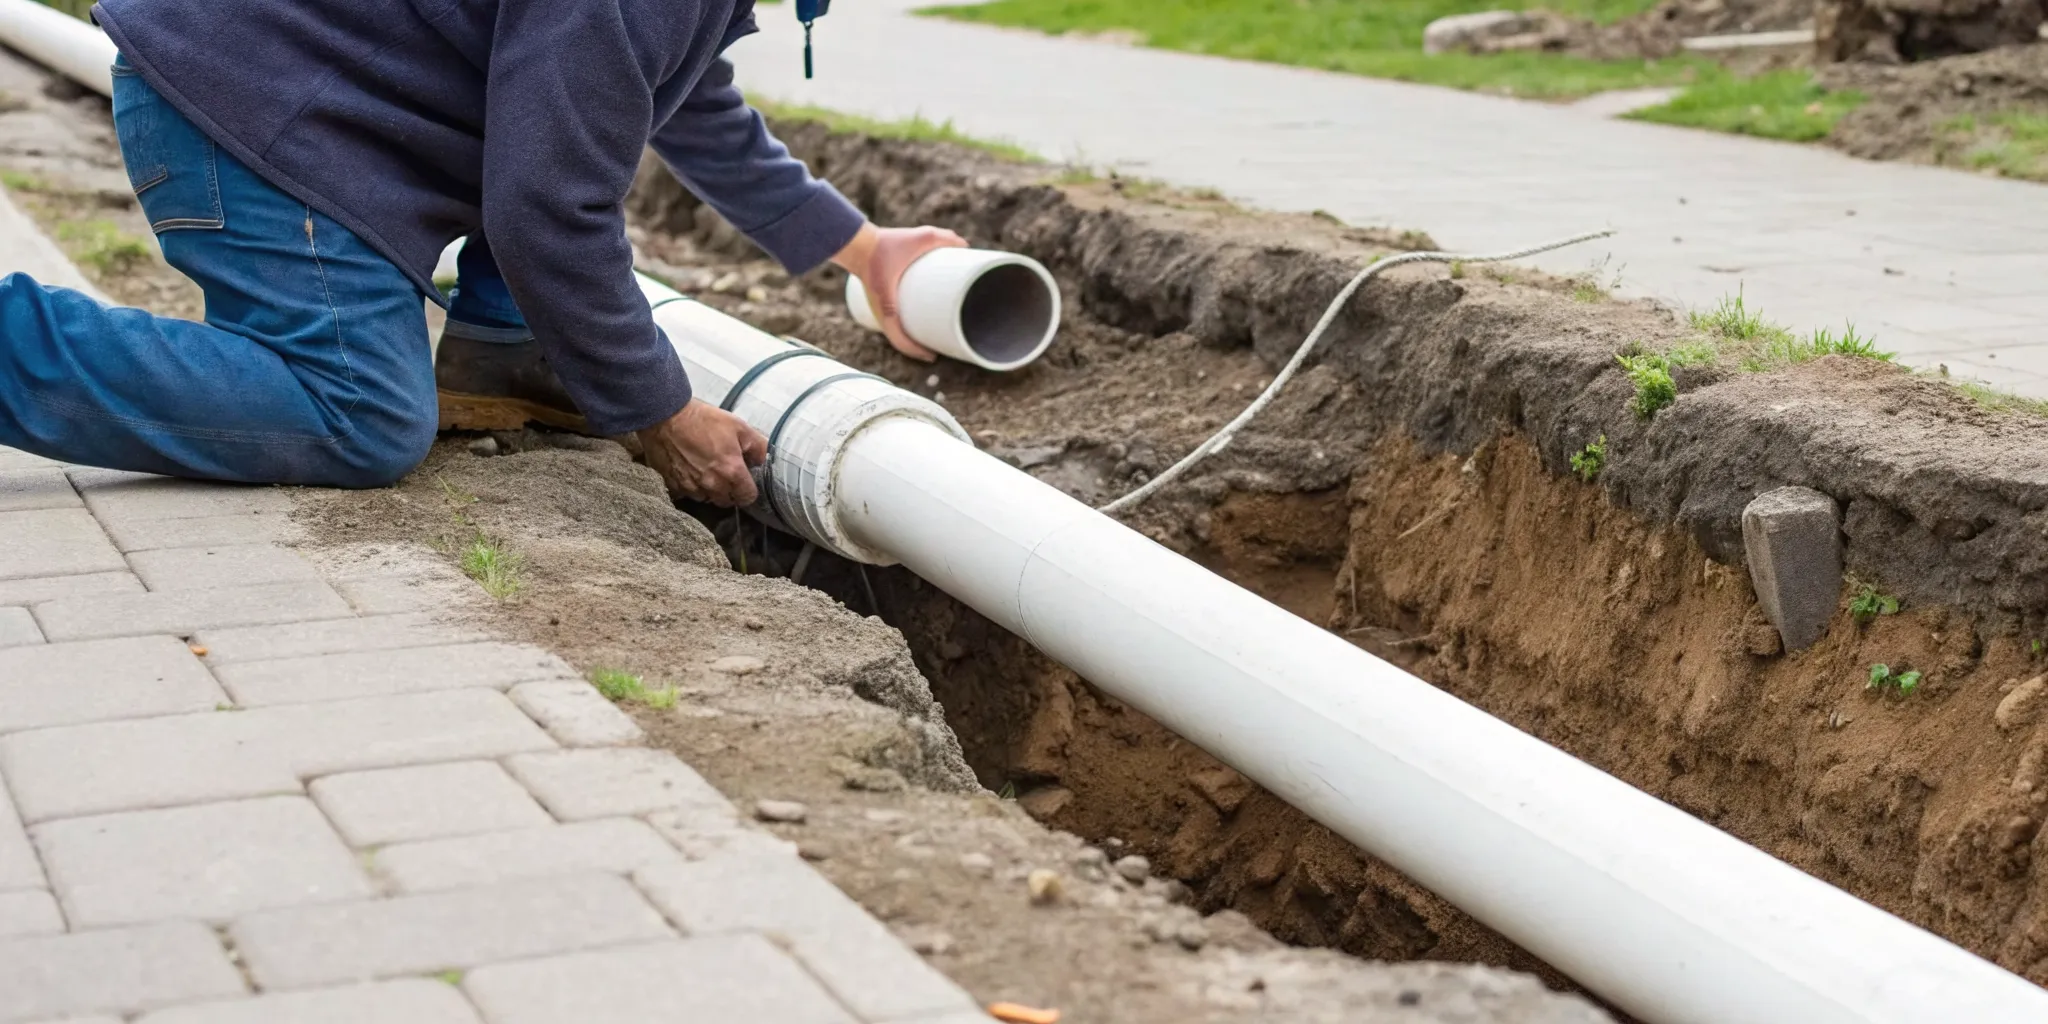
With your workspace cleared, you can now focus on removing the damaged section of the pipe. Using your hacksaw or reciprocating saw, make two clean cuts on either side of the break. It’s incredibly important that these cuts are straight and perpendicular to the pipe. Any jagged edges or angled cuts will prevent the new couplings from sitting flush, creating a weak spot in your repair that’s almost guaranteed to leak later. Taking an extra minute to line up your saw and cut carefully is one of the best ways to ensure your fix is durable and watertight, saving you from having to dig it all up again.
Cutting Out the Damaged Pipe Section
Now that the pipe is exposed, it’s time to remove the broken piece. Using a hacksaw or a reciprocating saw, make a clean, straight cut on each side of the damaged section. It’s a good practice to cut about six inches away from the visible damage on both ends to ensure you remove any hidden cracks. A straight cut is essential for getting a tight, leak-proof seal with the new fittings. If the pipe is under tension or the damage looks extensive, a DIY job can get complicated. Don’t hesitate to call for professional emergency plumbing if you feel out of your depth.
How to Repair PVC Pipe Step-by-Step
You’ve done the hard work of digging and cutting, and now it’s time to put everything back together. This is where precision matters most. Getting a clean, secure connection is the key to a repair that will last for years, so take your time and follow these steps carefully. A proper seal will prevent future leaks and save you from having to dig all this up again.
Step 1: Clean and Prep the Pipe Ends
Before you even think about reaching for the glue, you need to prep your surfaces. Any dirt, mud, or moisture will prevent the PVC cement from creating a strong, waterproof bond. Start by wiping the outside of the existing pipe ends and the inside of your new fittings with a clean, dry rag. If the cuts you made left any rough plastic burrs, carefully shave them off with a utility knife or a deburring tool. A smooth surface ensures the new pipe will slide snugly into the fitting, creating the perfect foundation for a leak-proof seal.
Step 2: Apply Primer and Cement Like a Pro
Think of primer and cement as a one-two punch for a solid connection. The primer (it’s usually purple) isn’t optional; it chemically cleans and softens the plastic, allowing the cement to form a permanent weld. Using the applicator, apply a liberal coat of primer to the outside of the pipe and the inside of the fitting. While it’s still wet, follow up with an even layer of PVC cement over the same areas. Immediately push the pipe into the fitting with a slight twisting motion. This helps spread the cement evenly. Hold it firmly in place for at least 15 seconds to prevent the pipe from pushing back out.
Create a Strong, Leak-Proof Seal
The final connection is often the trickiest, but you’ve got this. Once you apply the cement, you need to work quickly and confidently. Push the final pieces together, give them that slight twist, and hold them steady so they don’t wiggle apart as the cement begins to set. After all the joints are connected, the hardest part is waiting. Check the manufacturer’s instructions for the recommended cure time before you turn the water back on. If you run into any issues or the repair feels overwhelming, don’t hesitate to call for professional plumbing services to ensure the job is done right.
Use the Quarter-Turn Twist Technique
When you push the pipe into the fitting, don’t just shove it straight in. The key to an even, strong bond is the quarter-turn twist. After applying both primer and cement, immediately push the pipe into the fitting while giving it a slight twisting motion, about a quarter of a turn. This simple action helps spread the solvent cement evenly across the entire joint, eliminating any potential gaps or air bubbles that could cause leaks later. Once the pipe is fully seated, hold it firmly in place for at least 15 seconds. The cement sets quickly, and this pressure prevents the pipe from pushing itself back out of the fitting before the weld has a chance to form.
Step 3: Flush the Line (for Irrigation Systems)
If the pipe you’re repairing is part of a sprinkler or irrigation system, there’s one final step before you start backfilling the trench. It’s very likely that dirt and debris got into the line while you were making the repair. To prevent this grit from clogging your sprinkler heads, you need to flush the system. Before turning the water back on at the main valve, go to the sprinkler heads that are furthest from the repair site and unscrew the nozzles. Then, turn the water on for a few minutes to let it run freely, pushing all the dirt out. Once the water runs clear, you can turn it off and replace the nozzles.
Alternative PVC Pipe Repair Methods
Sometimes, a straightforward cut-and-replace repair just isn’t practical. You might be working in a tight space where you can’t bend the pipe, or maybe the pipe is in a location where it can’t be moved at all. In other cases, you might just need a quick, temporary fix to stop a leak until a more permanent solution can be put in place. Luckily, there are several alternative methods for repairing PVC pipes that can handle these tricky situations. From specialized couplings that slide into place to no-dig solutions for pipes buried deep underground, knowing your options can help you choose the right approach for your specific problem. While some of these are great for a DIY fix, others are complex and are best handled by a professional to ensure a lasting, reliable repair.
Using Slip or Repair Couplings in Tight Spaces
When you have very little room to work and can’t flex the pipe to fit a standard coupling, a slip coupling is the perfect solution. Unlike a regular coupling that has a stop in the middle, a slip coupling is a single, smooth tube that can slide completely over one end of the pipe. This allows you to position it fully on one side, align the new pipe section, and then slide the coupling back over the gap to connect the two ends. This “slip fix” makes it possible to join two immovable pipe ends without needing to bend or force anything into place, making it an ideal choice for repairs in cramped trenches or near walls.
Temporary Fixes with Epoxy Putty or Fiberglass Tape
If you’re dealing with a minor crack or a pinhole leak and need a quick fix, epoxy putty or fiberglass repair tape can be a lifesaver. These products are designed for fast, temporary patches. To use epoxy putty, you simply knead it until it’s a uniform color, then mold it firmly over the clean, dry, damaged area, pushing it into the crack. For repair tape, you’ll typically activate it with water and wrap it tightly around the pipe. While these methods can effectively stop a small leak in a low-pressure line, they are not permanent solutions. They are best used as a stopgap measure until you can perform a proper repair or call for emergency plumbing services.
Using a Rubber Sleeve and Hose Clamps for a Quick Patch
Another simple and effective temporary repair involves using a flexible rubber sleeve and two hose clamps. This method is incredibly straightforward: you just slide the rubber sleeve over the two ends of the pipe you want to join and then tighten a metal hose clamp securely at each end. This creates a mechanical seal that can stop a leak quickly without any need for primers or cements. This type of repair is particularly useful because it allows for a bit of movement and flexibility in the pipe, which can help prevent the pipe from breaking again in the same spot. It’s a great temporary patch to have in your toolkit for unexpected leaks.
Creating a Four-Elbow Bypass for Immovable Pipes
When you encounter a damaged pipe that absolutely cannot be moved in either direction, a more creative solution is needed. One effective method is to build a small bypass using four 90-degree elbows and short pieces of pipe. This creates a rectangular “bridge” that goes around the damaged section, allowing you to cut it out and reconnect the flow. While this technique works well, it requires precise measurements and multiple joints that all need to be perfectly sealed. Getting the alignment right can be tricky, and any error can result in leaks. For complex fixes like this, it’s often best to contact a professional plumber to ensure it’s built correctly.
Pipe Relining for Hard-to-Reach Underground Pipes
For damaged pipes buried deep underground or located beneath driveways, patios, or established landscaping, digging a trench isn’t always an option. In these cases, pipe relining offers a modern, long-lasting solution without the excavation. This “no-dig” method involves inserting a flexible, resin-coated liner into the existing damaged pipe. The liner is then inflated and cured in place, essentially creating a brand new, seamless pipe within the old one. Pipe relining is a highly effective way to fix underground PVC pipes without destroying your yard. Because it requires specialized equipment and expertise, this is a job best left to a professional plumbing company that offers comprehensive plumbing solutions.
Common DIY Pipe Repair Mistakes to Avoid
Even the most straightforward plumbing repair can go wrong if you miss a small step. Taking on a PVC pipe repair yourself is a great way to save money, but a simple mistake can lead to more leaks, water damage, and a much bigger headache down the road. Before you get started, let’s walk through a few common pitfalls so you can get the job done right the first time. Getting it wrong could mean you need emergency plumbing services, so it pays to be careful.
Mistake #1: Rushing the Prep Work
It’s tempting to dig fast and get straight to the repair, but rushing the prep work is a recipe for disaster. Before you do anything, make sure you’ve turned off the main water supply to your home. When you start digging, do it carefully to expose the pipe without causing more damage. You need enough space to work, so clear a small trench around the entire broken section. Hitting the pipe with your shovel or accidentally cutting the wrong area will only add to your workload and frustration. Take your time to create a clean, accessible workspace.
Mistake #2: Using Primer on a Wet Pipe
When it comes to PVC cement, water is your worst enemy. Even a little moisture can prevent the cement from creating a strong, permanent bond, leading to slow leaks later on. After cutting out the damaged section, do your best to dry the inside and outside of the existing pipe ends. Just as important is using PVC primer. Always apply primer to both pipe ends and the inside of your new fittings before the cement. This step cleans and softens the plastic, allowing the cement to chemically weld the pieces together for a much stronger seal.
Mistake #3: Using the Wrong Parts or Backfilling Too Soon
A trip to the hardware store can be overwhelming, but grabbing the wrong parts will stop your project in its tracks. Double-check that the new pipe and fittings are the exact same size and type as your existing pipe. A connector that’s even slightly off will not seal properly. Once the repair is complete and you’ve tested for leaks, be mindful of how you backfill the hole. Simply dumping the dirt back in can cause the pipe to shift or lose its proper slope, which is critical for drainage. Support the pipe with soil and fill the trench in gradually to ensure everything stays secure. If you run into issues, our team is always ready to help with a full range of plumbing solutions.
Mistake #4: Using the Wrong Sealants (Like Plumber’s Tape)
When you’re faced with a leaky pipe, it’s tempting to reach for the first sealant you can find, which is often a roll of plumber’s tape. However, this is a critical mistake when working with PVC. Plumber’s tape is designed for metal pipe threads, where it helps lubricate the connection and fill gaps. On PVC fittings, it can actually prevent them from tightening properly, creating a weak spot that’s likely to leak. The correct method for a permanent, watertight seal on PVC involves a two-step process using primer and solvent cement. The primer cleans and softens the plastic, preparing it for the cement, which then chemically welds the pieces together for a solid bond.
This isn’t just a minor detail; it’s a fundamental rule for a lasting repair. Even major adhesive manufacturers confirm that plumber’s tape simply does not work on PVC pipe threads. Using the right materials is the difference between a temporary patch and a durable fix that you won’t have to worry about again. If you’re ever unsure about which products to use, it’s always better to pause. Getting the seal right is everything, and if you have any doubts, our team is always ready to provide reliable plumbing solutions to ensure the job is done correctly.
When Should You Call a Professional Plumber?
Tackling a DIY project can be incredibly rewarding, but it’s also important to know your limits. When it comes to underground plumbing, a small mistake can lead to big, expensive problems. While many PVC pipe repairs are straightforward, some situations are best left to the experts. If you find yourself feeling unsure or if the problem seems to be getting worse, don’t hesitate to call for professional help. Recognizing when to step back is a key part of any successful home repair project. Here are a few clear signs that it’s time to put down the shovel and call a plumber.
The Repair Is More Complicated Than Expected
You’ve dug up the pipe, and the small crack you expected to see is actually a web of fractures or a crushed section of pipe. If you feel uncomfortable or the repair seems beyond your skill set, it’s wise to call a professional. A licensed plumber can do more than just patch the leak; they can figure out why it happened in the first place. Was it a case of frozen pipe repair from a harsh Detroit winter, or is there a bigger issue with soil shifting? A pro can ensure the repair is done correctly and help you prevent the same problem from happening again, saving you from future headaches and costly water damage.
You’re Unsure Where Other Utility Lines Are
Safety should always be your top priority. Even after you’ve called 811 and the utility lines have been marked, digging can be a delicate process. Accidentally striking a gas, electrical, or internet line can be incredibly dangerous and lead to expensive fines and repairs. Professionals have the experience and equipment to work safely around these critical connections. If your damaged pipe is located in a crowded area near other utilities, calling an experienced team like Mr. Pipey is the safest bet. It’s not worth risking a serious accident to save a few dollars on a repair.
You Have a Plumbing Emergency on Your Hands
Sometimes a small leak can quickly escalate into a full-blown crisis. If you can’t find the source of the leak, if your yard is flooding, or if you’ve lost water pressure to your entire home, you have an emergency on your hands. These situations require immediate attention to prevent significant property damage. Instead of scrambling to figure out a complex repair under pressure, your first move should be to shut off your main water supply and call for emergency plumbing services. A professional can locate the problem quickly, make a lasting repair, and get your home back to normal.
Related Articles
- Trenchless Pipe Repair: The Ultimate Guide
- DIY Pipe Leak Repair: Your Step-by-Step Guide
- Repair a Copper Pipe Leak: A Step-by-Step Guide
Frequently Asked Questions
How long should I wait for the PVC cement to dry before turning the water back on? Patience is key after you’ve made the repair. The exact cure time for PVC cement depends on the temperature, humidity, and the pipe’s diameter, so always check the instructions on the can for the most accurate information. As a general rule, you should wait at least one to two hours before slowly turning the water back on to test the joints. Rushing this step can easily blow out a fresh seal and force you to start over.
What if the leak is very close to my house’s foundation? If you discover the leak is right next to your foundation, I strongly recommend calling a professional. Digging near your home’s structural base can be risky, and water pooling in that area can cause serious, long-term damage. A professional plumber has the expertise to make the repair safely without compromising your foundation’s integrity.
Can I use a repair clamp or special tape instead of cutting the pipe? While repair clamps and tapes might seem like a quick fix, they are not a reliable solution for a pressurized underground water line. These products are best for temporary, low-pressure situations and will almost certainly fail over time. Taking the time to properly cut out the damaged section and install a new piece with solvent-welded fittings is the only way to ensure a permanent, leak-proof repair.
My water meter shows a leak, but my yard isn’t wet. What should I do? This is a tricky situation, but it’s not uncommon. The leak could be very deep, located under a driveway or patio, or it could even be under the slab of your house. Start by double-checking for subtle signs inside, like damp spots on the floor or the sound of running water when nothing is on. If you still can’t find it, this is the perfect time to call for professional leak detection services to pinpoint the exact location without unnecessary digging.
Is it okay to use a different size or type of pipe for the new section? No, you must use a new piece of PVC pipe that is the exact same size and schedule (a measure of wall thickness) as your existing pipe. Using a connector or pipe that is even slightly different will make it impossible to create a secure, watertight seal. For most residential water lines, this will be Schedule 40 PVC, but always confirm by checking the markings on your existing pipe.