That sudden, jarring silence when you flip the switch. The low, angry hum of a motor that won’t turn. The unwelcome puddle of water under your sink. These are the classic signs your garbage disposal needs attention, and each one points to a different cause. Figuring out the specific garbage disposal problem is the first step to a solution. Is it a simple power issue, a stubborn jam, or a failing seal? We’ll help you play detective, walking through each common issue so you can identify the culprit and find the right fix.
Key Takeaways
- Check for simple fixes first: Many common disposal issues have easy solutions. Before making a call, check if the unit’s reset button has been tripped or if the corresponding circuit breaker needs to be reset.
- Adopt preventative habits: Keep your disposal running smoothly by being mindful of what you put in it. Always use cold water when grinding, avoid sending down grease or fibrous vegetables, and clean it regularly with ice and citrus peels to prevent clogs and odors.
- Recognize when to call an expert: For your safety, leave complex issues to a professional. If you’re dealing with persistent leaks, electrical problems, or a jam you can’t safely clear, it’s time to get professional help to avoid bigger problems.
6 Common Garbage Disposal Problems
A garbage disposal is one of the hardest-working appliances in your kitchen, but when it stops working, it can bring your whole routine to a halt. From strange noises to a complete refusal to turn on, disposal problems can be frustrating. The good news is that many of these issues have simple fixes you can handle yourself with a little guidance. Understanding what’s going on is the first step to getting your sink back in working order.
Before you reach for the phone to call a plumber, it helps to diagnose the problem. Is it making a humming sound? Is water leaking underneath the sink? Or is it just completely silent? Each symptom points to a different cause, and many can be resolved without professional help. We’ll walk through the six most frequent garbage disposal headaches, from simple jams to mysterious leaks. This guide will help you identify what’s wrong and give you the confidence to tackle the fix. Of course, for more complex issues, our team is always here to provide expert plumbing solutions.
It Won’t Turn On at All?
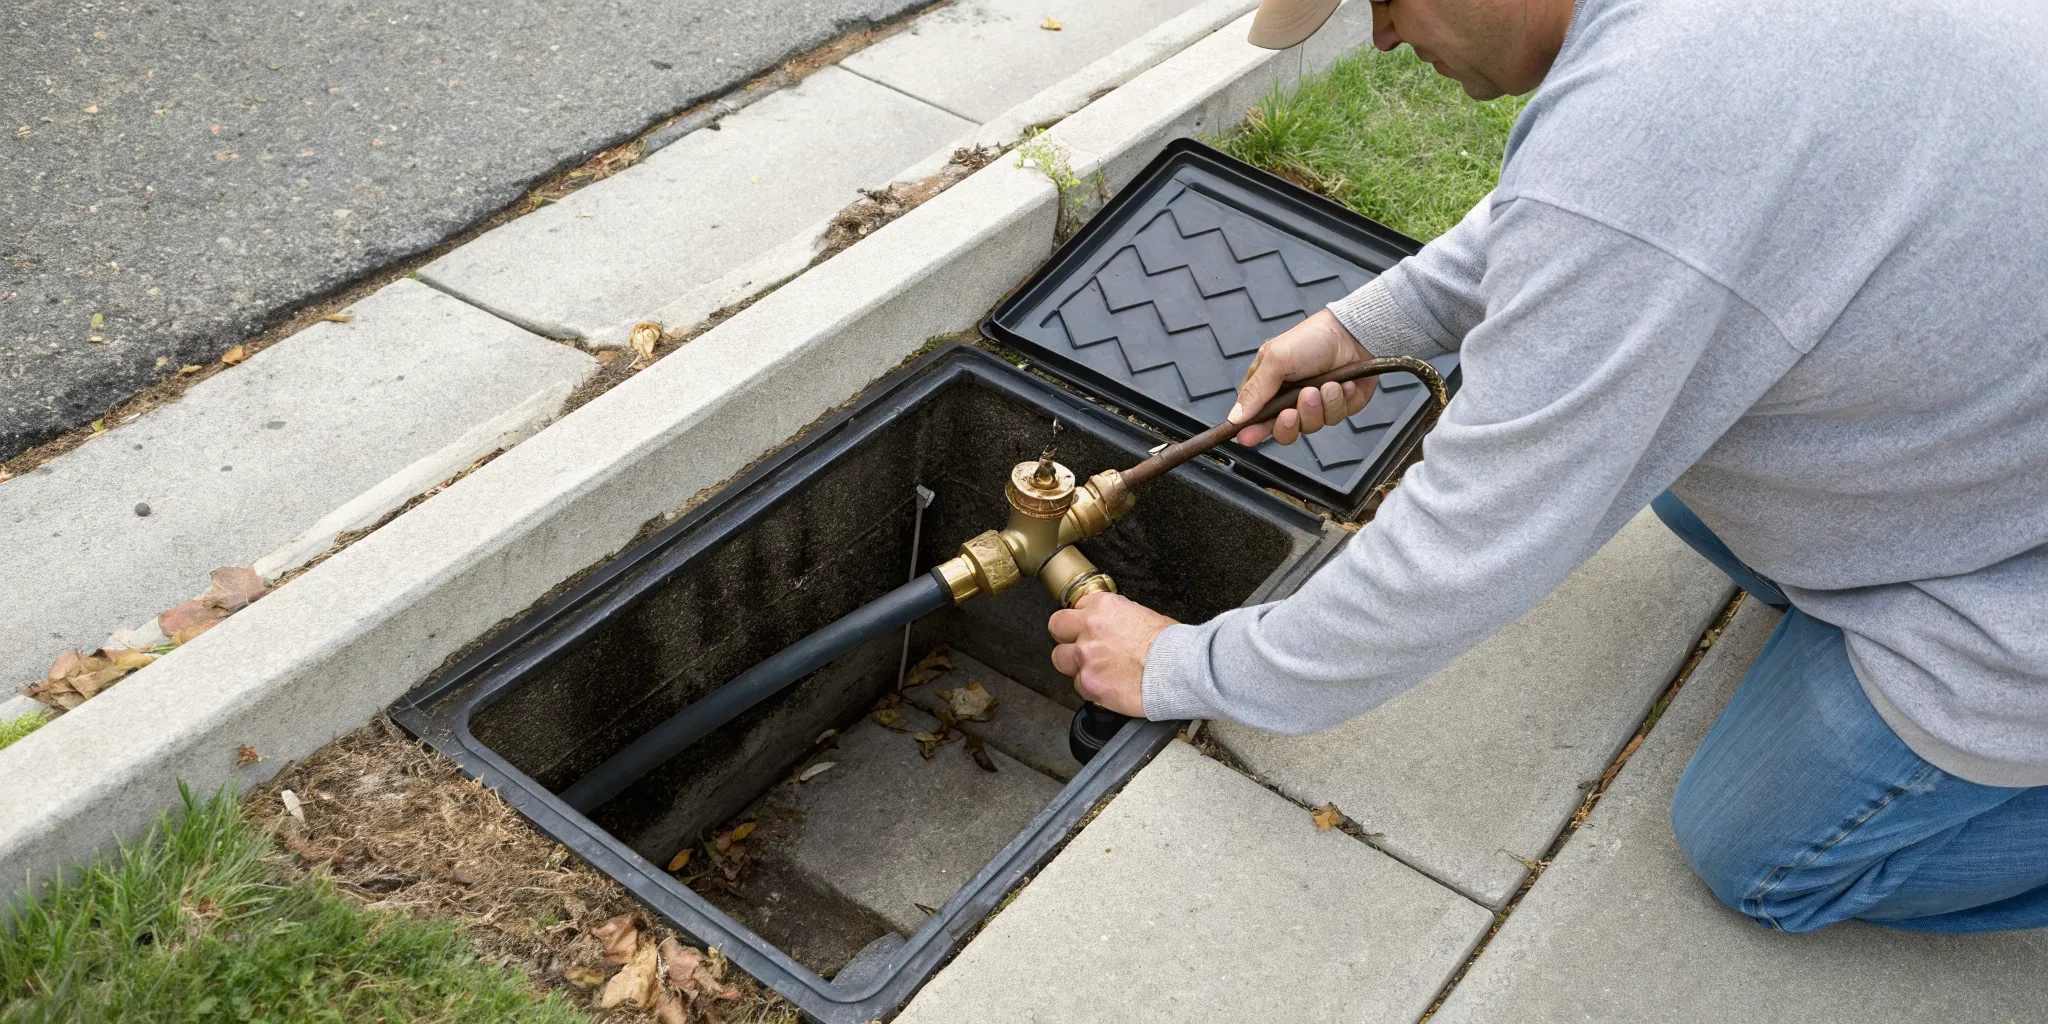
When you flip the switch and get nothing but silence, it’s easy to assume the worst. But don’t panic just yet. The most common reason for a completely dead disposal is a simple power issue. Before you do anything else, check to see if the unit is securely plugged into the outlet under the sink. Sometimes, vibrations can work the plug loose. If that’s not the problem, look for a small red or black reset button on the bottom of the disposal unit itself. Press it firmly to see if it resets the motor. If it still won’t turn on, the next step is to check your home’s main circuit breaker panel to see if the switch has been tripped.
Hearing a Hum, But Nothing’s Spinning?
If you hear a humming or buzzing sound when you turn on the disposal, it means the motor is receiving power but the blades are stuck. This is almost always caused by a jam. Something hard, like a fruit pit, bone, or even a stray bottle cap, has wedged itself between the blades and the grinding chamber wall, preventing them from spinning. It’s a very common issue, especially if something non-food-safe accidentally fell down the drain. The key is to turn off the power immediately to avoid burning out the motor. Clearing the jam is usually straightforward, but it’s crucial to do it safely without putting your hands inside the unit.
Finding Puddles Under the Sink?
Discovering a puddle in the cabinet under your sink is never a welcome sight. If you suspect the garbage disposal is the culprit, the first thing you need to do is pinpoint the source of the leak. Leaks can happen in a few different spots: the top flange where the disposal connects to the sink, the side connections where the dishwasher hose attaches, or the bottom drainpipe connection. Carefully dry the unit and run some water to see where the drips are coming from. Often, the fix is as simple as tightening a loose connection. However, if you find a crack in the unit’s body, it’s a sign that the disposal needs to be replaced. A persistent leak can cause water damage, so if you can’t find the source, it’s best to call for emergency plumbing help.
Dealing With a Smelly Drain?
That unpleasant smell wafting up from your kitchen sink is a tell-tale sign of trapped food particles decaying inside your disposal. Over time, tiny bits of food can get stuck in the grinding chamber and build up, creating a breeding ground for smelly bacteria. Luckily, this is usually a cleaning issue, not a mechanical one. You can easily freshen it up by grinding a handful of ice cubes and some citrus peels (lemon, lime, or orange) to scrub the chamber. For a deeper clean, pour half a cup of baking soda down the drain followed by a cup of vinegar. Let it fizz for about 15 minutes, then flush it all out with cold water.
Hearing Loud, Grinding Noises?
Your garbage disposal is designed to make some noise, but if you suddenly hear loud, metallic grinding, shut it off immediately. This jarring sound usually means a foreign object that doesn’t belong has found its way into the unit. Things like silverware, screws, coins, or glass can cause serious damage to the blades and the motor if left unchecked. Once the power is off, use a flashlight to look down the drain. If you can see the object, use tongs or pliers to carefully retrieve it. Never, ever use your hands to pull something out of the disposal, even with the power off.
Is Your Sink Draining Slowly?
When your sink starts backing up or draining at a snail’s pace, it’s a clear sign of a clog. The blockage could be inside the disposal itself or further down the drain line. If the disposal’s blades have become dull over time, they may not be grinding food waste into small enough particles, leading to a buildup in the pipes. The first step is to try and clear any visible food from the disposal. If that doesn’t work, the clog may be in the P-trap, which is the U-shaped pipe under your sink. While some homeowners are comfortable taking this apart to clear it, a stubborn clog might require professional attention. If you’ve tried everything and the water still won’t go down, it’s time to contact a professional.
Diagnosing Clogs in a Double Sink
If you have a double-basin sink, you have a built-in diagnostic tool. Check if the non-disposal side is draining properly. If it is, the clog is likely located in the disposal itself or the drainpipe immediately connected to it. This is a localized issue you might be able to resolve. However, if both sides of the sink are draining slowly or not at all, the problem is more serious. This indicates a blockage further down in the main drain line that serves both basins. A clog that deep requires more than a simple fix and is best left to professionals who have the right tools to clear it without damaging your pipes. For these tougher jobs, it’s wise to contact an expert.
Check for Worn-Out Blades
If your disposal seems to be working but the sink still drains slowly, the issue might be the blades themselves. Over years of use, the impellers (often called blades) can become dull and worn out. When this happens, they can no longer effectively grind food waste into fine particles. Instead, they produce larger chunks that can easily create a partial or full clog in your drainpipe. This is why you might experience frequent backups even if you’re careful about what you put down the drain. Unfortunately, you can’t sharpen or replace the blades on most units. A disposal with worn-out blades has reached the end of its life and will need to be replaced to restore proper drainage.
Is the Splash Guard Creating a Seal?
Sometimes the simplest explanation is the right one. Before you assume you have a major clog, take a look at the black rubber flap, or splash guard, at the top of your disposal drain. This guard is designed to prevent water and food from splashing back up into your sink, but occasionally it can create a vacuum-like seal. This seal can trap water in the sink, making it drain very slowly, even when there’s no clog at all. To check if this is the problem, try gently pushing the flaps down with a wooden spoon or tongs to break the surface tension. If the water immediately rushes down, you’ve found your culprit. Regularly cleaning the splash guard can also help prevent this from happening.
How to Fix a Garbage Disposal That Won’t Turn On
When you flip the switch and your garbage disposal stays silent, it’s easy to assume the worst. But more often than not, the fix is surprisingly simple. Before you start thinking about a replacement, let’s walk through a few quick troubleshooting steps. Most of the time, a lack of power is the culprit, and you can solve it in minutes without any special tools. These checks are safe, straightforward, and can get your kitchen back in working order.
From a simple reset button to a tripped circuit, we’ll cover the most common reasons your disposal won’t turn on. Just follow these steps in order, and you might be able to fix the problem yourself. If you’ve tried everything and still have no luck, it might be time for professional help. Our team at Mr. Pipey is always ready to provide expert plumbing solutions when you need them.
Start With the Power and Reset Button
First things first, let’s make sure the disposal is getting power. Take a peek under your sink and confirm that the unit is plugged securely into the wall outlet. Sometimes, vibrations can loosen the plug over time. If it’s plugged in tight, look for a small button on the bottom of the disposal unit itself. This is the reset button, and it’s usually red or black.
This button is a safety feature that automatically trips to prevent the motor from overheating. Press it firmly to reset it; you might hear a little click. Give the disposal a few minutes to cool down, then try flipping the wall switch again. This simple step resolves the issue for many homeowners.
Check Your Circuit Breaker
If the reset button didn’t do the trick, your next stop is the circuit breaker box. A garbage disposal can sometimes draw enough power to trip a breaker, especially if other appliances are running on the same circuit. Head to your home’s main electrical panel and look for the breaker connected to your kitchen. It should have a label like “Kitchen” or “Disposal.”
If the switch is in the “OFF” position or stuck in the middle, it has tripped. To reset it, push the switch firmly to the “OFF” position, then flip it back to “ON.” This should restore power to the outlet. If the breaker trips again right away, it could indicate a more serious electrical problem, and it’s best to get professional help.
Make Sure the Wall Switch Works
Still no power? The problem could be the wall switch you use to turn the disposal on. Over time, electrical switches can wear out and fail. If you’ve already checked the reset button and the circuit breaker, but the disposal is completely silent when you flip the switch (no humming or any other noise), the switch itself might be faulty.
While you can diagnose this, replacing a wall switch involves working with electrical wiring. For your safety, it’s a job best left to a professional. If you suspect a bad switch is the issue, it’s a good idea to contact our team. We can safely test the switch and replace it if needed.
Find and Reset the GFCI Outlet
Many modern kitchens have GFCI (Ground Fault Circuit Interrupter) outlets, especially around sinks. These outlets are designed to shut off power instantly if they detect a short circuit, protecting you from electrical shock. Your disposal may be plugged into one. A GFCI outlet is easy to spot; it has “TEST” and “RESET” buttons on its face.
Check the outlet under your sink and press the “RESET” button firmly. Sometimes, the GFCI that controls your disposal isn’t the one it’s plugged into. It could be another outlet elsewhere in the kitchen that’s on the same circuit. Check any other GFCI outlets nearby and reset them too. This is a common and easy fix that often gets overlooked.
How to Safely Unjam Your Garbage Disposal
A jammed garbage disposal is a common kitchen headache, but it’s often a problem you can solve yourself. Before you reach for the phone to call a plumber, a few simple steps can get your disposal back in working order. The key is to work safely and methodically. From cutting the power to manually turning the blades, we’ll walk you through the process of clearing a jam without any special skills. Just remember, your safety is the top priority, so never rush and always follow these instructions carefully. If at any point you feel unsure or the jam seems too stubborn, don’t hesitate to call for professional help.
Safety First: Always Disconnect the Power
Before you even think about reaching into your sink, your absolute first step is to cut the power to the garbage disposal. This is a non-negotiable safety measure to prevent the unit from accidentally turning on while you’re working on it. Start by flipping the wall switch for the disposal to the “off” position. Next, go under the sink and unplug the unit from the wall outlet. If your disposal is hardwired and doesn’t have a plug, you’ll need to go to your home’s main electrical panel and shut off the corresponding circuit breaker. This simple step is the most important one you’ll take to ensure your safety and avoid serious injury.
Use Tongs to Remove Blockages
Once the power is completely disconnected, you can safely investigate the cause of the jam. Grab a flashlight and peer down into the drain to see if you can spot the culprit. Often, the jam is caused by a foreign object like a bottle cap, a piece of silverware, or a stubborn food scrap like a fruit pit. If you see something, use a pair of tongs or needle-nose pliers to carefully reach in and pull it out. Whatever you do, never, ever put your hand down the disposal. The blades are sharp, even when the unit is off, and you could easily cut yourself. Using a tool is the only safe way to remove a visible obstruction.
Turn the Blades Manually with an Allen Wrench
If you’ve removed any visible blockages but the blades still won’t move, you can try turning them manually from underneath the sink. Most garbage disposals have a small, hexagonal hole in the center of the bottom of the unit. This is where you can insert a 1/4-inch Allen wrench (many disposals even come with a special tool for this purpose). Fit the wrench into the hole and turn it back and forth. This motion will move the blades, helping to dislodge whatever is causing the jam. You might feel some resistance at first, but a little gentle pressure should get things moving again. This is often all it takes to free up the grinding mechanism.
What If You Can’t Use an Allen Wrench?
So, what happens if you can’t find that little wrench, or your disposal model doesn’t have a spot for one on the bottom? Don’t worry, you’re not out of options. You can often achieve the same result from above using a common household item. First, and I can’t stress this enough, make sure the power to the disposal is completely off at the plug and the circuit breaker. Once you’re certain it’s safe, grab a sturdy wooden spoon or the end of a broom handle. You’ll use this as a lever to manually move the blades from inside the sink drain.
Insert the end of your wooden spoon or handle down into the disposal, pressing it firmly against one of the swiveling blades. Use the tool as a lever to push the blade and rotate the entire grinding plate. You’ll want to work the blades back and forth, so reposition the tool and push in the opposite direction to dislodge whatever is stuck. If the blades won’t budge with firm pressure, don’t force them, as you could damage the unit. When a jam won’t clear with this method, it’s a clear sign that it’s time to call in a professional. Our team can provide the expert plumbing solutions you need to get your kitchen running smoothly again.
Try a Vinegar and Baking Soda Fix
After you’ve cleared the jam and restored power, it’s a good idea to give your disposal a quick clean to wash away any lingering debris. A simple and effective method uses two common household items: baking soda and vinegar. Pour about half a cup of baking soda down the drain, followed by half a cup of white vinegar. The mixture will fizz and bubble, which helps break down any remaining gunk and food particles. Let it sit for about 15 minutes, then turn on the cold water and run the disposal for a minute to flush everything through. If these steps don’t work and your disposal is still stuck, it might be time to call in the experts for professional plumbing services.
Use the Disposal to Force a Clog Through
If your disposal is jammed but the motor still works, you can sometimes use the unit itself to clear a minor clog in the drain line. This method works best if you have a double-basin sink. First, securely plug the drain on the non-disposal side of the sink. Next, fill the disposal side with several inches of water. With the water creating pressure, turn on the disposal. The force of the spinning impellers combined with the weight of the water can act like a pump to push the blockage through the pipes. It’s a clever trick that uses the machine’s own power to solve the problem, and you’ll know it worked if the water suddenly drains away.
Clear Clogs with a Plunger or Snake
When a clog is too stubborn for the disposal to handle, it’s time to turn to some tried-and-true plumbing tools. Start with a standard sink plunger. Fill the sink with a few inches of water to ensure the plunger can form a tight seal over the drain, then give it several firm plunges. If the water still won’t go down, the clog is likely in the P-trap—the U-shaped pipe under your sink. If you feel comfortable with a bit of DIY, you can place a bucket under the trap to catch water, unscrew the connections, and clear out the blockage manually. However, if the clog persists or you’d rather leave it to a professional, our team is always here to provide expert plumbing solutions.
Fixing Leaks and Banishing Bad Smells
A leaky or smelly garbage disposal can quickly ruin your day, but don’t worry, these are often problems you can solve yourself. A puddle under the sink or a funky smell coming from the drain are clear signs that your disposal needs a little attention. Before you panic, a few simple diagnostic steps and cleaning tricks can often get things back to normal. With the right approach, you can tackle both leaks and odors and restore peace to your kitchen. If the problem seems too big to handle, remember that professional help is always an option.
Pinpoint the Source of the Leak
If you’ve spotted water under your sink, your first job is to play detective and find exactly where it’s coming from. Place a dry paper towel or a shallow pan under the disposal to catch drips, which will help you pinpoint the origin. The most common culprits are the connections. Check where the dishwasher hose connects to the disposal and where the disposal’s discharge pipe meets your sink’s drainpipe. You might also find a leak at the sink flange, which is the seal between the disposal and the bottom of the sink. Carefully inspect all these areas for moisture while running a small amount of water.
Check the Mounting Apparatus
Once you’ve dried everything off, it’s time to zero in on the usual suspects. Many leaks are simply the result of loose connections that have been shaken by the disposal’s vibrations over time. Start at the top, where the disposal meets the sink. This connection, called the sink flange, is sealed with plumber’s putty and held in place by a mounting ring. If this ring is loose, water can seep through. Next, check the side connections where the dishwasher hose attaches, and finally, inspect the main drainpipe at the bottom. Gently tighten any loose screws or nuts you find, but be careful not to overtighten, which could damage the seals.
Look for Cracks in the Housing
If all the connections are secure but you’re still dealing with a drip, the problem might be more serious. Take a close look at the main body of the disposal unit itself. Over time, the housing can develop cracks due to age or stress, causing water to leak from the inside. If you find a crack in the unit’s body, it’s a definite sign that the disposal needs to be replaced; this isn’t something that can be patched up. A persistent leak can cause serious water damage to your cabinets and flooring, so if you can’t find the source or you see a crack, it’s best to call for emergency plumbing help to get it resolved quickly.
Tighten Connections and Replace Worn Seals
Once you’ve located the leak, the fix is often straightforward. If the water is coming from a connection point, grab a screwdriver or wrench and gently tighten any loose bolts, clamps, or mounting screws. Sometimes, vibrations from running the disposal can cause these fittings to loosen over time. If tightening doesn’t stop the drip, a worn-out seal or gasket is likely the problem. You may need to replace the rubber gasket or apply a fresh layer of plumber’s putty around the sink flange. These are simple fixes, but if you’re not comfortable taking things apart, our team is always ready to provide expert plumbing solutions.
How to Fix a Small Crack with Epoxy
If you’ve discovered a crack in the body of your garbage disposal, it’s often a sign the unit is nearing the end of its life. For a very small hairline crack, you might be able to buy some time with a waterproof epoxy patch, but think of this as a temporary fix. First, unplug the disposal and make sure the area around the crack is completely clean and dry. Following the package instructions, mix the two-part epoxy and use a small applicator to work it into the crack, creating a smooth seal. The most important step is patience; you must let the epoxy cure fully, which usually takes 24 hours. Running the disposal before it’s hardened will ruin the patch. If the leak continues, it’s a clear sign that the disposal needs to be replaced, and it’s time to call a professional.
How to Deodorize Your Disposal Naturally
That unpleasant smell wafting from your sink is usually caused by tiny food particles that have gotten trapped and started to decay inside the disposal. Luckily, you don’t need harsh chemicals to fix it. A great natural deodorizer is probably already in your fruit bowl. Just toss a few lemon, lime, or orange peels into the disposal and run it with cold water for about 30 seconds. The citrus oils will cut through the grime and leave your drain smelling fresh and clean. For an extra cleaning punch, you can also pour half a cup of baking soda down the drain, followed by a cup of white vinegar, let it fizz for 10 minutes, and then flush with hot water.
Try This Ice Cube and Citrus Peel Trick
For a more thorough cleaning that scrubs away stubborn buildup, an ice cube treatment works wonders. Fill the disposal with a handful of ice cubes, add a scoop of coarse salt (like rock salt), and then turn on the cold water and run the unit. The ice and salt work together as a powerful, abrasive scrub, knocking food residue off the grinding components without damaging them. Once the grinding sound stops, you’ll know the job is done. For the final touch, run those citrus peels through the disposal to leave your kitchen sink smelling fantastic. Making this part of your regular cleaning routine will help keep odors from coming back.
Make Lemon Juice Ice Cubes for Extra Cleaning Power
If you’re looking for a simple, natural way to give your disposal a cleaning boost, look no further than your fruit bowl. Making lemon juice ice cubes is a fantastic trick for cutting through grime and banishing bad smells. Simply squeeze fresh lemon juice into an ice cube tray—you can dilute it with a little water if you like—and let it freeze. When you’re ready, toss a few of these frozen cubes into the disposal and run it with cold water. As the blades grind the cubes, the frozen citrus acid works to break down greasy buildup, while the natural oils release a fresh, clean scent, leaving your whole kitchen smelling better.
To take your cleaning routine to the next level, combine the power of citrus with a bit of abrasive action. After tossing in your lemon juice cubes, add a handful of regular ice cubes and a generous scoop of coarse salt, like rock salt. Turn on the cold water and run the disposal. The combination of hard ice and gritty salt creates a powerful scrubbing mixture that scours the inside of the grinding chamber and the blades, knocking loose any stubborn, caked-on food particles. This method is much safer and more effective than using harsh chemicals and helps address some of the most common garbage disposal problems before they start.
The best part about this trick is how easy it is to incorporate into your regular kitchen cleanup. By making this a weekly or bi-weekly habit, you can proactively prevent the buildup that leads to unpleasant odors and potential clogs. Think of it as simple preventative maintenance for one of your kitchen’s hardest-working appliances. A few minutes of care can go a long way in keeping your disposal running efficiently and your sink smelling fresh, helping you avoid the need for more serious interventions down the road. It’s a small step that helps maintain a healthy plumbing system throughout your home.
How to Prevent Future Garbage Disposal Problems
A little prevention goes a long way in keeping your garbage disposal running smoothly. While it’s a powerful appliance, it needs a bit of care to perform its best. By being mindful of what you put down the drain and performing some simple maintenance, you can avoid most common issues like clogs, jams, and unpleasant odors. Think of it as a small investment of time that pays off by saving you from future headaches and costly repairs. A well-maintained disposal is a key part of a functional kitchen, preventing backups and strange smells that can disrupt your home. Taking these proactive steps not only keeps your sink draining properly but also protects your plumbing system from more serious damage. Adopting these simple habits will help extend the life of your appliance and keep your kitchen sink functional and fresh. Of course, some problems are bigger than a DIY fix. If you ever need a hand with maintenance or run into a more complex issue, our team is always ready to help with a full range of plumbing solutions. We can handle everything from stubborn clogs to complete unit replacements, ensuring your kitchen gets back to normal as quickly as possible.
What Not to Put Down Your Garbage Disposal
Your garbage disposal is tough, but it’s not invincible. To prevent clogs and damage, it’s best to avoid sending certain foods down the drain. Steer clear of fats, oils, and grease, as they can solidify and create stubborn blockages in your pipes. Stringy or fibrous vegetables like celery, asparagus, and onion skins can wrap around the blades and jam the motor, bringing everything to a halt. Other items to keep out include coffee grounds, which create a thick sediment, along with hard materials like bones and eggshells that don’t break down easily. A good rule of thumb is: if you have to question it, it’s probably better to toss it in the trash.
Be Cautious with Starchy and Fibrous Foods
While some foods seem harmless, starches and fibrous items are notorious for causing trouble in garbage disposals. Think of things like potato peels, pasta, and rice. When you grind them up with water, they can form a thick, glue-like paste that’s perfect for creating a stubborn clog deep in your pipes. Similarly, fibrous vegetables like celery, asparagus, and even onion skins don’t break down easily. Instead, their long, stringy fibers can wrap around the disposal’s blades, jamming the motor and bringing everything to a standstill. To avoid a call for emergency plumbing services, it’s always safer to toss these items in your compost or trash bin.
Why You Should Always Use Cold Water
It might seem counterintuitive, but cold water is your disposal’s best friend. Always run a strong stream of cold water before, during, and for about 20 seconds after you finish grinding food. Hot water can liquefy fats and grease, which seems helpful at first, but it allows them to travel further down your pipes before they cool and solidify into a clog. Cold water, on the other hand, keeps fats solid, making it easier for the disposal blades to chop them up and flush them through the system completely. This simple step also helps keep the motor from overheating, ensuring your disposal works efficiently for years to come.
And Let It Run for a Full Minute
It’s tempting to shut off the water the second you hear the grinding stop, but that’s a habit you’ll want to break. Think of it as a two-step process: first, the disposal grinds the food, and second, the water flushes it away. Without a good flush, those tiny food particles can get stuck in the P-trap under your sink, creating a future clog. After the grinding noise is gone, keep the cold water running for at least another 30 seconds. This ensures a strong, steady flow carries all the waste completely through the pipes and into the main drain line. This extended flow of cold water also helps the motor cool down, which can extend the life of your appliance. Adopting this habit is one of the easiest ways to prevent common disposal problems and keep your plumbing system happy.
Create a Simple Cleaning Routine
Keeping your garbage disposal clean is key to preventing foul odors and buildup. For a quick refresh, just squirt a little dish soap into the disposal, run some cold water, and let it run for about a minute. For a deeper clean, toss a handful of ice cubes and a scoop of coarse salt (like rock salt) down the drain. Run the cold water and turn on the disposal; the ice and salt work together to scrub the grinding chamber and blades without harsh chemicals. To get rid of lingering smells, you can grind up some citrus peels from lemons or oranges. It’s an easy way to leave your sink smelling fresh and clean.
Run the Disposal Regularly to Prevent Rust
It might sound strange, but one of the best things you can do for your garbage disposal is to use it regularly. Even if you don’t have any food scraps to grind, you should turn it on with a stream of cold water for about a minute every few days. Because the unit is made of metal and constantly exposed to water, running it frequently helps prevent rust from forming on the internal parts. This simple action also keeps the moving components from seizing up, ensuring everything stays lubricated and ready to work when you need it. Think of it as a quick exercise routine for your appliance that keeps it in prime condition.
Use Boiling Water Monthly to Clear Grease
While you should always use cold water when grinding food, there’s one exception to the rule for cleaning purposes. Once a month, carefully pour a pot of boiling water directly into the disposal drain. This helps melt and wash away any stubborn grease or oily residue that has built up on the blades and inside the pipes. Just be sure to pour it slowly and directly down the drain to avoid splashing. This monthly flush is a great preventative measure against slow drains and clogs. If you’re dealing with a serious blockage that boiling water can’t fix, it’s a sign of a deeper issue that may require professional plumbing solutions.
Warning Signs Your Disposal Needs Attention
Your disposal will usually give you a heads-up when something is wrong. If you hear a humming sound but the blades aren’t spinning, it’s likely jammed. Persistent leaks under the sink are another clear sign that a seal or connection has failed, and that water damage could be next. You should also pay attention if you find yourself hitting the reset button frequently or if your sink drains very slowly despite your cleaning efforts. These symptoms suggest a deeper problem that DIY fixes might not solve. If you notice any of these issues, it’s time to call for professional help to avoid a bigger mess down the road.
When Is It Time to Call a Plumber?
While tackling a home repair project yourself can be incredibly satisfying, it’s also important to know when to step back and call for help. Garbage disposals combine electricity, sharp blades, and water, which can be a tricky combination. If you’ve tried the DIY solutions and are still stuck, or if you simply don’t feel comfortable with the repair, there’s no shame in calling a professional. A licensed plumber can diagnose the problem quickly and safely, saving you time, stress, and potentially preventing a small issue from turning into a major headache. Think of it as calling in a specialist to get the job done right.
Garbage Disposal Problems Best Left to the Pros
Some garbage disposal issues are clear signals that it’s time to call a professional. If you notice a persistent leak that you can’t stop, it could point to a cracked housing or a failing seal that needs an expert touch. Another major red flag is an electrical problem. If the disposal hums but the blades won’t spin even after you’ve tried to clear a jam, or if you keep tripping the circuit breaker, it’s best to leave it to a pro. Working with electrical wiring and water is risky, and a plumber has the training to handle it safely. When a problem goes beyond a simple clog or reset, our emergency plumbing team is ready to help.
Repair or Replace? How to Make the Call
Deciding whether to repair or replace your garbage disposal often comes down to age and cost. Most disposals have a lifespan of about five to 10 years. If your unit is getting older and experiencing frequent problems like recurring leaks or loud, unusual noises, replacing it might be the more sensible and cost-effective option in the long run. Sometimes, the cost of a professional repair can be close to the price of a new, more efficient model. A professional plumber can give you an honest assessment and help you weigh the pros and cons, ensuring you make the best choice for your home and budget.
Consider the Lifespan and Cost
A good rule of thumb is to look at the age of your disposal, as most units are designed to last about five to ten years. If yours is getting close to that decade mark and you’re facing one problem after another—like constant leaks or loud, unusual noises—it’s a strong sign it’s on its last legs. Before you pay for a big repair, weigh the long-term value. The cost of a professional fix can sometimes be nearly as much as a brand-new, more efficient model. Choosing a replacement is often the more sensible and cost-effective option, saving you from a frustrating cycle of service calls and giving you a reliable appliance for years to come.
Why Hiring a Pro Can Save You Time and Money
Calling a professional plumber offers peace of mind that the job will be done correctly and safely. We have the specialized tools and experience to accurately diagnose the root cause of the issue, whether it’s a hidden leak, a motor problem, or an internal blockage. Instead of spending your weekend troubleshooting, you can rely on an expert to handle the repair efficiently. At Mr. Pipey, we treat your home like our own, providing reliable solutions that last. If you’re ready to hand the problem over to a friendly expert, you can contact us to schedule a service call.
Related Articles
- Garbage Disposal Not Working? 5 Easy Fixes to Try
- DIY Garbage Disposal Repair: A Step-by-Step Guide
- How to Fix a Humming Garbage Disposal Fast
Frequently Asked Questions
What’s the difference between a humming disposal and one that’s completely silent? A humming sound is actually a good sign, in a way. It means the motor is getting power, but the blades are physically stuck on something, which points to a jam. A completely silent unit, however, suggests a power issue. For a silent disposal, you should first check the reset button on the bottom of the unit and then look at your home’s circuit breaker.
Is it okay to use chemical drain cleaners in my garbage disposal? I strongly advise against using harsh chemical drain cleaners. These chemicals can corrode the metal parts of your disposal and damage your plumbing pipes over time. For clogs and odors, natural solutions like ice cubes, citrus peels, or a baking soda and vinegar mixture are much safer and often just as effective for routine maintenance.
How often should I clean my disposal to prevent smells? A good habit is to give it a quick cleaning about once a week. You can do a simple refresh by grinding up some citrus peels or running a handful of ice cubes through it. This regular maintenance helps prevent food particles from building up and creating those unpleasant odors in your kitchen sink.
My disposal is pretty old. Should I repair it or just get a new one? This often comes down to the age of the unit and the cost of the repair. Most disposals last about 10 years. If yours is nearing that age and needs a significant repair, investing in a new, more efficient model is often the smarter financial choice. A professional can give you an honest assessment to help you weigh the costs.
I tried all the DIY fixes, but it’s still not working. What’s next? If you’ve gone through the troubleshooting steps and the problem persists, it’s time to call a professional. Continuing to try and fix it could lead to bigger issues or even personal injury, especially when dealing with electricity and sharp blades. An expert can safely diagnose the root cause, whether it’s an internal mechanical failure or a complex electrical problem.