That strange popping or rumbling sound from your basement isn’t just the house settling. It’s your water heater telling you it needs help. The culprit is a thick layer of water heater sediment that has settled at the bottom of the tank. This forces your heater to work so much harder, trapping water until it boils and “pops.” This process wastes energy, drives up your utility bills, and puts immense strain on the tank, leading to corrosion and potential leaks. Learning how to properly drain the sediment is the most effective way to quiet the noise, restore efficiency, and extend your appliance’s life.
Key Takeaways
- Drain your water heater annually to improve efficiency: Flushing mineral sediment from your tank once a year is crucial for performance. This simple task helps lower your energy bills, prevents internal corrosion that can cause leaks, and significantly extends the life of your appliance.
- Adjust your schedule if you have hard water: Since Metro Detroit is known for its hard water, sediment accumulates much faster in local homes. Plan to drain your tank every six months to avoid issues like popping noises, lukewarm water, and premature failure.
- Prioritize safety and know when to call a pro: Always turn off the gas and water supplies and let the water cool before you begin. If you encounter a stuck valve, a persistent leak, or feel uncomfortable with any step, calling a professional is the safest and most effective solution.
What Is Water Heater Sediment (and Why It Matters)
If you’ve ever heard a strange popping or rumbling sound coming from your basement, it might not be the house settling. It could be your water heater calling for help. The culprit is often something surprisingly simple: sediment. Over time, tiny minerals and bits of debris that are naturally present in your water supply settle at the bottom of your water heater tank. This creates a layer of sediment that can cause all sorts of problems for your home.
As this layer gets thicker, it forms an insulating barrier between the heating element and the water it’s supposed to be heating. Your heater is forced to work much harder and run longer to get your water hot, which wastes energy and can lead to a noticeable jump in your utility bills. Think of it like trying to boil a pot of water with a thick layer of sand at the bottom; it’s just not efficient. This buildup not only costs you money but can also shorten the lifespan of your water heater by causing it to overheat. Regularly draining this sediment is a key piece of home maintenance that keeps your system running smoothly and protects your investment.
Where Does Water Heater Sediment Come From?
The water that flows into your home isn’t perfectly pure; it contains dissolved minerals like calcium and magnesium. When that water sits inside your heater and gets warmed up, these minerals separate from the water and sink to the bottom of the tank. It’s a completely natural process, much like the chalky white scale you might find inside a frequently used tea kettle. Over months and years, these tiny particles accumulate to form a thick, sludgy layer. This is the sediment buildup that you need to flush out periodically to keep your water heater healthy and efficient.
What’s Actually in the Sediment?
So, what is this gunk actually made of? The sediment at the bottom of your tank is essentially a collection of tiny particles that were dissolved in your water. The main culprits are minerals like calcium and magnesium, which are especially common in areas with hard water. When the water is heated, these minerals separate and settle at the bottom. But it’s not just minerals. You might also find small amounts of sand, dirt, and even rust flakes from older pipes mixed in. Think of it as a collection of everything the water picked up on its journey to your home. This mix of tiny bits is what creates that thick, insulating layer that makes your water heater work so much harder to do its job.
The Link Between Hard Water and Sediment Buildup
If your home has “hard water,” you’re likely to face sediment problems more frequently and severely. Hard water is simply water that has a higher concentration of dissolved minerals. Many communities in Metro Detroit have moderately hard to very hard water, which means our water heaters are especially prone to rapid sediment accumulation. Because there are more minerals in the water to begin with, the sediment layer builds up much faster. This makes regular maintenance, like draining your tank, even more critical for local homeowners. If you have hard water, you’ll want to be extra diligent about flushing your water heater to prevent damage and keep it running efficiently.
Is It Time to Drain Your Water Heater? 4 Telltale Signs
Your water heater usually works quietly in the background, but it will give you some clear signals when it needs a little attention. Sediment buildup is one of the most common issues, and ignoring it can lead to bigger problems. If you notice any of these signs, your heater is likely telling you it’s time for a flush. Catching these clues early can save you from a cold shower, a high energy bill, or a call for emergency plumbing services down the road.
Hearing Strange Popping or Rumbling Noises?
If your water heater has started making popping, rumbling, or banging noises, it’s not haunted; it’s just full of sediment. This happens when a thick layer of minerals settles at the bottom of the tank. Water gets trapped underneath this layer, and as the burner heats it, the water boils and tries to escape, creating those distinct sounds. It’s a lot like hearing popcorn pop. While it might just seem like a strange noise, it’s a sign of inefficiency. The heater is struggling to heat the water through the sediment, which can cause strain and damage over time.
Is Your Hot Water Not So Hot Anymore?
Are your hot showers turning lukewarm faster than they used to? Sediment buildup is a likely culprit. That layer of minerals at the bottom of the tank acts as a barrier between the heating element and the water. Your heater has to work much harder to get the water up to the temperature you’ve set on the thermostat. This results in inconsistent temperatures and a less reliable supply of hot water for your home. If you’re constantly adjusting the faucet to find hot water, it’s a strong indication that a good flush is overdue.
Noticing Rusty or Smelly Water?
When you turn on the hot water tap, you expect it to be clear and odorless. If you’re seeing rusty, cloudy, or sandy-looking water, it’s a direct sign that the sediment inside your tank is making its way into your pipes. Over time, that mineral buildup can also create a welcoming environment for certain types of harmless but smelly bacteria, leading to a rotten egg smell. Discolored or smelly water isn’t just unpleasant; it’s a clear signal that the inside of your tank needs a thorough cleaning to restore your water quality.
Are Your Energy Bills Creeping Up?
An unexpected spike in your gas or electric bill can often be traced back to a struggling appliance, and your water heater is a prime suspect. When sediment forces your heater to work harder and run longer to warm the water, it uses more energy. That wasted energy translates directly into higher utility costs for you. Draining the sediment restores your heater’s efficiency, allowing it to heat water quickly without the extra effort. This is a simple maintenance step that pays for itself by lowering your monthly bills, similar to how pipe insulation helps conserve heat.
Is Your Hot Water Pressure Dropping?
If you’ve noticed the hot water from your faucets is more of a trickle while the cold water comes out with full force, sediment could be the problem. As mineral deposits build up inside your tank, they don’t just stay at the bottom. Small particles can get swept up and clog the hot water outlet pipe, creating a bottleneck that reduces your water pressure. This is more than just an annoyance; it’s another sign that your water heater is working inefficiently. The same sediment that makes your heater struggle to warm water can also block the flow, leading to a weak stream when you need hot water most. Flushing the tank can help clear out these particles and restore your water pressure.
Seeing Leaks from the Pressure Relief Valve?
A leak from the temperature and pressure (T&P) relief valve on your water heater is a serious warning sign that should never be ignored. This valve is a critical safety feature designed to release pressure if it gets too high inside the tank. When sediment buildup causes the heater to overheat, it can create dangerous levels of pressure, forcing the valve to open and leak. This isn’t just a simple drip; it’s a sign of a potentially hazardous situation. Ignoring it can lead to catastrophic tank failure. If you see water leaking from this valve, it’s time to call a professional immediately. This is a problem that requires an expert diagnosis to ensure your system is safe, making it a clear case for emergency plumbing services.
How Often Should You Drain Your Water Heater?
Think of draining your water heater like changing the oil in your car. It’s a simple maintenance task that prevents bigger, more expensive problems down the road. As a general rule, you should plan to drain your water heater at least once a year. This annual flush clears out the sediment that naturally builds up inside the tank, helping your heater run more efficiently, save energy, and last longer.
When sediment accumulates, it creates a layer between the heating element and the water. Your heater has to work much harder to do its job, which drives up your energy bills and puts extra strain on the components. Over time, this can lead to corrosion, leaks, and a much shorter lifespan for your unit. Ignoring this simple task can eventually lead to a situation where you need emergency plumbing services for a major leak or a complete lack of hot water. Sticking to a regular draining schedule is one of the best ways to protect your investment and keep your home running smoothly. However, “once a year” isn’t a one-size-fits-all answer. The ideal frequency really depends on a couple of key factors, especially the quality of your local water supply.
Factors That Affect Your Draining Schedule
Your water heater’s manufacturer manual is always the best place to start for specific maintenance recommendations. But the biggest factor that influences your draining schedule is your water quality. If your home has “hard water,” you’ll need to drain your tank more often than someone with soft water. The age of your water heater can also play a role; older units may have more accumulated sediment and benefit from more frequent flushing. Neglecting this task forces your heater to work overtime, which can damage parts and shorten its life. This ultimately costs you more in energy bills and could lead to needing a range of plumbing solutions.
Why Hard Water Requires More Frequent Draining
So, what exactly is “hard water”? It simply means your water has a high concentration of dissolved minerals, primarily calcium and magnesium. While it’s perfectly safe to drink, these minerals cause problems inside your water heater. When the water is heated, the minerals separate and settle at the bottom of the tank as chalky, gritty sediment. Because we have notoriously hard water in the Metro Detroit area, this buildup happens faster here. You may need to drain your tank every six months to keep it running efficiently. If you’re tired of dealing with sediment, a water softener can be a great long-term solution for your entire home’s plumbing system.
A Word of Caution Before You Start
Okay, so you’re ready to roll up your sleeves and get this done. I love that can-do spirit! Before you grab your hose and bucket, however, let’s talk about a scenario where pressing pause might be the smartest move. While flushing your water heater is a fantastic maintenance task, it comes with a few potential pitfalls, especially if your unit has been neglected for a while. The goal is to prevent a plumbing headache, not create one. Knowing the risks ahead of time can help you decide if this is a job you want to handle yourself or if it’s time to bring in a professional for your plumbing solutions.
Warning: Flushing an Old, Unmaintained Heater
If your water heater is more than a few years old and you can’t remember the last time it was drained—or if it never has been—you need to proceed with caution. Over time, the drain valve at the bottom of the tank can become seized with mineral deposits or rust. Trying to force a stuck valve open can cause it to break off completely, turning a simple maintenance job into an uncontrolled leak. What starts as a proactive step can quickly become a call for emergency plumbing services. If you encounter a valve that won’t budge or you feel at all unsure, the safest bet is to stop and call a professional. It’s much better to have an expert handle a tricky valve than to deal with a flooded basement.
Gather Your Tools: What You’ll Need
Before you roll up your sleeves, let’s get everything in order. Taking a few minutes to gather your tools and review the safety steps will make the whole process much smoother and safer. Think of it as your pre-game huddle. A little preparation now ensures you won’t be scrambling for a towel or second-guessing a step later on. If at any point you feel unsure or run into trouble, remember that our team is always here to help with any plumbing services you might need.
Your Draining Day Toolkit
Having the right gear on hand is half the battle. You probably have most of these items around your home already. Here’s a quick checklist of what you’ll need to drain your water heater effectively:
- A garden hose: Make sure it’s long enough to reach from your water heater’s drain valve to a floor drain or an area outside.
- A bucket: This is great for catching any initial drips when you connect the hose.
- A flathead or Phillips screwdriver: You might need this to open the drain valve, depending on the type you have.
- Old towels: Spills happen, so it’s always smart to have a few towels ready to protect your floors.
- An adjustable wrench (optional): This can be helpful if any fittings are tight.
- A wet/dry vacuum (optional): If you have a lot of stubborn sediment, a shop vac can help pull it out.
Key Safety Steps: Gas, Hot Water, and Pressure
Safety is the most important part of this job. You’re dealing with gas, hot water, and pressure, so it’s crucial to follow these steps carefully.
- Turn off the gas supply. Before you do anything else, locate the thermostat on your gas water heater and turn the dial to the “OFF” or “PILOT” position. This stops the unit from heating the water while you work.
- Shut off the water. Find the cold water supply valve, which is usually located above the water heater, and turn it off. This prevents more water from entering the tank as you drain it.
- Let the water cool. To avoid burns, it’s best to wait a few hours after turning off the gas for the water in the tank to cool down. If you’re ever uncomfortable handling these steps, it’s always safest to call a professional for emergency plumbing assistance.
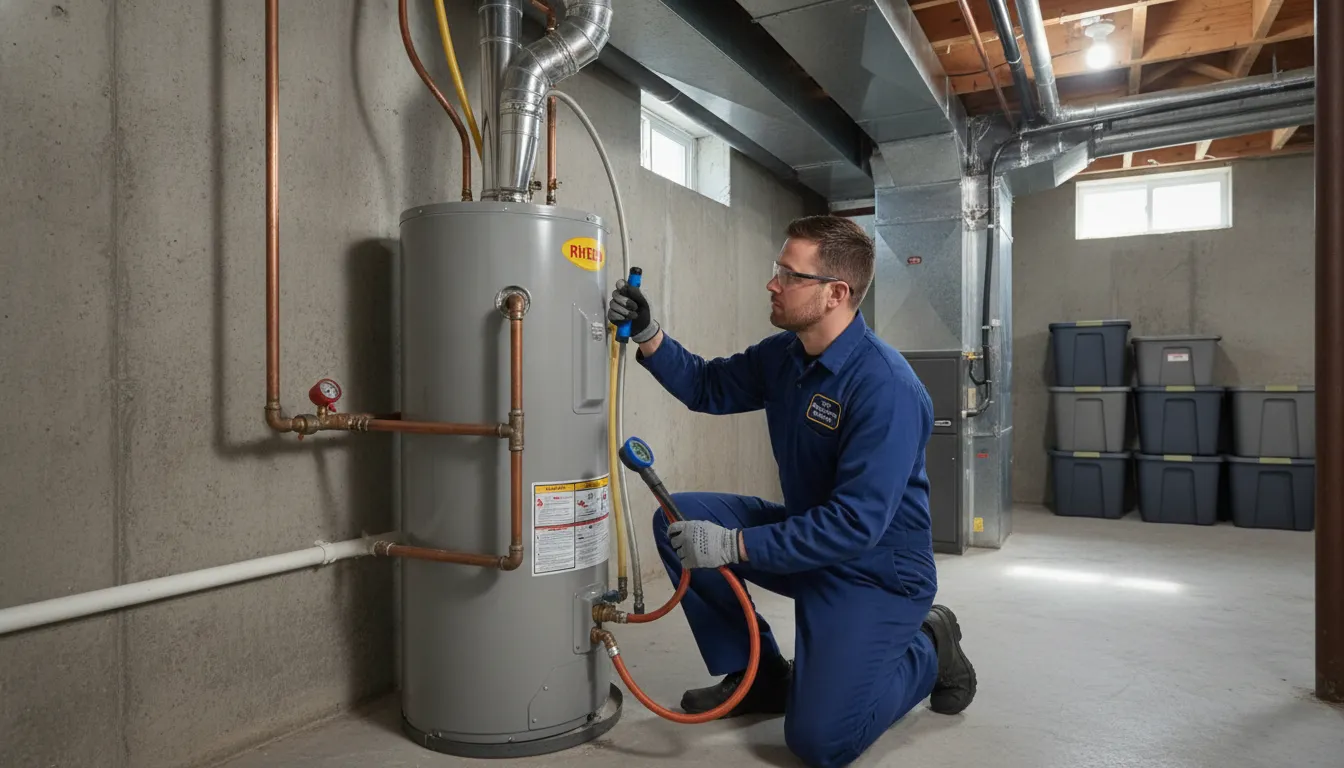
How to Drain Your Water Heater, Step by Step
Ready to tackle this yourself? Great! Draining your water heater is a totally manageable DIY project that can make a huge difference in your home’s hot water supply and energy efficiency. Just follow these steps carefully. Remember, plumbing projects can sometimes have surprises. If you get stuck or just don’t feel comfortable, don’t hesitate to contact our team. We’re always here to help.
Step 1: Turn Off the Power or Gas
First things first: safety. Before you do anything else, you need to turn off the gas supply to your water heater. Look for a dial or switch on the gas control valve, which is usually a small box near the bottom of the tank. Turn the dial to the “OFF” or “PILOT” position. This is a critical step because it prevents the burners from firing up while the tank is empty, which could seriously damage the unit. Double-check that it’s securely in the off position before moving on.
Step 2: Shut Off the Cold Water Supply
Next, you need to stop water from entering the tank while you’re trying to drain it. Find the cold water inlet pipe, which is typically on top of the water heater and might be labeled or have a blue handle. There will be a shut-off valve on this line. Turn the handle clockwise until it stops. This closes the valve and ensures the tank won’t refill itself as it drains. If the valve is a lever style, a quarter turn should do the trick.
Step 3: Let the Water Cool Down (Don’t Skip This!)
The water inside your tank is scalding hot, so you absolutely must let it cool down before draining to avoid serious burns. After turning off the gas, it’s best to wait at least a few hours, or even overnight, to be safe. You can test the water temperature by briefly turning on a hot water tap nearby. Once the water runs cool, you’re ready for the next step. Patience is key here, so please don’t rush this part of the process.
Step 4: Attach a Garden Hose to the Drain Valve
Now it’s time to get ready to drain. Locate the drain valve, which looks like a spigot near the bottom of your water heater. Tightly connect a standard garden hose to this valve. Run the other end of the hose to a safe drainage spot, like a floor drain in your basement, a utility sink, or outside on the lawn away from your foundation. Make sure the hose is positioned downhill so gravity can do the work for you, and ensure there are no kinks that could block the flow.
Alternative Draining Setups
Sometimes, especially with the hard water we have in Metro Detroit, a simple garden hose isn’t enough to get stubborn sediment moving. If the water drains to a trickle but you know the tank is still full, you might need a bit more persuasion. A great trick is to use a wet/dry vacuum at the T&P valve opening to create suction, which can help dislodge packed-in minerals. Another method is to briefly open the cold water supply valve for a few seconds at a time to stir things up inside the tank. If you’ve tried these methods and still have a blockage, the sediment might be too severe for a DIY flush. In that case, it’s wise to call for professional help to avoid damaging the drain valve or the tank itself.
Step 5: Open a Nearby Hot Water Faucet
To help the tank drain faster and more completely, you need to let air in. Go to a sink inside your house, preferably on an upper floor, and turn on the hot water tap. You won’t get much water, but leaving the faucet open breaks the vacuum inside the tank. This allows air to enter as the water exits, preventing a suction effect that can slow or stop the draining process. It’s a simple but important step for a smooth flush.
Tip: Use the T&P Valve to Speed Up Draining
Along with opening a faucet, here’s another pro tip to get things moving faster: use the Temperature and Pressure (T&P) relief valve. This is a safety feature, usually on the side or top of your tank, designed to automatically release pressure if things get too hot. By carefully lifting the lever, you allow more air to enter the tank from the top. This helps break the vacuum that can form inside, letting the water and all that gunky sediment flow out much more freely. A complete drain is what we’re aiming for, because leaving sediment behind just means your heater will keep struggling and wasting energy.
Just be gentle with this valve. On older tanks, they can sometimes be stubborn or fail to reseal properly, leading to a new leak. If the lever feels stuck or you notice it dripping after you close it, don’t force it. A stuck valve or a persistent leak is a clear sign to stop what you’re doing and call in a professional. It’s a simple fix for an expert but can turn into a bigger headache if you’re not careful. When in doubt, our team is always ready to handle any emergency plumbing situations safely and correctly.
Step 6: Open the Valve and Start Flushing
Head back to your water heater. It’s time to open the drain valve where you attached the hose. Some valves have a handle you can turn by hand, while others might require a flathead screwdriver to turn. Open it slowly and carefully. You should hear water begin to flow through the hose. The water will likely look cloudy or have visible bits of sediment, which is exactly what you want to get out. Draining can take anywhere from 20 minutes to an hour, depending on your tank size.
Step 7: Flush Out Stubborn Sediment with Cold Water
Once the tank is empty, you can give it a final flush to dislodge any stubborn sediment. With the drain valve still open, briefly turn the cold water supply back on for a few seconds. This will send a blast of water into the tank, stirring up any gunk left at the bottom. Let that water drain out, and repeat the process a few times. You’ll know you’re done when the water running through the hose looks clear. This extra step really helps clean the tank thoroughly.
Step 8: Close the Valve and Refill the Tank
Now you can start putting everything back together. First, close the drain valve tightly and disconnect your garden hose. Make sure the hot water faucet you opened earlier is still on. Go to the cold water supply valve and turn it back on to begin refilling the tank. You’ll hear water flowing in. Keep an eye on the open faucet inside; once you have a steady, air-free stream of water coming out, the tank is full. You can then turn that faucet off.
Step 9: Restore Power and Restart Your Heater
With a full tank of water, you can safely restore power. Turn the gas control valve from “OFF” back to the “ON” position. Most water heaters have instructions for relighting the pilot printed directly on the tank, so follow those carefully. If you smell gas or feel unsure about this step, it’s always best to call a professional. An improperly lit pilot can be dangerous, and our emergency plumbing team is ready to help ensure it’s done right.
What to Do If the Drain Valve Is Stuck or Leaking
You’re all set to drain your water heater, but when you go to turn the drain valve, it won’t budge. Or worse, it starts dripping everywhere. It’s a frustrating roadblock, but this is a common issue with a few clear solutions, so don’t panic. Most of the time, a stuck valve is simply jammed with the very sediment you’re trying to remove.
If the valve is clogged, you can try a “power flush” to get things moving. With the hose still securely attached and pointed to a safe drainage area, briefly open the cold water supply valve for a few seconds. This quick burst of water pressure can often dislodge the sediment that’s causing the jam. Just be gentle and avoid forcing the valve handle with a tool, as older plastic parts can become brittle and snap.
A leaking valve is another common headache, especially with the factory-installed plastic valves that many heaters have. While tightening it might seem like the answer, the best long-term solution is usually an upgrade. We recommend replacing the standard plastic valve with a full-port brass ball valve. These are far more durable and have a wider opening, which makes future draining much faster and helps prevent clogs by allowing larger pieces of sediment to pass through easily.
Replacing a drain valve requires completely draining the tank and can be a messy job if you’re not prepared. If you’ve tried to clear a clog with no luck, if the leak won’t stop, or if you simply don’t feel comfortable tackling the replacement yourself, it’s the perfect time to call a professional. Our team at Mr. Pipey can handle all your plumbing services, getting your water heater fixed quickly and correctly so you can get back to your day.
Why Draining Your Water Heater Is Non-Negotiable
I get it, draining your water heater sounds like another chore to add to an already long list. But trust me, this is one maintenance task you don’t want to put off. Skipping it can lead to some pretty frustrating and expensive problems down the road. Think of it as a little bit of prevention that saves you from a whole lot of cure. Let’s walk through exactly what you’re avoiding by keeping up with this simple flush.
It Wastes Energy and Costs You Money
That layer of sediment at the bottom of your tank acts like a barrier between the gas burner and the water you’re trying to heat. Because of this, your water heater has to work much harder and burn more fuel just to reach the temperature you’ve set. It’s like trying to cook on a stove with a thick ceramic plate between the flame and your pan; it just isn’t efficient. This extra work directly translates into wasted energy and, you guessed it, higher monthly utility bills. Keeping the tank clean ensures your heater runs efficiently, saving you money over time.
You Risk Leaks and Permanent Tank Damage
All that sediment doesn’t just sit there quietly. As it gets thicker, it can trap water underneath it, causing the bottom of the tank to overheat and corrode. This constant stress can weaken the metal, leading to tiny cracks that eventually turn into full-blown leaks. A leaking water heater is more than just a puddle; it can cause serious water damage to your floors, walls, and belongings. If you ever find yourself facing a sudden leak, it’s a true plumbing crisis. That’s why having a reliable team for emergency plumbing is so important for any homeowner.
The Danger of Extreme Pressure Buildup
Beyond corrosion, that trapped, boiling water creates steam, which dramatically increases the pressure inside the tank. Your water heater has a temperature and pressure (T&P) relief valve designed as a safety measure to release this excess pressure. However, if the valve is old, corroded, or blocked by sediment itself, it might not work when you need it most. An unchecked pressure buildup can lead to catastrophic tank failure. While explosions are extremely rare, the immense pressure can easily cause major leaks or a complete rupture. Ignoring the warning signs can quickly escalate from a simple maintenance task to a crisis requiring emergency plumbing services to manage a flooded basement.
The Hidden Weight of Sediment
It’s easy to think of sediment as just a bit of sand, but over the years, it becomes a dense, heavy layer of solid rock. This accumulation adds a surprising amount of weight to your water heater. I’ve heard stories from plumbers who needed two strong people to haul away a 20-year-old tank that should have been a one-person job, all because it was packed with mineral buildup. This hidden weight puts constant strain on the tank’s structural integrity and even the floor beneath it. It also makes any future repairs or eventual replacement a much more difficult and labor-intensive job, which can add to the final cost of professional plumbing solutions.
It Shortens Your Water Heater’s Lifespan
A water heater is a major home appliance and a significant investment. You want it to last as long as possible, right? Well, the constant overheating and corrosion caused by sediment buildup puts a huge strain on the entire unit. This accelerates wear and tear, drastically shortening its lifespan. Instead of getting a solid 10 to 15 years of service, you might find yourself needing a replacement much sooner. Regularly draining the tank is one of the easiest ways to protect your investment and ensure your water heater serves your family well. It’s a small bit of maintenance that prevents a premature and costly replacement, and it’s just one of the many plumbing services that keep your home running smoothly.
How Sediment Impacts the Average Lifespan
Think of sediment as the number one enemy of your water heater’s longevity. When that mineral layer builds up, it traps heat at the bottom of the tank, forcing the metal to endure temperatures it was never designed for. This constant overheating puts a huge strain on the unit, accelerating wear and tear. Instead of getting the typical 10 to 15 years of reliable service you’d expect, you could be looking at a costly replacement much sooner. Regularly draining the sediment is the single best thing you can do to protect your investment. It’s a simple maintenance step that ensures your heater isn’t working itself into an early grave, saving you from the headache and expense of a premature failure.
More Tips for a Healthy Water Heater
Flushing your water heater is a fantastic step toward keeping it in great shape, but it’s not the only thing you can do. A little extra maintenance goes a long way in extending your heater’s lifespan, improving its efficiency, and preventing surprise breakdowns. Think of it like a car; you don’t just change the oil and call it a day. These additional tips will help you get the most out of your appliance and keep the hot water flowing reliably. By incorporating these simple checks into your routine, you’re not just maintaining a piece of equipment; you’re investing in your home’s comfort and safety. You’re also being proactive about your budget, as preventing a problem is always more cost-effective than fixing a crisis. Most of these tasks are straightforward, but they do require a bit of confidence. If you ever feel unsure, remember that our team is always here to help with any plumbing services you need. We believe in empowering homeowners, but we also know when a professional touch is needed. Taking care of these small jobs now can save you from a major headache and expense later, ensuring you have peace of mind and consistent hot water for years to come.
Check Your Anode Rod Annually
Inside your water heater tank is a hidden hero called the anode rod. This metal rod is designed to corrode so your tank doesn’t. It essentially sacrifices itself by attracting minerals and other corrosive elements in the water that would otherwise eat away at the steel tank lining. Over time, this rod gets completely used up. Inspecting it every two to three years is a smart move. If it’s pencil-thin or covered in calcium, it’s time for a replacement. Swapping out a spent anode rod is a simple, inexpensive fix that can prevent a catastrophic tank leak and add years to your water heater’s life. If you’re not comfortable checking it yourself, you can always contact us to handle it for you.
Choosing the Right Anode Rod Material
When you’re picking a new anode rod, the most important factor is your water. The main options you’ll see are magnesium and aluminum. Magnesium rods are a great default choice for homes with soft water. However, for most of us here in Metro Detroit dealing with hard water, an aluminum rod is usually the better pick because it’s designed to handle a higher mineral content. If you’ve ever noticed a “rotten egg” smell from your hot water, look for a special aluminum/zinc alloy rod; the zinc helps fight the bacteria that cause that unpleasant odor. It might seem like a small detail, but selecting the right material is a simple way to give your water heater the best possible protection from the inside out.
Try a Vinegar Flush for Tough Sediment
If you’ve flushed your tank but still hear some crackling, you might have stubborn sediment clinging to the bottom. For a deeper clean, a vinegar flush can work wonders. After you’ve drained the tank following the steps above, close the drain valve and pour one to two gallons of white vinegar into the tank through the hot water outlet or anode rod port. Then, fill the tank with water and let it sit for a few hours. The vinegar’s acidity helps dissolve the tough mineral scale that a normal flush leaves behind. Afterward, just drain the tank again to flush out the vinegar and dissolved sediment. This is especially effective for homes with hard water.
Set Your Thermostat to a Safe 120°F
Many water heaters come from the factory with the thermostat set to 140°F, but that’s hotter than most households need. The U.S. Department of Energy recommends a setting of 120°F. This temperature is hot enough for all your needs (including dishwashing) while reducing the risk of scalding, which is especially important if you have kids or elderly family members at home. Lowering the temperature also slows mineral buildup and corrosion inside your tank. Plus, for every 10 degrees you lower the temperature, you can save up to 5% on your water heating costs. It’s an easy adjustment that makes your home safer and saves you money.
Regularly Test the Pressure Relief Valve
Your water heater’s temperature and pressure (T&P) relief valve is a critical safety device. It’s designed to automatically open and release pressure if the temperature or pressure inside the tank gets dangerously high. To make sure it’s working, you should test it once a year. Place a bucket under the discharge pipe connected to the valve, then briefly lift the lever. You should hear a gurgling sound and see a burst of hot water come out. Let the lever snap back into place. If it drips afterward or doesn’t release any water at all, the valve needs to be replaced immediately. A faulty T&P valve is a serious safety hazard, so don’t hesitate to call for emergency plumbing if you suspect a problem.
How to Prevent Future Sediment Buildup
While flushing your water heater is an essential maintenance task, the best long-term strategy is to stop sediment from forming in the first place. Think of it as treating the cause, not just the symptom. By improving the quality of the water entering your tank, you can dramatically slow down mineral accumulation. This not only makes your annual flushes easier but also provides better protection for all your plumbing fixtures and appliances. Taking a proactive approach saves you time, reduces wear and tear on your system, and ensures your water heater operates at peak efficiency for years to come. It’s a smart investment in the health of your home’s entire plumbing system.
Test Your Water Quality
The first step in prevention is understanding what you’re working with. The water that flows into your home isn’t perfectly pure; it contains dissolved minerals like calcium and magnesium. When that water sits inside your heater and gets warmed up, these minerals separate from the water and sink to the bottom of the tank. Since Metro Detroit is known for its hard water, our homes are particularly susceptible. You can get a clear picture of your water’s hardness by using an inexpensive DIY test kit from a local hardware store. Knowing your specific mineral content helps you decide on the right solution. If you’d rather have an expert opinion, you can always get a professional assessment to understand your water quality and its impact on your plumbing.
Consider a Water Filtration System
The most effective way to stop sediment is to prevent it from ever reaching your water heater. The best approach is to clean the water before it even enters your home’s plumbing. A whole-house water filter does exactly that. This type of system is installed at your main water line, capturing sediment and other impurities before they can travel through your pipes and settle in your appliances. While it’s a bigger upfront investment, a whole-house filter helps protect your entire plumbing system, from your dishwasher and washing machine to your faucets and showerheads, extending their lifespan and improving their performance.
A Note on Water Softeners
Many homeowners with hard water consider a water softener, which is another excellent solution. Softeners work by using a process called ion exchange to remove “hard” minerals like calcium and magnesium. This drastically reduces the amount of material available to form sediment in your tank. However, it’s important to have realistic expectations. As many plumbers will tell you, having soft water helps reduce sediment, but it doesn’t mean you can skip draining the tank forever. A water softener is a fantastic tool for prevention, but it’s still a good idea to perform an annual flush to clear out any minor accumulation and keep your heater in top condition.
When to Call a Plumbing Pro
Tackling home maintenance projects yourself can be incredibly rewarding. But sometimes, a seemingly straightforward task can turn into a major headache. Draining your water heater is usually manageable, but there are definitely times when it’s smarter to put down the wrench and pick up the phone. If you find yourself feeling unsure or run into a problem you can’t solve, don’t hesitate to call for backup. A professional has the right tools and experience to get the job done quickly and safely, saving you from potential frustration and costly mistakes.
Here are a few situations where calling in an expert is your best bet:
-
The Sediment Is Stubborn: If you’ve followed all the steps and only a trickle of water is coming out, you might be dealing with a serious clog of hardened sediment at the drain valve. Forcing it can damage the valve or the tank. A professional can use specialized tools to break up the blockage or determine if the buildup is so severe that you might need a new water heater.
-
Your Water Heater Is Old: If your water heater is getting up there in years (around 8 to 12 years old) and is making a lot of noise, the sediment might be a symptom of a bigger problem. A plumber can assess the tank’s overall health and help you decide if a repair makes sense or if investing in a new, more efficient unit is the more cost-effective choice.
-
You Notice Leaks or Damaged Parts: During the process, you might spot a leaking drain valve, a corroded pipe, or a pressure relief valve that’s not working correctly. These aren’t issues to ignore. A licensed plumber can safely handle any emergency plumbing repairs and ensure your system is secure.
-
You Want a Long-Term Solution: If you live in an area with hard water, sediment buildup will be a recurring issue. A professional can do more than just flush your tank; they can offer lasting solutions. We can talk to you about installing a water softener to protect not just your water heater but all your pipes and appliances from mineral damage. If you’re ready for an expert opinion, feel free to contact our team. We’re always happy to help.
Related Articles
- When to Call a Plumber for Water Heater Repair
- How to DIY a Tankless Water Heater Installation
- How to Repair an Instant Water Heater: A DIY Guide
- 6 Signs You Need Water Heater Repair Now
Frequently Asked Questions
My water heater is electric, not gas. Are the steps different? Yes, there is one very important difference. Instead of turning off a gas valve, you need to turn off the electricity to the water heater at your home’s circuit breaker box. This is a critical safety step to prevent the heating elements from burning out in an empty tank, a problem known as “dry firing.” After you shut off the power at the breaker, the rest of the steps for draining and refilling the tank are the same.
I opened the drain valve, but only a little water is trickling out. What should I do? This is a very common problem, and it usually means a chunk of sediment is blocking the drain valve opening. You can try to dislodge it by briefly turning the cold water supply back on for a few seconds. This blast of pressure can often break up the clog. If that doesn’t work, avoid forcing the valve handle, as it could break. A stubborn clog is a clear sign that it’s time to call a professional for help.
How long does this whole process take from start to finish? You should set aside a good portion of your day for this project. The most time-consuming part is waiting for the water in the tank to cool down, which can take several hours. The actual draining process usually takes between 20 and 60 minutes, depending on your tank size. Refilling and reheating the water will take another hour or two. It’s best to plan on starting in the morning so you have hot water again by the evening.
Will flushing the tank get rid of the rotten egg smell from my hot water? It can certainly help. That unpleasant smell is often caused by bacteria that thrive in the sediment at the bottom of the tank. Flushing out that sediment removes their habitat. However, if the smell persists after a thorough flush, the issue might be with the anode rod. In that case, the rod may need to be inspected and possibly replaced to solve the problem for good.
Is it possible to damage my water heater by draining it myself? Yes, it is possible if you miss a key safety step. The most common mistake is forgetting to turn off the gas or electricity before draining the tank. This can cause the heating elements or burner to fire in an empty tank, which can cause serious damage. Another risk is breaking an old, brittle plastic drain valve. If you follow the instructions carefully and call a professional when you encounter a problem you can’t solve, you can avoid these issues.