Dealing with a sewage spill in your yard is stressful, but it’s more than just a gross mess—it’s a serious health hazard. Raw sewage is teeming with dangerous bacteria and viruses that can make your family sick. That’s why your first priority isn’t cleaning; it’s safety. This guide will show you exactly how to clean a sewage spill outdoors the right way. We’ll cover the non-negotiable protective gear you need, how to secure the area from kids and pets, and the critical mistakes to avoid. Following these steps carefully helps you manage the situation and protect everyone’s health.
Key Takeaways
- Make Safety Your First Step: Before you do anything else, put on protective gear like waterproof gloves and boots. Then, create a clear barrier to keep children and pets safely away from the contaminated zone.
- Use a Systematic Cleaning Method: Contain the spill using absorbent materials like sand or kitty litter to stop it from spreading. After removing solids, use garden lime to neutralize odors and a bleach solution to thoroughly disinfect the entire area.
- Don’t Hesitate to Call a Professional: A DIY approach isn’t right for every situation. If a spill is large, a recurring issue, or poses a health risk, calling a professional is the safest choice to fix the underlying problem for good.
First Things First: Your Safety Checklist
Before you grab a shovel or a hose, let’s pause and talk about safety. A sewage spill isn’t just a mess; it’s a biohazard. Rushing into cleanup without the right precautions can put your health at serious risk. Think of this as your pre-cleanup mission briefing. We’ll cover the essential gear you need, how to protect your loved ones, and the critical mistakes to avoid so you can handle this situation safely and effectively.
Shut Off Utilities to Prevent Electrocution or Explosion
Before you even think about cleanup, you must address the invisible dangers of electrocution or an explosion. Water from a sewage spill mixing with your home’s electrical or gas systems is a recipe for disaster, making this your most critical safety step. If the spill has reached any electrical outlets, call your utility company to shut off the power immediately—do not touch the breaker box yourself. The American Red Cross stresses using extreme caution around standing water and electricity. Similarly, be aware that the strong sewage odor can mask a gas leak. If you smell gas, evacuate the house and call the gas company from a safe distance. Don’t create any sparks. Remember, a sewage backup often points to a bigger problem, and calling a professional for emergency plumbing is the safest way to fix the root cause.
Gear Up with Protective Equipment
This is not the time to worry about a little dirt. Raw sewage is full of harmful bacteria and viruses, so gearing up is non-negotiable. At a minimum, you need waterproof gloves and rubber boots to protect your skin from direct contact. I also recommend wearing safety goggles to shield your eyes from splashes and a respiratory mask to prevent inhaling airborne contaminants. Any clothes you wear during cleanup should be considered contaminated and washed separately in hot water with disinfectant. Protecting yourself is the first and most important step in managing any emergency plumbing situation.
Keep Kids and Pets Safely Away
Your yard might be a playground on a normal day, but a sewage spill turns it into a hazardous zone. It’s critical to keep children and pets far away from the contaminated area until the cleanup is completely finished and disinfected. Their immune systems are more vulnerable, and they won’t understand the danger of playing in or near the spill. Use temporary fencing, rope, or even lawn furniture to create a clear barrier. The safest bet is to keep them inside until you are absolutely certain the area is clean and safe for them again.
Understand the Health Risks of Sewage Exposure
It’s easy to focus on the smell and the mess, but the biggest threat from a sewage spill is invisible. Raw sewage is a cocktail of dangerous pathogens, including harmful bacteria, viruses, and parasites that can cause serious illness. Direct contact with contaminated water or soil, or even inhaling airborne particles, can lead to infection. This is why we stress the importance of protective gear and keeping a safe distance. Understanding these health risks isn’t about causing panic; it’s about empowering you to handle the situation with the seriousness it deserves. Protecting your family’s health is the number one priority, and that starts with knowing exactly what you’re up against before you begin the cleanup process.
Common Symptoms to Watch For
If you or a family member has been near the spill, it’s important to be aware of the signs of sewage-related illness. These symptoms can show up after exposure and are your body’s way of signaling an infection. Keep an eye out for issues like diarrhea, fever, stomach cramps, nausea, and vomiting. Other signs can include headaches, general weakness, or a sudden loss of appetite. These aren’t just signs of a simple bug; they can indicate more serious waterborne illnesses caused by the contaminants. If anyone in your home starts feeling unwell after a spill, don’t wait it out. It’s best to seek medical attention right away and let your doctor know about the potential exposure.
Avoid These Common Safety Mistakes
Two major mistakes can turn a bad situation into a dangerous one. First, never assume the water is safe just because it looks clear. Sewage water is contaminated even if you can’t see solids, and lingering moisture can lead to hidden mold growth that affects air quality. Second, and most importantly, be aware of electrical hazards. If standing water is near any outdoor electrical outlets, extension cords, or appliances, you have a serious risk of electrocution. Shut off the power to the affected area at the breaker box before you do anything. If you’re unsure how to do this safely, it’s time to call a professional for emergency plumbing help.
How to Contain the Sewage Spill
Once you’ve secured the area and have your safety gear on, your next priority is damage control. The goal is to stop the spill from spreading and getting worse. This involves finding the source, soaking up the excess liquid, and creating a clear boundary. Acting quickly here can make the cleanup process much more manageable and prevent further contamination of your yard. Let’s walk through the three key steps to get the situation under control.
Stop the Flow at the Source
First things first, you need to figure out where the sewage is coming from. A spill is usually a symptom of a bigger problem, like a broken sewer line, a clogged pipe, or a septic tank failure. If you can safely identify the source, you might be able to stop the flow. For a broken pipe, shutting off your home’s main water supply can provide a temporary fix. However, if the cause isn’t immediately obvious or seems too complex to handle, it’s time to call for backup. This is often the point where professional help is necessary to prevent more damage. A quick response from an emergency plumbing team can make all the difference.
Soak It Up with Absorbent Materials
With the source managed, your next move is to keep the spill from spreading across your lawn. You can do this by using absorbent materials to soak up the liquid and create a barrier. You probably have some of these items at home already. Things like kitty litter, sand, sawdust, or even wood pellets work well. Sprinkle a generous amount of your chosen material around the edges of the spill to form a dam. This will absorb the sewage and stop it from reaching clean areas, storm drains, or nearby water sources. This simple step contains the mess, making the next phase of cleanup much easier.
Build a Barrier to Stop the Spread
Now that you’ve contained the liquid, it’s essential to create a clear physical boundary around the entire contaminated zone. This isn’t just about keeping the mess in one place; it’s about keeping people and pets out. Sewage contains harmful bacteria and pathogens that can cause serious illness. Use rope, stakes, caution tape, or even lawn chairs to block off the area. Make sure the barrier is visible and clearly marks the entire spill zone. This step is non-negotiable for safety, especially if you have curious kids or pets who play in the yard. The area should remain off-limits until the cleanup and disinfection process is complete.
Properly Remove Liquid Waste
After you’ve stopped the spill from spreading, you need to deal with the liquid waste itself. Managing this part correctly is essential to prevent further contamination and health risks. There is one absolute rule you must follow: never let sewage water go into storm drains. It might seem like a quick way to get rid of the mess, but it creates a much bigger problem by polluting natural water sources and causing significant environmental damage. Instead, your goal should be to use the right methods to contain the liquid and prepare it for safe, proper disposal.
Never Use Storm Drains for Disposal
I can’t say this enough: sending sewage into a storm drain is a critical error. Raw sewage is a biohazard, full of harmful germs like bacteria and viruses that can make people, pets, and wildlife sick. Here in Metro Detroit, most storm drains lead directly to our rivers and lakes. Flushing sewage into them is like dumping it directly into our community’s water supply. This is why you must contain the spill with absorbent materials to stop it from spreading. When it comes to final disposal, you have to follow local regulations. If you’re facing a large spill, the safest move is to call for emergency plumbing services. A professional team knows exactly how to remove and dispose of hazardous waste safely, protecting both your family and the environment.
How to Clean the Sewage Spill Area
With the spill contained, it’s time to clean up. This is where you’ll remove the contamination and disinfect the area to make it safe again. Keep your protective gear on throughout this entire process. We’ll break it down into three steps: removing solids, treating with garden lime, and disinfecting. Following these steps carefully will help restore your yard. If the job feels too big, remember that professional help is always an option.
Understand the Cleanup Timeline and Mold Risk
It’s important to have a realistic idea of the cleanup timeline. How long it takes to make your yard safe again depends on the size of the spill and how quickly you act. A small, contained spill that you address immediately might only take a day or two to clean and dry. However, if the sewage has been sitting for a while or has soaked into porous surfaces like wood decking or the soil near your foundation, the process can be much longer. The biggest risk with any delay is mold growth. Lingering moisture creates the perfect environment for mold, which can pose its own set of health risks. Quick action is your best defense to resolve the contamination before it leads to a more complicated and lengthy cleanup project.
Always Clean Surfaces Before Disinfecting
This is a critical step that many people miss: you must clean before you disinfect. Disinfectants like bleach can’t work effectively if they have to get through a layer of dirt and grime first. Think of it like trying to mop a floor before you sweep—you’ll just be pushing the mess around. Start by physically removing any remaining solid waste. Then, thoroughly scrub any hard surfaces like patios, walkways, or siding that came into contact with the sewage. Use hot water and a strong soap or detergent to wash all surfaces completely. Once everything is visibly clean and rinsed, you can move on to the disinfection stage, where you’ll kill the harmful bacteria left behind.
Clear Away Solids and Debris
First, you need to clear away any solid waste. Use a sturdy shovel or rake to scoop up the solids and place them directly into heavy-duty contractor trash bags. Don’t use flimsy bags here; you need something thick that won’t rip. Once a bag is about half-full, tie it securely and then place it inside a second bag. This double-bagging method is a simple but crucial step to prevent leaks. Set the sealed bags aside in a secure spot for proper disposal later. This initial removal is messy but essential for the next stages of cleaning.
Neutralize Odors with Garden Lime
With the solids gone, your next step is to use garden lime, which you can find at most garden supply stores. Garden lime is great because it helps neutralize odors and dries up the remaining liquid waste, making it easier to handle. Generously sprinkle the lime over the entire affected area until it’s completely white. If you’re dealing with thicker patches, gently mix the lime in with your shovel. Let it sit and work its magic for a full 24 hours. Afterward, the dried mixture can be shoveled into double-bagged trash bags for disposal.
Scrub and Disinfect with a Bleach Solution
The final step is to thoroughly disinfect the area to kill any lingering germs. A simple DIY solution works well here. Mix one cup of household bleach with one gallon of water in a bucket or garden sprayer. Carefully apply the bleach solution to all surfaces that came into contact with the sewage. Let the solution sit for at least 30 minutes to give it enough time to eliminate harmful bacteria. After 30 minutes, lightly rinse the area with a garden hose. For persistent issues or large-scale contamination, our emergency plumbing team can ensure the area is professionally sanitized.
Handling Contaminated Items and Structures
After you’ve cleaned the initial spill, the next step is sorting through what the sewage touched. This can be the hardest part, as it often involves personal belongings and parts of your home. The most important rule to follow is: when in doubt, throw it out. Sewage water contains dangerous contaminants that can soak deep into porous materials, making them impossible to fully sanitize. Trying to save an item that should be discarded can lead to lingering bacteria and mold, posing a long-term health risk to your family. In this section, we’ll go through exactly what needs to be tossed and what can be salvaged. If the damage to your home’s structure, like floors and walls, seems extensive, it’s always best to get a professional opinion. A major backup often points to a serious underlying issue that requires emergency plumbing expertise to resolve correctly.
What to Discard: Porous Materials
Some items are simply not salvageable after contact with raw sewage, and it’s crucial to know what they are. Porous materials act like sponges, absorbing contaminated water deep into their fibers. No amount of surface cleaning can reliably remove the bacteria, viruses, and mold spores trapped inside. This category includes things like carpeting, drywall, mattresses, and upholstered furniture. While it’s tough to throw away personal belongings, your family’s health has to be the priority. Attempting to clean these items creates a false sense of security and can lead to persistent odors and serious health issues down the road. It’s better to accept the loss and focus on creating a safe, clean environment again.
Wall-to-Wall Carpeting, Drywall, and Insulation
There’s no way to sugarcoat this: any wall-to-wall carpet, along with its padding, that has been touched by sewage must be removed and thrown out. It cannot be professionally cleaned or saved. The same rule applies to soaked drywall and insulation. These materials hold moisture and contaminants, creating a perfect breeding ground for mold that can compromise your home’s air quality and structural integrity. After removing the damaged sections, the area underneath needs to be thoroughly dried and disinfected before any repairs can begin. Replacing drywall and insulation is a significant job, and it’s important to ensure it’s done right to prevent future problems. If you need help assessing the damage, our team can identify the source of the problem and recommend the best course of action for all your plumbing needs.
Upholstered Furniture, Mattresses, and Soft Toys
Just like carpeting, soft, absorbent items are impossible to fully decontaminate. This includes upholstered furniture like couches and armchairs, mattresses, pillows, and even your kids’ favorite stuffed animals. The contaminated water soaks deep into the foam, stuffing, and fabric, and surface cleaning won’t reach the pathogens hidden inside. It’s heartbreaking to part with these items, especially those with sentimental value, but keeping them poses a real health risk. Bacteria can multiply within the material, leading to constant exposure for anyone who uses them. For the safety of your household, these items must be discarded and replaced.
What Can Be Salvaged and How
Now for some good news. Not everything is a lost cause! Many items made from hard, non-porous materials can be safely cleaned and disinfected. This includes things like solid wood furniture, hard plastic toys, and some types of clothing. The key is to use the right cleaning methods and to be thorough. Unlike porous materials, these items don’t absorb contaminants deep within, so a proper cleaning and disinfection process can effectively remove any harmful bacteria from the surface. It will take some work, but you can save many of your belongings with careful attention to detail. Let’s look at the specific techniques for salvaging clothes and wooden items.
Washing Contaminated Clothing in Hot Water
If clothing or other machine-washable fabrics came into contact with small amounts of sewage, you can often save them with a proper wash. First, be sure to handle them with gloves and keep them separate from any uncontaminated laundry to prevent cross-contamination. Wash them in a hot water cycle, aiming for a temperature of at least 140°F (60°C), as the heat is essential for killing bacteria. Use your regular laundry detergent along with a disinfectant, like pine oil or a phenolic disinfectant, which you can find in the laundry aisle. For delicate items that can’t handle a hot wash, taking them to a professional dry cleaner is another safe option.
Cleaning and Misting Wooden Structures
Solid wood items, like furniture legs or hardwood floors, can often be saved, but you have to be careful not to cause more damage. Wood is semi-porous, so you should never soak it with water or cleaning solutions, as this can cause it to warp, swell, and crack. Instead, the best method is to mist the surface. Fill a spray bottle with your disinfectant solution and lightly mist the entire contaminated area. Let it sit for a few minutes, then wipe it clean. Repeat this process a few times to ensure the disinfectant has time to work without oversaturating the wood. This kind of water damage can sometimes be a sign of other issues, like a burst pipe from cold weather, so it’s wise to check for related problems with your pipe insulation.
Dealing with Contaminated Food
When it comes to food, there is absolutely no room for error after a sewage backup. Foodborne illness is a serious risk, and you must be extremely cautious when deciding what to keep and what to throw away. Even if food looks and smells fine, it could be harboring dangerous bacteria from the floodwater. The rule is simple: if any food has come into contact with sewage—or even if you suspect it has—it’s almost always best to discard it. In the next few sections, we’ll cover the specific guidelines for food in your fridge and pantry, so you can make safe and confident decisions for your family.
Food Safety in Refrigerators and Freezers After Power Loss
If your sewage backup was accompanied by a power outage, you need to check the food in your refrigerator and freezer. Perishable items like meat, poultry, fish, eggs, and dairy are unsafe if they have been at a temperature above 40°F for two hours or more. A good indicator is the internal temperature of the appliance; if it’s warmer than 45°F, you should start discarding items. Throw away any food that has an unusual color, odor, or texture. Remember the most important food safety rule: when in doubt, throw it out. It’s not worth risking your health over a few dollars worth of groceries.
How to Safely Sanitize Undamaged Canned Goods
Commercially canned goods are one of the few food items that can be salvaged after exposure to contaminated water, but only if the can is completely undamaged. Inspect each can carefully for any signs of swelling, leakage, punctures, or deep rust. If the can is intact, you can sanitize it. First, remove the paper label, as it can harbor germs. Then, wash the can thoroughly with soap and hot water. Finally, disinfect it by completely submerging the can for 15 minutes in a solution of one ounce (two tablespoons) of household bleach per gallon of water. Let the cans air dry completely before storing.
What Packaged Foods to Throw Away
Unfortunately, most packaged foods must be thrown away if they’ve come into contact with sewage water. This includes anything in cardboard, paper, or foil packaging, such as cereal boxes, flour bags, and pasta boxes. You should also discard any items with screw caps, snap lids, or pull tops, like milk cartons, bottled drinks, and jars of sauce. These types of containers are not waterproof, and contaminated water can easily seep inside through the seals and closures. It’s impossible to know if the contents are safe, so the only way to protect your family is to discard these items without hesitation.
What to Do About Contaminated Soil
Once you’ve cleaned the surface, it’s time to address the soil itself. Sewage can soak into the ground, leaving behind harmful germs and chemicals that pose a risk to your family, pets, and garden. Treating the soil properly is a critical step to make sure your yard is truly clean and safe again. The approach you take will depend on how much sewage was spilled and how deeply it soaked in. For small, manageable spills, a few simple steps can do the trick. But for larger, more saturated areas, you might need to take more drastic measures to eliminate the contamination completely.
First, Assess the Level of Contamination
Before you start any treatment, it’s crucial to assess the situation. A sewage spill doesn’t just make a mess; it introduces harmful bacteria, viruses, and other germs into your soil that can pose a serious health risk. Take a close look at the affected area to determine the extent of the contamination. Is it a small, shallow puddle, or did a large volume of sewage soak deep into the ground? Knowing the severity will guide your next steps. A light spill might only need surface-level treatment, while a heavy one will require a much more thorough approach to make sure your yard is safe for your family and pets again.
How to Treat Minor Soil Spills
If you’re dealing with a minor spill that hasn’t soaked too deeply, you can often manage the cleanup on your own. First, gently rake the surface of the soil to break it up. This aeration helps sunlight and air get in to start the natural cleaning process. Next, sprinkle a generous layer of agricultural lime over the entire area. Lime is fantastic for neutralizing nasty odors and killing off lingering germs. Let the lime sit for a full 24 hours to do its job, then carefully shovel the mixture into heavy-duty trash bags for proper disposal. This method is a great first line of defense for smaller incidents.
For Heavy Spills: Remove and Replace the Soil
For more severe spills, just treating the surface isn’t going to cut it. To truly eliminate the hazard, you’ll need to physically remove the contaminated soil. This typically involves digging up the top two to three inches of soil across the entire affected area. It’s a tough job that requires careful handling to avoid spreading the contamination further. Once you’ve removed the compromised soil, you can fill the area with fresh, clean topsoil. If the spill is large, deep, or you feel overwhelmed by the task, it’s wise to call for professional emergency plumbing assistance to ensure it’s handled safely and correctly.
Let Sunlight and Time Do the Work
After you’ve treated or replaced the contaminated soil, let nature lend a helping hand in the final stages of cleanup. Sunlight is a powerful natural sterilizer, and exposing the treated area to direct sun will help kill off any remaining pathogens. This isn’t an instant fix, so patience is key. It can take a few months for the soil’s ecosystem to fully recover and for harmful bacteria to die off completely. During this recovery period, it’s a good idea to keep children and pets from playing in that part of the yard. This final, natural step helps ensure your outdoor space is truly safe and healthy again.
What Cleaning Solutions Should You Use?
When you’re dealing with a sewage spill, having the right cleaning supplies makes all the difference. You don’t need fancy equipment, just a few effective solutions to disinfect the area and get rid of odors. These simple, go-to recipes can handle most outdoor spills. For manageable situations, these three solutions are your best friends for getting your yard back to normal safely. However, if you’re feeling overwhelmed or the spill is just too big, it’s always best to call for emergency plumbing services.
The Right Bleach-to-Water Ratio
A simple bleach solution is one of the most effective ways to disinfect an area after a sewage spill. It’s a straightforward recipe that packs a punch against harmful bacteria. Just mix one cup of household bleach with one gallon of water and carefully apply it to the affected surfaces. The most important part is patience. Let the solution sit for at least 30 minutes to give it enough time to kill any lingering pathogens. After the half-hour is up, you can give the area a light rinse with clean water. This simple step ensures the space is properly sanitized.
Alternative Disinfecting Solutions
If you don’t have bleach on hand or simply prefer another option, you’re not out of luck. Other common household cleaners can be just as effective at killing germs after a sewage spill. You can create a powerful disinfectant by mixing two and a half tablespoons of a product like Lysol or Pine-Sol into one gallon of water. Apply this solution to the affected area and let it sit for a while to ensure it has time to work. While these DIY methods are great for manageable spills, extensive contamination can be tricky. If the job feels too big, calling for emergency plumbing services is the safest way to guarantee your yard is completely sanitized and safe for your family.
Garden Lime to Neutralize Odors and Germs
Sewage spills leave behind unpleasant odors and a breeding ground for germs. This is where garden lime comes in. You can find it at most home and garden stores, and it’s great for neutralizing both smells and bacteria. Sprinkle a generous layer of lime over the contaminated area until it looks white. If you’re dealing with thicker sludge, work the lime into it. Let it sit for a full 24 hours, then shovel the mixture into heavy-duty trash bags. A final rinse and a day of sunshine will help kill off any remaining germs.
For Hard Surfaces: Use Hot Water and Soap
Hard surfaces like concrete patios or wood decks require a two-step cleaning process. Start by scrubbing everything down with hot water and a mild soap, like your everyday dish soap. This initial wash removes the grime and physical waste. Once you’ve cleaned the surfaces, it’s time to disinfect. Mix one tablespoon of liquid household bleach into a gallon of water and use this solution to rinse everything you just washed. This final rinse ensures that any invisible contaminants are eliminated, leaving your outdoor surfaces clean and safe to use again.
Critical Safety Warning: Never Mix Bleach and Ammonia
When you’re in cleanup mode, it’s easy to think that more cleaning power is better, but there’s one combination you must avoid at all costs: never mix bleach and ammonia. I can’t stress this enough. Mixing these two common household cleaners creates toxic chloramine vapors, a dangerous gas that can cause serious respiratory damage, chest pain, and nausea. As safety experts at STOP Restoration warn, this mixture creates dangerous fumes that pose a significant health risk. Your safety is the absolute top priority during any cleanup. It’s also vital to remember that, according to local safety guidelines, sewage water is contaminated even if it looks clear. Sticking to a single, approved disinfectant like a proper bleach-and-water solution is the only safe way to handle the job.
How to Dispose of Sewage Waste Safely
Once you’ve contained the spill and cleaned the area, you’re left with the cleanup aftermath: contaminated materials and dirty tools. Handling this waste correctly is non-negotiable for protecting your family’s health and the local environment. It’s not just about bagging it up and tossing it; there are specific steps to ensure everything is disposed of safely and responsibly. Think of this as the final, crucial step to closing the chapter on this messy problem. If you’re ever unsure about local regulations or how to handle contaminated materials, a quick call for professional advice can prevent bigger issues down the road. For complex situations, our emergency plumbing team is always ready to help manage the entire process, including proper disposal.
Bag and Dispose of Contaminated Materials
First things first, let’s get the solid waste out of there. Carefully use a shovel or rake to pick up any solids and place them directly into heavy-duty trash bags. Don’t skimp on quality here; you need bags that can handle the weight and won’t rip easily. To be extra safe and prevent any nasty leaks, always double-bag the waste. Seal the bags tightly before moving them to a secure spot away from kids and pets while you figure out the next steps for disposal. This simple but critical step contains the contaminants and makes the final disposal process much smoother and safer for everyone involved.
Don’t Forget to Sanitize Your Tools
Every tool that came into contact with the sewage needs a thorough cleaning. Shovels, rakes, buckets, and even the boots you wore should be disinfected to kill any lingering bacteria and pathogens. A simple and effective way to do this is with a bleach solution (about one cup of bleach per gallon of water). Let the tools soak for a few minutes or scrub them down completely, then rinse with clean water and allow them to air dry in the sun. This prevents cross-contamination and ensures your tools are safe to use for your next garden project.
Disinfecting with a Bleach Solution
To properly disinfect your tools, a simple bleach solution is your best bet. Mix one cup of household bleach with one gallon of water in a bucket. For smaller items, you can submerge them directly. For larger tools like shovels and rakes, use a cloth to wipe them down thoroughly with the solution. The most important step is to let the bleach sit for at least 30 minutes; this contact time is what kills the harmful bacteria. After waiting, rinse everything with clean water and let it air dry, preferably in the sun. This level of sanitation is crucial, which is why professional emergency plumbing teams always finish a job by meticulously disinfecting all equipment to guarantee the site is completely safe.
Always Check Local Disposal Regulations
Before you haul those sealed bags to the curb, take a moment to check your local regulations. You can’t always treat sewage waste like regular household trash. Different municipalities have specific rules for disposing of biohazardous materials. A quick call to your local waste management authority or public works department will give you the clear instructions you need. Following these guidelines is essential for protecting public health and our local waterways. If you’re feeling overwhelmed or just want to be certain it’s done right, feel free to contact us. We can offer guidance or take care of it for you.
Practice Proper Personal Hygiene After Cleanup
You’ve bagged the waste and sanitized your tools, but the job isn’t quite finished. The final, and arguably most important, step is cleaning yourself. Even if you wore protective gear, it’s easy to come into contact with contaminants without realizing it. Think of this as your personal decontamination phase. Raw sewage is teeming with invisible germs that can cause serious illness, and this last step is your final line of defense. Before you relax, take the time to thoroughly wash away any potential hazards to protect your health and prevent spreading bacteria inside your home.
Thoroughly Wash Hands, Skin, and Under Fingernails
Start by washing your hands and any exposed skin with plenty of soap and warm water. Don’t just give them a quick rinse; scrub for at least 20 seconds. Use a nail brush to get under your fingernails, a common hiding spot for germs. It’s also a good idea to cover any cuts or scrapes before you start cleaning and wash them thoroughly afterward. Once you’ve finished the entire cleanup, the best practice is to head straight for the shower. Wash your hair and body completely, and put your contaminated clothes directly into the washing machine on a hot cycle, separate from other laundry. It’s a step our own emergency plumbing experts never skip to ensure everyone stays safe.
What to Watch For After the Cleanup
You’ve tackled the mess, and your yard is starting to look like itself again. That’s a huge relief. But the cleanup process doesn’t end when the last bit of waste is gone. Monitoring the area afterward is just as important for ensuring your family’s health and safety. Here’s what you need to watch for in the days, weeks, and months ahead.
Signs of an Incomplete Cleanup Job
Just because the area looks clean doesn’t mean it’s free of contaminants. One of the biggest mistakes is assuming that clear water is safe water. Harmful bacteria can linger long after the visible mess is gone, and leftover moisture can lead to hidden mold, which may cause respiratory issues. Keep an eye out for persistent damp spots or any musty odors, as these are red flags. If you notice any of these signs or suspect the cleanup wasn’t thorough enough, it might be time to call for emergency plumbing services. A lingering issue could point to a bigger problem that requires an expert eye.
When Is It Safe to Use the Area Again?
If the sewage spill happened in your garden, you’ll need to be patient before planting again, especially if you grow your own food. To be safe, you should not grow any edible crops in the affected soil for at least 12 months. This waiting period gives the soil enough time to naturally break down harmful pathogens, ensuring your future fruits and vegetables are safe to eat. For lawns or flower beds, the risk is lower, but it’s still wise to wait several months and ensure the area is completely dry and odor-free before you start reseeding or planting new ornamentals.
Perform Long-Term Monitoring
Even after a thorough cleaning, it takes time for the environment to fully recover. Most germs from human waste need about three to six months to die off completely. During this period, it’s a good idea to limit activity in the affected area, especially for children and pets. Watch for any changes in the soil or grass, and pay attention to your plumbing system. If you hear gurgling drains or notice slow flushing toilets, the original problem might not be fully resolved. Scheduling a professional inspection can give you peace of mind and help prevent another spill down the road.
When Should You Call a Professional?
While you can handle a minor sewage spill with the right steps and safety gear, some situations are simply too big, too risky, or too persistent for a DIY approach. Knowing when to step back and call for help is the most important part of managing a sewage backup safely. If you’re facing a massive mess, have any health and safety worries, or if this isn’t the first time you’ve dealt with a spill, it’s time to bring in a professional.
A licensed plumber doesn’t just clean up the spill; they find and fix the source of the problem. This prevents future backups and gives you peace of mind that your home and yard are truly safe. At Mr. Pipey, we handle these tough jobs with the right equipment and expertise, ensuring the cleanup is thorough and the underlying issue is resolved for good. When in doubt, always choose the safer option and give our team a call for emergency plumbing support.
The Spill Is Too Large to Handle
Size and location are the first indicators that you need professional help. Restoration experts agree that if a sewage spill covers an area larger than 10 square feet, it’s beyond a simple DIY cleanup. The volume of contaminated material is just too much to handle safely without specialized equipment. You should also call a professional if the spill has reached a garden, a well, or any other water source. The risk of widespread contamination is high in these cases, and a pro will know how to manage the cleanup and remediation process to protect your property and the environment.
You Have Underlying Health Concerns
Your health should always be your top priority. Sewage contains harmful bacteria, viruses, and parasites that can cause serious illness. If you or anyone in your family has a compromised immune system, it’s not worth the risk. Beyond the biological hazards, there are other dangers to consider. A significant backup can create a risk of electrocution if standing water comes into contact with electrical systems or an explosion if it affects gas lines. If you have any concerns about your ability to handle the cleanup safely, it’s best to contact a professional plumber immediately.
It’s a Recurring Problem
If you’ve cleaned up a sewage spill only to have another one happen weeks or months later, you’re dealing with a symptom of a larger issue. Recurring spills are a clear sign of an underlying problem in your plumbing system, such as a persistent clog in the main line, invasive tree roots, or a failing septic system. Simply cleaning the surface won’t solve the root cause. A professional plumber can perform a thorough inspection to diagnose the problem correctly and provide a lasting solution. This saves you from the stress and expense of repeated cleanups and protects your property from long-term damage.
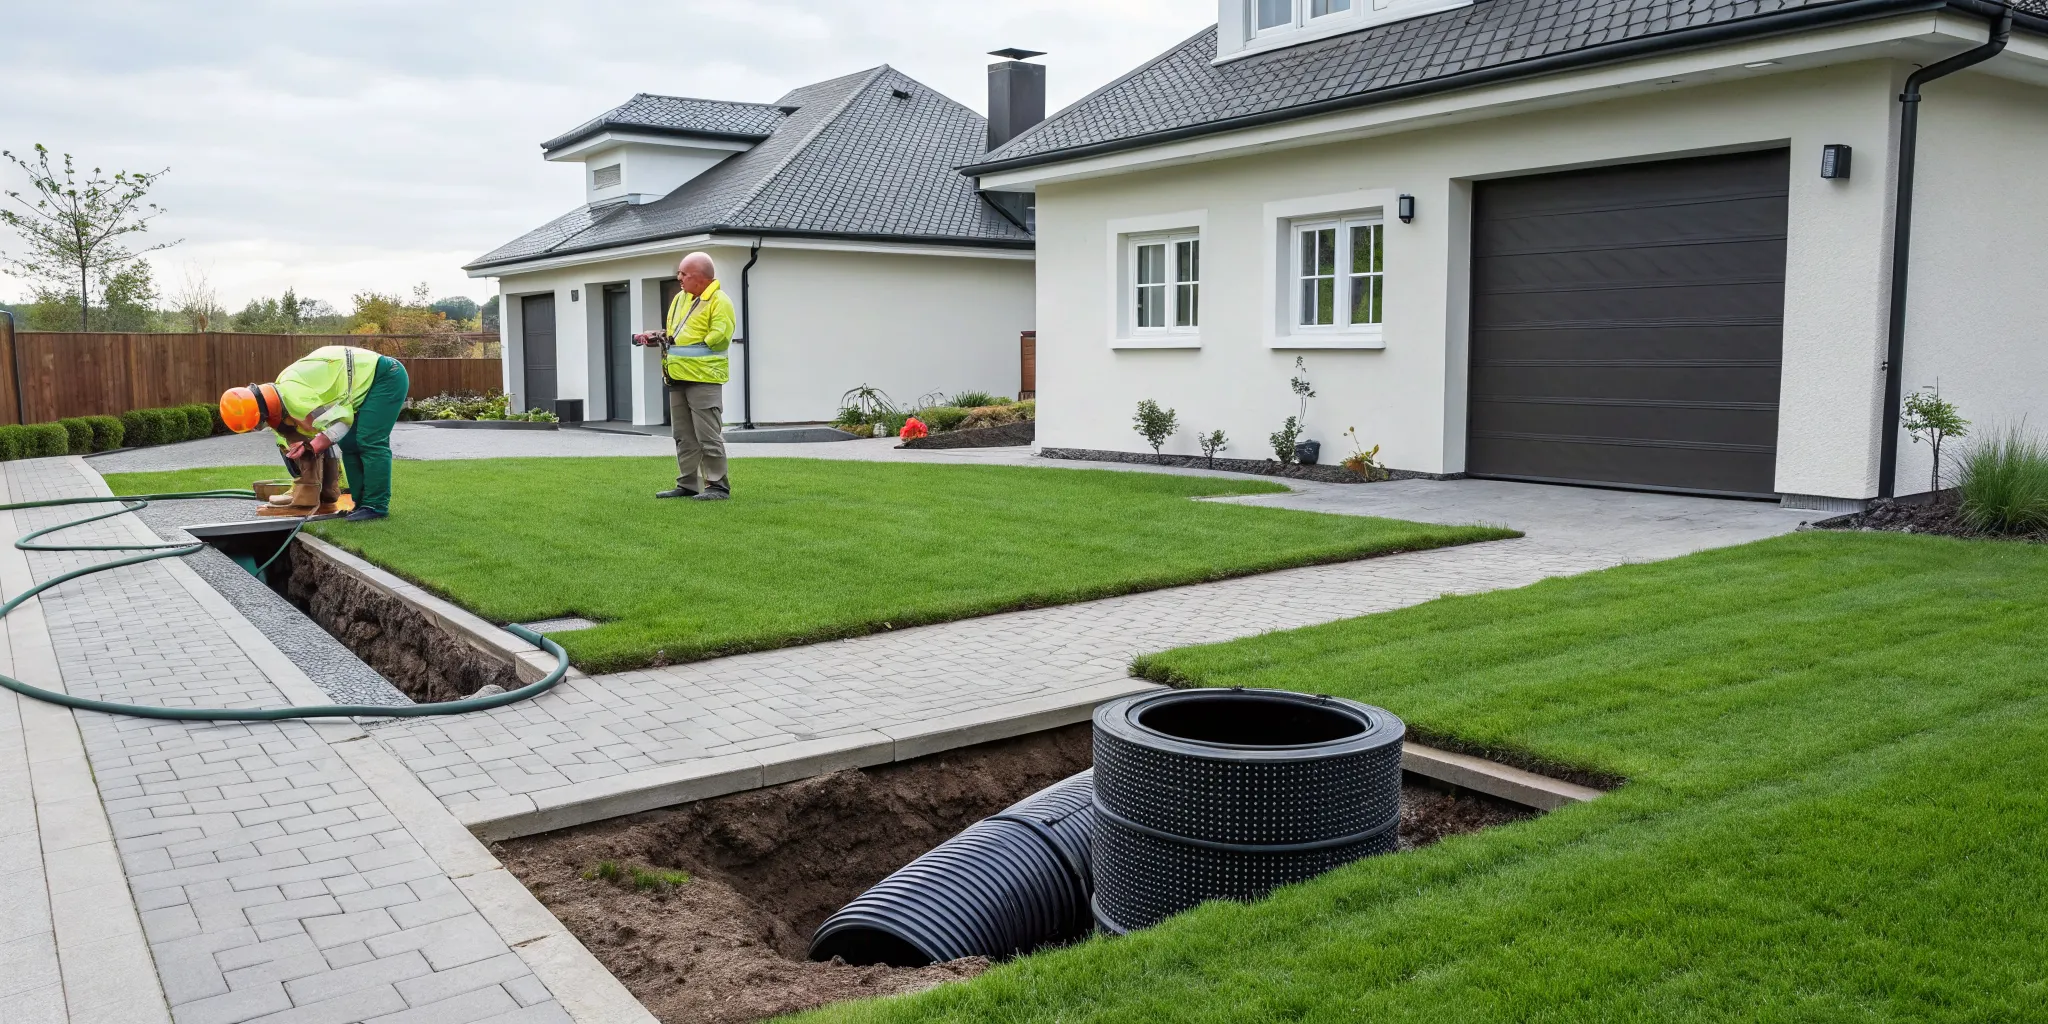
The Backup Involves a Septic System
If your home uses a septic system instead of a municipal sewer line, a sewage backup in your yard is a major red flag. This isn’t just a simple clog; it’s often a direct sign that your entire system is failing. A failing septic system can release untreated sewage, creating a serious health hazard right on your property. According to health officials, it’s crucial to act quickly when you suspect a failure, as the risks are significant. Unlike a straightforward pipe repair, diagnosing and fixing a septic system requires specialized knowledge of tanks, drainfields, and local environmental regulations. This is definitely a job for a professional who understands the complexities of these systems.
Why Pumping a Septic Tank Isn’t a Permanent Fix
Many homeowners believe that pumping the septic tank is the go-to solution for a backup. While pumping is a critical part of routine maintenance, it’s often just a temporary band-aid for a failing system. As experts from King County Public Health note, pumping may alleviate symptoms, but it doesn’t address the underlying issue. Think of it this way: if your drainfield is clogged and can no longer absorb liquid, pumping the tank just empties the container. It will inevitably fill up and overflow again. The real problem—whether it’s compacted soil, invasive roots, or a broken pipe—remains untouched. A professional can diagnose the true cause of the failure and recommend a lasting repair, not just a quick fix.
Understanding Repair Permits and Financial Aid
Fixing a septic system isn’t as simple as digging in your backyard. Most local health departments, including those across Metro Detroit, require a repair permit before any work can begin. This process ensures that all repairs meet strict health and safety codes to protect your family and the local groundwater. Navigating the permit application can be confusing, which is another reason why working with a licensed professional is so important. They understand the local requirements and can manage the paperwork for you. Additionally, some areas offer financial aid or low-interest loans for septic system repairs, so it’s worth checking with your local health department to see what resources might be available to you.
Discussing Advanced Methods like Pipe Jetting
When dealing with a septic system blockage, a professional might discuss advanced cleaning techniques like pipe jetting, also known as hydro-jetting. This method uses high-pressure water to blast through tough clogs in your pipes. While it can be incredibly effective, it’s not a one-size-fits-all solution. For older or more fragile septic systems, the intense pressure from pipe jetting can sometimes cause more harm than good, potentially damaging pipes and leading to even costlier repairs. An experienced plumber will first assess the condition of your system to determine if this is a safe and appropriate option. This expert diagnosis is key to choosing the right plumbing service and avoiding further damage.
How to Prevent Future Sewage Spills
After dealing with a sewage spill, the last thing you want is a repeat performance. The good news is that you can take proactive steps to keep your plumbing system healthy and prevent future disasters. Staying ahead of potential problems not only saves you from the stress and mess of another cleanup but also protects your property and family. It all comes down to a little maintenance, knowing what to look for, and calling for help when you need it.
Schedule Regular Plumbing Check-ups
Think of your plumbing system like your car; it needs regular check-ups to run smoothly. A little preventative care can go a long way in avoiding major backups. Start with simple habits, like only flushing human waste and toilet paper. Things like wipes, paper towels, and hygiene products don’t break down and can cause serious clogs. If you have a septic tank, get it pumped regularly. Also, be mindful of landscaping. Tree roots are naturally drawn to the moisture in sewer lines and can cause significant damage. By scheduling routine maintenance, you can catch and fix old or cracked pipes before they fail, ensuring you have reliable comprehensive plumbing solutions year-round.
Recognize the Early Warning Signs
Your plumbing system will often give you hints that something is wrong before a full-blown crisis occurs. Knowing these early warning signs allows you to act fast and prevent a minor issue from becoming a major spill. Keep an eye (and nose) out for red flags like foul odors coming from your drains or yard, especially near the drain field. Other signs include slow-draining sinks and tubs, gurgling sounds in your pipes, or plumbing that backs up frequently. Outside, you might notice standing water or unusually lush, green patches of grass over your sewer lines. Spotting these issues early can be the key to avoiding a plumbing emergency.
Invest in a Professional Camera Inspection
When you notice any of the warning signs, don’t wait for the problem to fix itself. It won’t. Calling a professional plumber for an inspection is the smartest and safest next step. A trained expert can accurately diagnose the root cause of the issue, whether it’s a simple clog, a broken pipe, or a failing septic system. They have the tools and expertise to assess the situation and recommend the right repairs to prevent a future spill. If you suspect something is off with your plumbing, it’s always better to be safe than sorry. A professional inspection provides peace of mind and a clear plan of action, so don’t hesitate to give us a call.
Related Articles
- Sewage Clean Up: A Complete Homeowner’s Guide
- Drain Backup in Basement? A Step-by-Step Guide
- Basement Drain Backup: Your Step-by-Step Guide
Frequently Asked Questions
What is the absolute first thing I should do if I find sewage in my yard? Before you do anything else, your first priority is safety. Immediately get any children and pets inside and block off the contaminated area to keep them away. Once the area is secure, you can put on protective gear and assess the size of the spill. This initial step prevents health risks and gives you a moment to decide if this is a job you can handle or if you need to call for professional help.
Is it really safe to clean up a small sewage spill myself? You can safely manage a very small spill (less than 10 square feet) as long as you take the proper precautions. This is non-negotiable: you must wear waterproof gloves, rubber boots, safety goggles, and a mask. However, if the spill is large, has soaked into your garden, or if you have any health conditions that make you more vulnerable, calling a professional is the safest choice.
How long will my yard be unsafe for my kids and pets after the cleanup? Even after a thorough cleaning, it’s best to keep kids and pets away from the affected area for a few months. While you will have removed the visible waste and disinfected the surface, invisible pathogens in the soil need time to die off naturally. Sunlight and dry conditions will help speed this process up, but patience is key to making sure your yard is completely safe for play again.
I’ve cleaned everything, but there’s still a bad smell. What does that mean? A lingering odor is a major red flag that the cleanup might not be complete. It usually indicates that moisture and bacteria are still present, either on the surface or soaked into the soil. It could also mean the original plumbing problem that caused the spill hasn’t been fully resolved. If the smell persists after a day or two of drying in the sun, it’s a good idea to have a professional assess the situation.
Can I plant my vegetable garden in that spot again? If the spill contaminated your vegetable garden, you should not plant any edible crops in that soil for at least one full year. This waiting period is critical to allow any harmful pathogens to completely break down, ensuring the food you grow is safe to eat. For flower beds or lawns, the risk is lower, but it’s still wise to wait several months until the area is fully recovered.