Your old water heater is finally on its last legs, leaving you with a big decision: should you replace it yourself or call in a professional? It’s tempting to try and save some money with a DIY approach. But a water heater installation is one of those jobs with zero room for error. You’re dealing with a tricky combination of water, electricity, and maybe even natural gas. One wrong move can be costly and dangerous. This guide will walk you through the critical steps and safety measures, giving you the clarity to make the right choice for your home.
Key Takeaways
- Match your water heater to your lifestyle: Consider your family’s daily hot water needs, your home’s energy source, and long-term operating costs—not just the initial price—to find the most efficient and cost-effective unit for you.
- Master the critical safety steps for installation: A safe setup depends on a few non-negotiable actions, like correctly installing the new T&P relief valve, double-checking every connection to prevent leaks, and strictly following all local electrical and ventilation codes.
- Plan for the entire project, not just the hookup: A smooth installation includes preparing your tools and permits ahead of time, having a plan for disposing of the old unit, and performing simple annual maintenance to extend the life of your new heater.
Signs Your Water Heater Needs Replacing
Before you find yourself in a cold shower on a chilly morning, your water heater will usually give you a few hints that it’s nearing retirement. Paying attention to these signs can help you plan for a replacement instead of dealing with an unexpected plumbing emergency. A water heater that’s more than 10 years old is already on borrowed time, but age isn’t the only factor. Keep an eye out for changes in its performance, strange noises like popping or rumbling (often caused by sediment buildup), or any signs of rust and corrosion on the tank itself. Catching these issues early gives you time to research new models and schedule an installation without the stress of a sudden breakdown.
Water Takes Too Long to Heat Up
If you feel like you’re waiting forever for the water to get warm, your water heater is probably struggling to keep up. Over time, heating elements can wear out, making them less effective at their job. Another common culprit is sediment buildup inside the tank. As minerals from the water supply settle at the bottom, they form a thick layer that insulates the water from the heating mechanism. This forces the unit to work much harder and longer to reach the right temperature, driving up your energy bills and putting extra strain on the appliance. This inefficiency is a clear signal that your water heater is losing its power and may be due for a replacement.
You’re Running Out of Hot Water Too Quickly
Are your showers getting shorter and shorter? When a full tank of hot water doesn’t last as long as it used to, it’s a classic sign of a failing water heater. This issue often points to a malfunctioning thermostat that can’t accurately read the water temperature or a failing heating element that can’t heat the water effectively. As experts at Del-Air note, an inconsistent supply of hot water is a definite red flag. Instead of enjoying a long, hot shower, you might get a brief blast of heat followed by a lukewarm flow. This frustrating experience means the internal components are no longer reliable and the unit is likely on its way out.
The Unit Needs Frequent Repairs
Having a plumber on speed dial for the same appliance is never a good sign. While a single repair can sometimes fix a specific problem, recurring issues suggest a more systemic failure. If you’re constantly spending money on fixes, you might be throwing good money after bad. It’s wise to weigh the cost of another repair against the price of a new, more efficient unit. As A.O. Smith points out, installation and repair mistakes can end up costing you more money later. If your water heater is becoming a constant source of trouble, investing in a replacement is often the more cost-effective and reliable long-term solution.
The Risk of Sudden Failure
An old, neglected water heater isn’t just an inconvenience; it’s a significant risk to your home. The older a unit gets, the higher the chance of a sudden and catastrophic failure, which usually means a major leak. A tank holding 40 or 50 gallons of water can cause extensive damage to your floors, walls, and belongings in a matter of minutes. For gas heaters, the risks are even more serious. An improper installation or a failing unit can be dangerous, leading to potential gas leaks or carbon monoxide issues. If you suspect your water heater is on its last legs, it’s better to replace it proactively than to wait for an emergency plumbing situation.
How to Choose the Right Water Heater
Choosing a new water heater feels like a big decision because it is! It’s a major player in your home’s comfort and your monthly utility bills. The right choice depends on your family’s needs, your home’s setup, and your budget. Let’s walk through the main types so you can find the perfect fit for your Metro Detroit home.
Tank vs. Tankless: What’s the Difference?
The first big choice is between a traditional tank heater and a modern tankless one. A conventional tank water heater keeps a reservoir of hot water (usually 40-50 gallons) ready to go. They are generally more affordable upfront and have a long track record of reliability. On the other hand, tankless water heaters heat water on demand, right when you turn on the faucet. This means you get a continuous supply of hot water and save energy since the unit isn’t constantly heating a large tank. While the initial cost is higher, the energy savings can pay off over time.
Electric vs. Gas: Which Should You Choose?
Your home’s existing connections will likely guide this decision, but it’s good to know the differences. Gas water heaters tend to heat water faster than their electric counterparts and can have lower operating costs, depending on local natural gas prices. They do, however, require proper ventilation. Electric water heaters are often easier and less expensive to install and can be placed in more locations throughout the house since they don’t need a vent. Their main drawback can be a higher monthly operating cost compared to gas models, so it’s wise to check your local utility rates.
DIY Installation: Electric vs. Gas Difficulty
When it comes to a DIY installation, there’s a night-and-day difference between electric and gas models. Many handy homeowners find that installing an electric water heater is a manageable weekend project. Because they have fewer connections and don’t require complex venting, the process is more straightforward. A gas water heater, however, is a completely different story. You’re not just dealing with water pipes; you’re working with a gas line, which introduces significant risks if not handled perfectly. Improper installation can lead to dangerous gas leaks or carbon monoxide poisoning. Because of these serious safety concerns, we always recommend having a licensed professional handle any gas appliance. It’s the only way to guarantee the job is done right and your family is safe.
Go Green: Heat Pump & Condensing Heaters
If energy efficiency is your top priority, two fantastic options are heat pump and condensing water heaters. A heat pump water heater, also called a hybrid model, doesn’t create heat directly. Instead, it pulls heat from the surrounding air and transfers it to the water in the tank, making it incredibly efficient. A condensing water heater is a great choice for homes with natural gas. It captures exhaust gases that would normally escape through a vent and uses that extra heat to warm the water, maximizing energy use. Both are smart investments that can significantly lower your energy bills. We can help you explore all the latest plumbing solutions available.
What Size Water Heater Do I Need?
Sizing your water heater correctly is key to keeping everyone in your home happy. For a traditional tank heater, the right size depends on your household size and peak hot water usage. A family of four, for example, will likely need at least a 50-gallon tank. For a tankless unit, sizing is based on the flow rate required to run multiple fixtures at once. You’ll need to add up the gallons per minute (GPM) for the shower, faucets, and appliances you might use simultaneously. If this sounds complicated, don’t worry. We can help you perform a quick assessment to ensure you get the perfect size when you contact our team.
Get Your Tools and Materials Ready
Getting organized before you start is the secret to a smooth installation. Nothing is more frustrating than having to stop mid-project for a trip to the hardware store. Taking the time to gather everything you need not only saves you a headache but also makes the entire process safer. Think of it as setting up your workspace for success. A little prep work now means you can focus on doing the job right without any interruptions. We’ll walk through the essential tools, the specific parts you’ll need on hand, and the safety items that should always be part of your project plan.
The Tools You Can’t Work Without
Before you get started, lay out your tools so everything is within reach. While the exact list can vary slightly depending on your specific model and existing plumbing, most installations require a standard set of gear. You’ll likely need a pipe wrench, an adjustable wrench, a tubing cutter, a screwdriver set, and a measuring tape. For soldering copper pipes, you’ll also need a torch, solder, and flux. And here’s a crucial tip: a water heater is heavy and awkward. You should always have at least two people or an appliance dolly to move it. This isn’t just about convenience; it’s about preventing serious back injuries.
Don’t Forget These Parts and Supplies
Beyond your toolbox, you’ll need several key components to connect your new water heater correctly. It’s smart to install a drain pan underneath the unit; it should be at least two inches wider than the heater and connected to a drain to prevent water damage from any future leaks. You will also need to install the new temperature and pressure (T&P) relief valve that comes with your heater. The discharge pipe for this valve must be at least 3/4-inch wide and made of an approved material like copper, PEX, or CPVC. Using the new valve is a non-negotiable safety step. Other common parts include flexible water supply lines, Teflon tape for sealing threads, and any necessary fittings or adapters for your specific setup.
Safety First: Gear and Permits You’ll Need
Safety should always be your top priority. Start with the basics: wear sturdy gloves to protect your hands and safety glasses to shield your eyes. Beyond personal gear, you need to think about official requirements. Your installation must follow all local, state, and national plumbing and electrical codes. These rules are in place to keep you and your home safe. It’s also important to check with your local municipality about permits. Many areas require a permit for water heater installation. If you’re unsure about local codes or permit rules, it’s always best to contact a professional for guidance.
Your Step-by-Step Water Heater Installation Guide
Alright, you’ve got your new water heater, your tools are laid out, and you’re ready to get started. Installing a water heater is a significant project, but by taking it one step at a time, you can manage it safely and effectively. This guide will walk you through the core process, from removing the old unit to firing up the new one. Remember to prioritize safety above all else—working with water, gas, and electricity requires your full attention. If at any point you feel unsure, don’t hesitate to call in a professional. It’s always better to be safe than to deal with a major leak or electrical issue later.
Step 1: Prepare Your Space (and Read the Manual!)
Before you touch a single pipe, your first move is to read the manufacturer’s manual. Seriously, don’t skip this. The instructions that came with your water heater are your most important guide for a safe and successful installation. They contain specific details about your model that a general guide can’t cover, from wiring diagrams to clearance requirements. Once you’re familiar with the manual, clear the area around your old water heater. You’ll need plenty of space to work, so move any stored items out of the way. Finally, shut off the water supply to the heater, and turn off the power at the circuit breaker (for electric) or switch the gas line to the “off” position (for gas).
Step 2: Out With the Old Water Heater
With the power and water off, you can start disconnecting the old unit. Drain the tank completely by connecting a hose to the drain valve and running it to a floor drain or outside. This can take a while, so be patient. Once it’s empty, disconnect the water lines and the electrical or gas connections. Be prepared—even when empty, water heaters are incredibly heavy and awkward. As safety instructions often note, you should use at least two people or an appliance dolly to move the water heater. This isn’t the time to test your strength; a back injury is the last thing you need. If you’re struggling, remember that our team handles these removals every day and can provide expert plumbing solutions to get the old unit out safely.
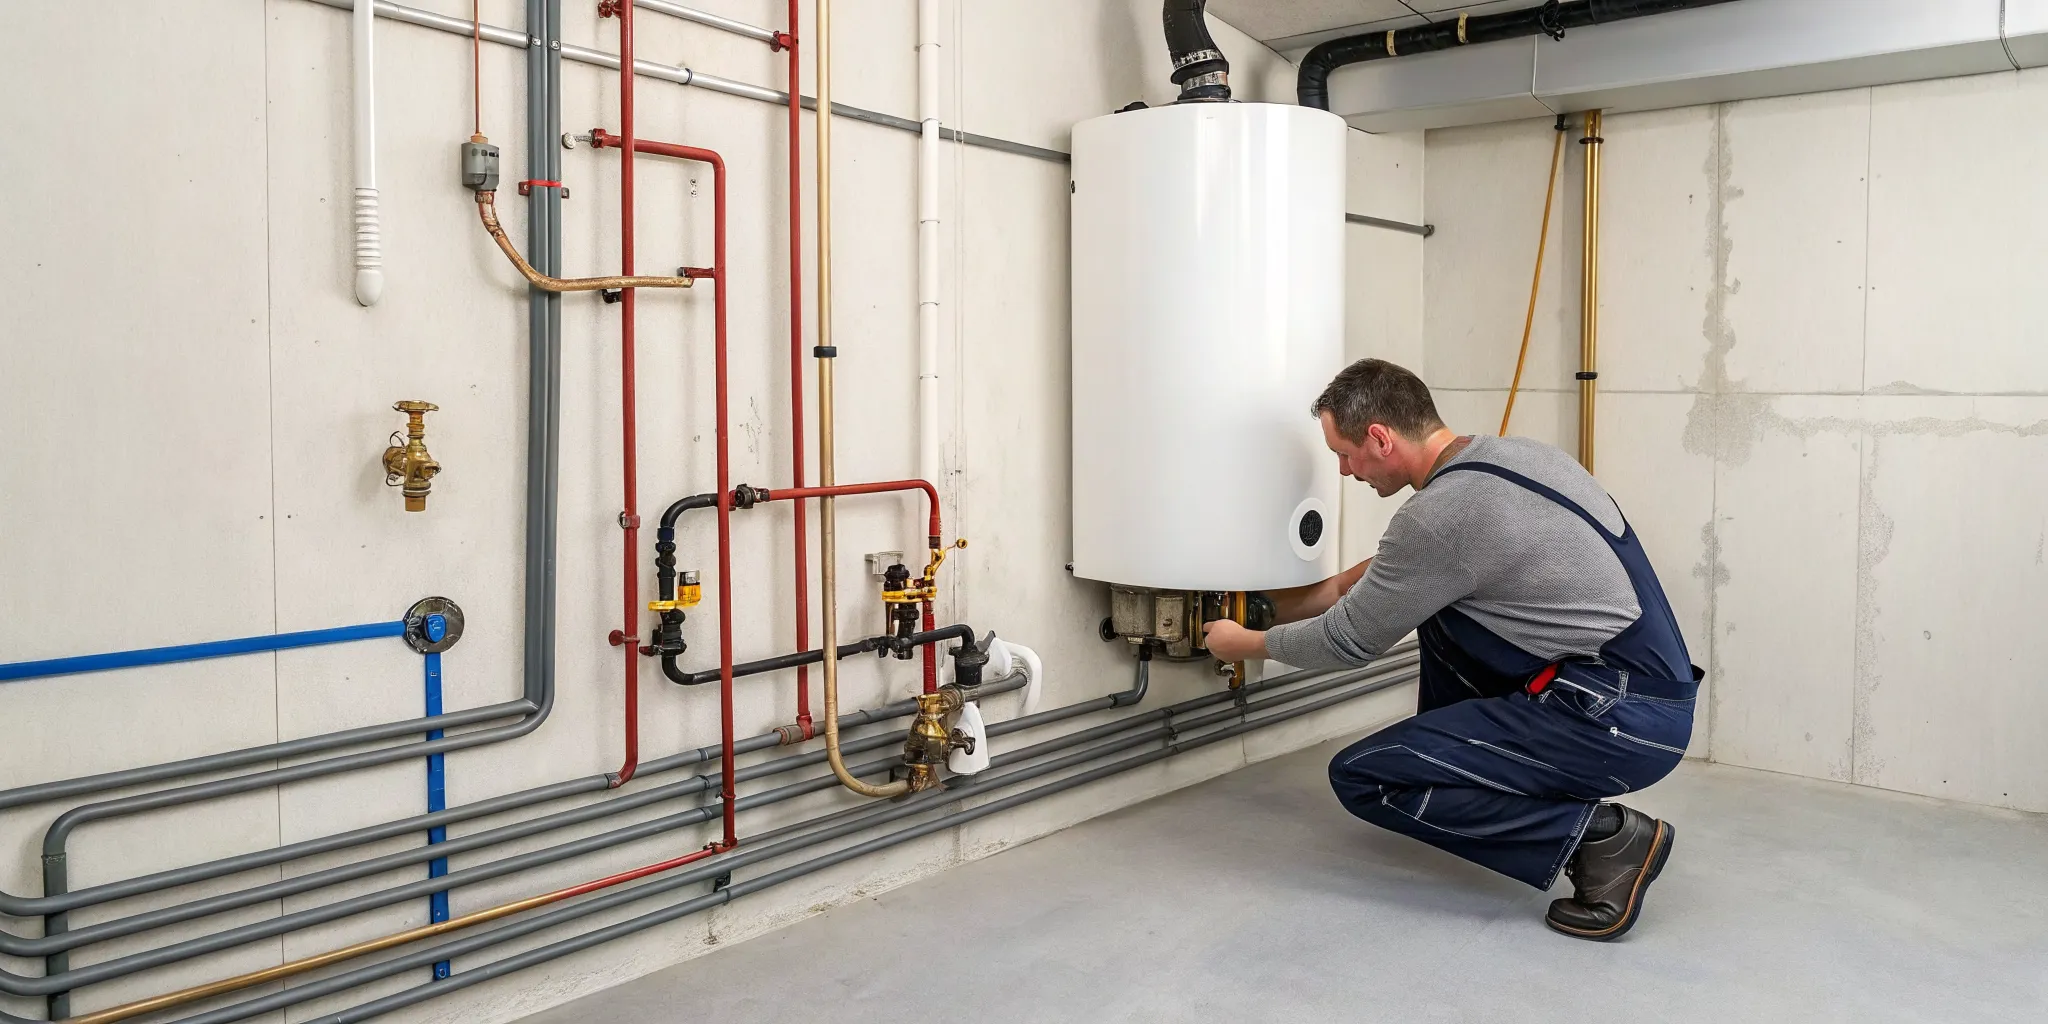
Step 3: Position Your New Heater
Now for the exciting part: bringing in the new unit. Carefully move the new water heater into position. Before you make any connections, place a drain pan underneath it. The pan should be at least two inches wider than the heater’s diameter and connected to a drain. This simple step is your first line of defense against future leaks and can save you from costly water damage down the road. Make sure the unit is level and stable before you proceed. Take a moment to double-check that all the connection points are clean and free of debris from the old unit. A clean connection is less likely to leak.
Step 4: Make the Water and Power Connections
With the new heater in place, it’s time to connect the water lines. Use flexible water heater connectors to attach the cold water inlet and hot water outlet pipes. Once they’re securely tightened, you can turn the water supply back on. Do not turn on the power or gas yet. It is critical to fill the tank completely with water first. Open a hot water tap somewhere in your house and let it run until water flows out steadily—this removes all the air from the tank and pipes. Hearing sputtering is normal at first. Once the tank is full and the air is gone, you can safely connect the electricity or gas line according to the manufacturer’s instructions.
Key DIY Tips for Water Connections
Getting the water connections right is arguably the most critical part of the installation, as even a small drip can lead to significant water damage. Always use new, high-quality flexible water supply lines for your connections; reusing old ones is a common cause of leaks. When tightening the fittings, aim for snug, not strained—overtightening can strip the threads. It’s also essential to correctly install the new temperature and pressure (T&P) relief valve that came with your heater. This is a crucial safety device, and its discharge pipe must be made of an approved material like copper or PEX, pointing down toward the floor. After you’ve made all your connections, go back and double-check every single one. If you feel at all unsure about your work, calling a professional plumber is the safest bet for a secure, leak-free setup.
Step 5: Fire It Up and Check for Leaks
The final step is to check your work. After the tank has been full for a little while, carefully inspect all your connections for any signs of dripping. Use a flashlight to get a good look. Most leaks happen at the connection points, not the tank itself, so give every fitting a close look. If you spot a leak, turn the water off and tighten the connection. Once you’re confident everything is dry, you can turn on the power or light the pilot light for your gas heater. Let the heater run until the water is hot, then test the temperature and pressure relief (T&P) valve to ensure it’s working correctly. If you run into any issues you can’t solve, our emergency plumbing team is always ready to help.
Safety Tips for Your Water Heater Installation
Installing a water heater involves working with water, electricity, and potentially gas—a combination that demands your full attention and respect. While tackling this project yourself can feel empowering, safety should always be your top priority. These aren’t just suggestions from a manual; they are critical steps to protect your home and family from very real hazards like major leaks, electrical shocks, or even fires. Getting it right means more than just having hot water for your morning shower; it means having the peace of mind that your home is safe for the long haul. A single misstep, like a loose electrical connection, an improperly installed pressure valve, or poor ventilation for a gas unit, can lead to costly damage or dangerous situations down the road. Think about the potential consequences: a slow leak can cause hidden mold and structural damage, while an electrical fault could pose a serious shock risk. For gas heaters, improper venting can lead to a silent but deadly carbon monoxide buildup. Before you even begin, take a moment to assess the project honestly. If you feel even slightly unsure or overwhelmed by any step, remember that calling a professional is the safest and smartest decision you can make. Your family’s safety is worth more than any DIY bragging rights.
Working Safely with Electrical Wiring
When it comes to electrical work, there is zero room for error. Before you touch a single wire, your first move should always be to shut off the power at the circuit breaker. Don’t just trust the switch; use a circuit tester to confirm the power is completely off. Once you’re sure it’s safe, you’ll need to connect your home’s ground wire to the water heater’s green ground screw—this is a crucial step that protects against electrical faults. After making your connections, double-check that the electrical junction box cover is put back on securely. This simple cover is essential for preventing fire and electric shock.
Why You Should Never “Dry Fire” an Electric Heater
One of the most critical rules for an electric water heater is to never, ever turn it on when the tank is empty. This is known as “dry firing,” and it can instantly destroy the unit’s heating elements. Without water to absorb the intense heat, the elements will overheat and burn out in a matter of seconds, leaving you with a brand-new but completely useless water heater. This is why it’s absolutely essential to fill the tank completely and run a hot water tap to purge all the air from the system *before* you restore power at the circuit breaker. A single misstep like this can turn a DIY project into a costly mistake. If you have any doubts about the process, remember that your family’s safety is paramount, and the safest decision is to contact a professional to ensure everything is done correctly.
Why Your T&P Valve Is So Important
That little valve on the side or top of your water heater is one of the most important safety features in your home. The Temperature and Pressure (T&P) Relief Valve is designed to release pressure and prevent a dangerous explosion if the tank overheats. It is absolutely critical that you install the new one that came with your water heater; never reuse an old one. The discharge pipe connected to this valve must be at least 3/4 inch wide and made of a suitable material like copper, PEX, or CPVC. Make sure it drains downward toward a safe location and is never capped or blocked.
Give Your Heater Room to Breathe
Your water heater needs room to breathe. Proper airflow is essential for it to operate safely and efficiently, so be sure to leave enough space around the unit as specified in the manufacturer’s manual. This is especially important for gas models. If your water heater is in a garage, building codes often require the pilot light to be at least 18 inches off the floor to avoid igniting flammable vapors from gasoline or other chemicals. Ensuring your installation meets all local codes can be tricky, which is why having a professional plumber handle the job is always a reliable choice.
The Serious Risks of Improper Gas Heater Installation
While installing an electric water heater is a challenging DIY project, working with a gas model is on a completely different level. A gas water heater installation is a complex job that involves connecting gas lines, ensuring proper ventilation, and following strict local building codes. If it isn’t done correctly, the consequences can be severe. The risks aren’t just about a leaky pipe; we’re talking about the potential for gas leaks, fires, explosions, and silent but deadly carbon monoxide poisoning. Because of these dangers, this is one job that is strongly recommended for licensed professionals. They have the training, specialized tools, and knowledge of local codes to handle gas, water, and electrical connections safely, ensuring your home and family are protected.
Switching from Electric to Gas? Call a Professional
If you’re thinking about switching from an electric water heater to a gas one to save on energy costs, it’s important to understand that this is a major plumbing project, not a simple swap. This conversion requires a professional to run entirely new gas lines to the heater’s location. It also involves creating a proper ventilation system to safely route harmful exhaust gases out of your home. These are not tasks for a weekend DIY project; they require the expertise of a licensed plumber to prevent serious hazards like water damage, burns, or fires. At Mr. Pipey, we handle these complex conversions regularly. Our team can ensure your new gas lines and ventilation are installed correctly and up to code, giving you total peace of mind. If you’re considering making the switch, contact us to discuss the project safely.
Special Safety Rules for Garage Installations
Garages present unique safety challenges for water heaters. Beyond raising the unit so the pilot light is at least 18 inches from the floor, you need to maintain a clean and clear space around it. The garage is often a storage area, but it’s vital to keep anything that can burn—like paper, sawdust, paint thinners, or gasoline—far away from the heater. Think of the area around your water heater as a “no-clutter zone.” Keeping this space clear is a simple but effective way to prevent a fire and ensure your unit can be easily accessed for any future maintenance or repairs.
What’s the Cost of a New Water Heater Installation?
Let’s talk numbers. Budgeting for a new water heater can feel a bit like guessing, but understanding the costs upfront can make the whole process smoother. The final price tag is more than just the sticker price on the unit; it’s a combination of the heater itself, professional labor, and a few other potential expenses. While it’s a significant home investment, getting it right means years of reliable hot water and peace of mind.
Think of the total cost in two main parts: the equipment and the expertise. The water heater unit can range anywhere from around $70 for a small, basic model to over $3,600 for a high-efficiency, tankless one. On top of that, you have the cost of professional installation. While every job is different, you can expect the labor portion to cover the plumber’s time, expertise, and the basic pipes and fittings needed to get everything connected safely and correctly. Investing in a professional ensures your new unit is installed to code and operates efficiently from day one, preventing costly issues down the road.
The Cost Breakdown: Unit vs. Pro Labor
When you start shopping, you’ll see that the cost of the water heater itself varies wildly. This depends on the type (tank or tankless), fuel source (gas or electric), brand, and size. A standard 40-gallon tank model will be on the lower end, while a large tankless unit will be a bigger initial investment. Professional installation is a separate, crucial cost. This fee covers the skilled work of a licensed plumber who will handle everything from inspecting your space and delivering the new unit to making sure all connections are secure and up to code. It’s a price worth paying for safety and reliability.
How Much Can You Save with a DIY Installation?
Let’s be honest: the biggest reason to consider a DIY installation is the potential savings. Homeowners have reported saving over $1,000 on labor, which is enough to invest in a higher-quality, more efficient water heater from the start. If you’re comfortable with plumbing projects, tackling an electric model can feel like a straightforward job. But that savings comes with a serious trade-off—you’re taking on all the risk. With gas heaters, the stakes are significantly higher, as a mistake can lead to dangerous gas leaks or carbon monoxide exposure. That’s why even major manufacturers strongly recommend hiring a licensed professional for any gas unit. At the end of the day, no amount of savings is worth compromising your family’s safety.
Don’t Forget Permits and Hidden Costs
Beyond the unit and basic installation, a few other costs can pop up. Most municipalities require a permit for water heater installation, which can range from about $50 to $150. This ensures the work is done safely and meets local building codes. You’ll also need to account for the removal and disposal of your old unit, which can add another $100 to $500. If you’re switching from an electric to a gas model (or vice versa), be prepared for a more involved project. This often requires new plumbing lines or electrical wiring, which can add several hundred to over a thousand dollars to the final bill.
What Can Change the Final Price?
Several key factors will influence your total installation cost. The biggest variable is the type and size of the water heater you choose—a high-efficiency tankless model will always cost more upfront than a traditional storage-tank heater. The complexity of the installation also plays a huge role. If your new unit is a simple swap-out in an easily accessible location, the labor costs will be lower. However, if the job requires rerouting pipes, upgrading ventilation for a gas unit, or bringing electrical work up to code in an older home, the price will increase to reflect the additional time and materials.
Why You Should Always Get Multiple Quotes
Here’s a pro tip: always get at least two or three quotes from local, licensed plumbers before making a decision. While it might seem convenient to use the installation service offered by a big-box store, they often subcontract the work to third parties, which can inflate the price. By speaking directly with local companies, you can compare costs, understand exactly what’s included in their estimate, and get a feel for their customer service. This is your chance to ask questions and find a team you trust. When you’re ready, we’d be happy to provide a clear, straightforward quote for your plumbing service needs.
Benefits of a Professional Installation
While the DIY route can be tempting, a water heater installation is one of those jobs where professional expertise is truly worth it. You’re dealing with a tricky combination of water, high-voltage electricity, and potentially natural gas lines—all of which need to be handled with precision to keep your home and family safe. A professional plumber doesn’t just connect a few pipes; they bring years of experience to the job. They understand the specific building codes for Metro Detroit, have the right tools to ensure every connection is secure, and know how to prevent common but costly mistakes that can lead to leaks, water damage, or even dangerous pressure buildup. Hiring a pro is an investment in peace of mind, ensuring the job is done right the first time.
Beyond safety, a professional installation protects your investment. A new water heater is a significant purchase, and an improper setup can void the manufacturer’s warranty, leaving you on the hook for future repairs. A licensed plumber ensures your unit is installed according to the manufacturer’s exact specifications, maximizing its efficiency and lifespan. They can also assess your home’s entire plumbing system to spot any potential issues that could affect your new heater. From selecting the right size unit for your family’s needs to handling the heavy lifting and proper disposal of your old tank, a professional manages the entire process. This comprehensive approach is a core part of all our plumbing services, giving you a reliable, long-lasting solution without the stress.
The Mr. Pipey Process: What to Expect
We know that inviting a contractor into your home requires trust, which is why we’ve built our process around clear communication and respect for your space. As a family-owned business, we treat every client like a neighbor. From the moment you call us to the final handshake, our goal is to make your water heater installation as smooth and straightforward as possible. You can expect a friendly, licensed technician to arrive on time, listen to your needs, and explain every step of the process without using confusing jargon. We handle everything with care, from protecting your floors to cleaning up thoroughly once the job is done, ensuring a hassle-free experience from start to finish.
Initial Consultation and Clear Estimates
Your experience with us begins with a straightforward consultation. A licensed Mr. Pipey plumber will come to your home to assess your current setup, discuss your hot water needs, and recommend the best options for your budget and lifestyle. We believe in providing cost-effective solutions, not upselling you on things you don’t need. After our assessment, we’ll give you a clear, upfront estimate with no hidden fees, so you know exactly what to expect before any work begins. This is your opportunity to ask questions and get expert advice, and we’re happy to take the time to make sure you feel completely comfortable with the plan. Ready to get started? You can contact our team today to schedule your consultation.
Final Walkthrough and Maintenance Guidance
Our job isn’t finished just because the new heater is running. Once the installation is complete, our technician will walk you through your new system. We’ll show you how everything works, explain any new features, and point out the main shut-off valves. We’ll also provide simple maintenance tips you can use to keep your water heater running efficiently for years to come and explain the details of your warranty. This final check-in is part of our commitment to 100% customer satisfaction. We want you to feel confident and knowledgeable about your new appliance, and we won’t leave until all your questions are answered. It’s this dedication to service that defines who we are, and you can learn more about our company values and our promise to you.
Avoid These Common Water Heater Installation Mistakes
Even if you feel confident in your DIY skills, installing a water heater has a few common trip-ups that can lead to big problems down the road. From slow leaks that cause water damage to serious safety hazards, these mistakes are easy to make but also easy to avoid when you know what to look for. Getting the installation right from the start saves you from future headaches, costly repairs, and the stress of a job-gone-wrong.
Think of it this way: a little extra time and attention to detail now is your best insurance policy for a safe, efficient, and long-lasting water heater. We’ll walk through the most frequent errors we see so you can steer clear of them. If you ever feel out of your depth, remember that our team is always ready to step in and ensure your installation is done perfectly. Taking on a project like this is commendable, but knowing when to call for professional help is just as important.
Mistake #1: Not Double-Checking for Leaks
A slow drip might not seem like a big deal, but it’s one of the most destructive issues you can face. The number one cause of post-installation leaks is an insecure connection. This can happen if fittings are too loose, too tight, or if you accidentally use incompatible metals, which can cause corrosion over time. Every single connection—from the water lines to the pressure relief valve—needs to be sealed correctly and tightened to the right specification.
Before you call the job done, go back and double-check every fitting. Run your hands over the connections to feel for any moisture. Even a tiny bit of dampness is a red flag. A small, undetected leak can lead to mold, rot, and significant structural damage, turning a simple DIY project into a major plumbing emergency.
Mistake #2: Skipping Safety and Code Checks
This part is non-negotiable. Local building codes and safety tests exist for a critical reason: to keep you and your family safe. One of the most dangerous mistakes is improperly installing the temperature and pressure relief (T&P) valve. This valve is a crucial safety feature that releases pressure if it builds up too high inside the tank. A faulty installation can turn your water heater into a serious hazard.
Beyond the T&P valve, you also need to follow codes for ventilation (especially for gas heaters), clearance space, and electrical wiring. Skipping these steps or assuming your setup is “good enough” isn’t worth the risk. A professional plumber is always up-to-date on local codes and performs rigorous safety checks to ensure everything is working as it should. When it comes to safety, there are no shortcuts.
Mistake #3: Disposing of the Old Unit Incorrectly
Once your new water heater is up and running, you’re still left with one final task: getting rid of the old one. You can’t just leave it on the curb with your regular trash. Water heaters are bulky and contain materials that need to be disposed of responsibly. Many municipalities have specific regulations for appliance disposal, often requiring you to take the old unit to a designated recycling or waste facility.
Before you even think about moving it, make sure all water, gas, and electrical lines are safely and completely disconnected. Handling this yourself can be tricky and heavy work. When you hire a professional for your installation, they typically include the removal and proper disposal of your old unit as part of the service. This takes the final, cumbersome step off your plate and ensures it’s handled correctly and safely.
How to Maintain Your New Water Heater
Getting your new water heater installed is a great first step, but a little routine care will ensure it runs efficiently and safely for years to come. Think of it like a car—regular check-ups prevent major breakdowns. By staying on top of a few simple tasks and knowing what warning signs to look for, you can extend the life of your unit and keep the hot water flowing without a hitch.
A Simple Maintenance Checklist
To get the most out of your new water heater, a little regular maintenance is key. We always suggest having a professional inspect it once a year to catch small issues before they become big problems. A crucial part of this check-up is the anode rod—a small, replaceable part that sacrifices itself to prevent the tank from rusting from the inside out. It’s a huge job for a little component! You should also flush the tank annually to clear out sediment buildup, which can hurt performance and efficiency. Always check your manufacturer’s manual for specific steps, as following their guidelines will help protect your 6- to 10-year warranty.
Find the Perfect Temperature for Savings
Finding the right temperature for your water heater is a balancing act between safety and comfort. Most units are factory-set to 120°F, which is hot enough for daily use and helps prevent scalding. While some people turn it up to 140°F to kill bacteria, this significantly increases the risk of burns, especially for children or elderly family members. If you do opt for a higher temperature, it’s a good idea to install anti-scald devices on your faucets. Setting the right temperature not only keeps your family safe but also helps you manage your energy bills by not overheating water unnecessarily.
When Is It Time to Call a Pro?
Your water heater will usually give you a few hints when it needs attention. Knowing what to look and listen for can save you from a major headache down the road. Keep an eye out for rusty water, which could mean the tank is corroding, or listen for popping or rumbling sounds, which often point to sediment buildup. A pilot light that won’t stay lit is another clear red flag. If you ever smell rotten eggs, you could have a gas leak. For these issues, or in a true crisis like a bulging tank, don’t wait. It’s time to call for emergency plumbing services right away.
Frequently Asked Questions
How do I know when it’s time to replace my old water heater? A few classic signs will tell you it’s time to start shopping. If you notice rusty water coming from your hot taps, hear rumbling or popping sounds from the tank, or see any moisture pooling around the base, your unit is likely on its last legs. Age is another big factor. Most traditional tank heaters last about 8 to 12 years, so if yours is in that range, it’s smart to replace it before it fails completely.
Is it really cheaper to install a water heater myself? While you might save on the initial labor cost, a DIY installation can have hidden expenses. You may need to buy or rent specific tools, pull a permit from your city, and figure out how to dispose of the old, heavy unit. More importantly, a small mistake with a water, gas, or electrical connection can lead to a major leak or a serious safety issue, resulting in repairs that cost far more than the original installation fee. Hiring a professional is an investment in getting the job done right and safely the first time.
How long should my new water heater last? The lifespan of your new water heater depends on the type you choose and how well you maintain it. A standard storage-tank model typically lasts between 8 and 12 years. A tankless water heater is a bigger investment upfront but can last for 20 years or even longer. The key to getting the most out of either type is consistent annual maintenance, like flushing the tank and checking the anode rod, which helps prevent problems before they start.
What’s the biggest difference I’ll notice between a tank and a tankless water heater? The main difference you’ll experience day-to-day is how you get your hot water. With a traditional tank, you have a large reservoir of hot water ready to go, but it’s a finite supply that can run out if multiple people shower back-to-back. A tankless heater heats water as you need it, so you get an endless supply of hot water. The trade-off is that you might notice a brief delay of a few seconds before the water gets hot when you first turn on the tap.
How long does a typical installation take? For a professional plumber, a straightforward replacement—swapping a similar-sized unit in the same location—usually takes about two to three hours. However, the job can take longer if the project is more complex. For instance, if you’re switching from an electric to a gas model, moving the heater to a new location, or if any of your existing plumbing or ventilation needs to be updated to meet current building codes, you can expect the installation to take more time.