Tackling your own sump pump installation is a seriously rewarding project. You save money and get the satisfaction of a job well done. But this is one job where the details really matter. A small mistake can lead to big problems when the next storm hits. That’s why I created this guide—to give you the confidence to do the job right. We’ll break down every step, from picking the perfect location to testing your system. I’ll also be honest about when a project might be too complex, so you know when calling a professional is the smartest move.
Key Takeaways
- Choose the right pump for your space: A powerful, quiet submersible pump is ideal for finished basements with significant water issues, while a cost-effective pedestal pump is a solid choice for smaller spaces with minor dampness.
- Nail the installation fundamentals: Your pump’s success hinges on three key details: placing the pit at your basement’s lowest point, using a dedicated GFI outlet for safety, and running the discharge pipe at least 10 feet from your foundation.
- Don’t hesitate to call a professional: A DIY installation involves cutting concrete, plumbing, and electrical work. If any part of the process feels overwhelming, calling an expert is the smartest move to protect your home from costly water damage.
How Does a Sump Pump Keep Your Basement Dry?
If you’ve ever worried about your basement flooding during a heavy Michigan downpour, a sump pump might be the peace of mind you’re looking for. It’s a simple yet powerful device designed to keep your home’s foundation and lower level dry and protected from water damage. Let’s break down what it is and how to tell if you need one.
Understanding the Basics
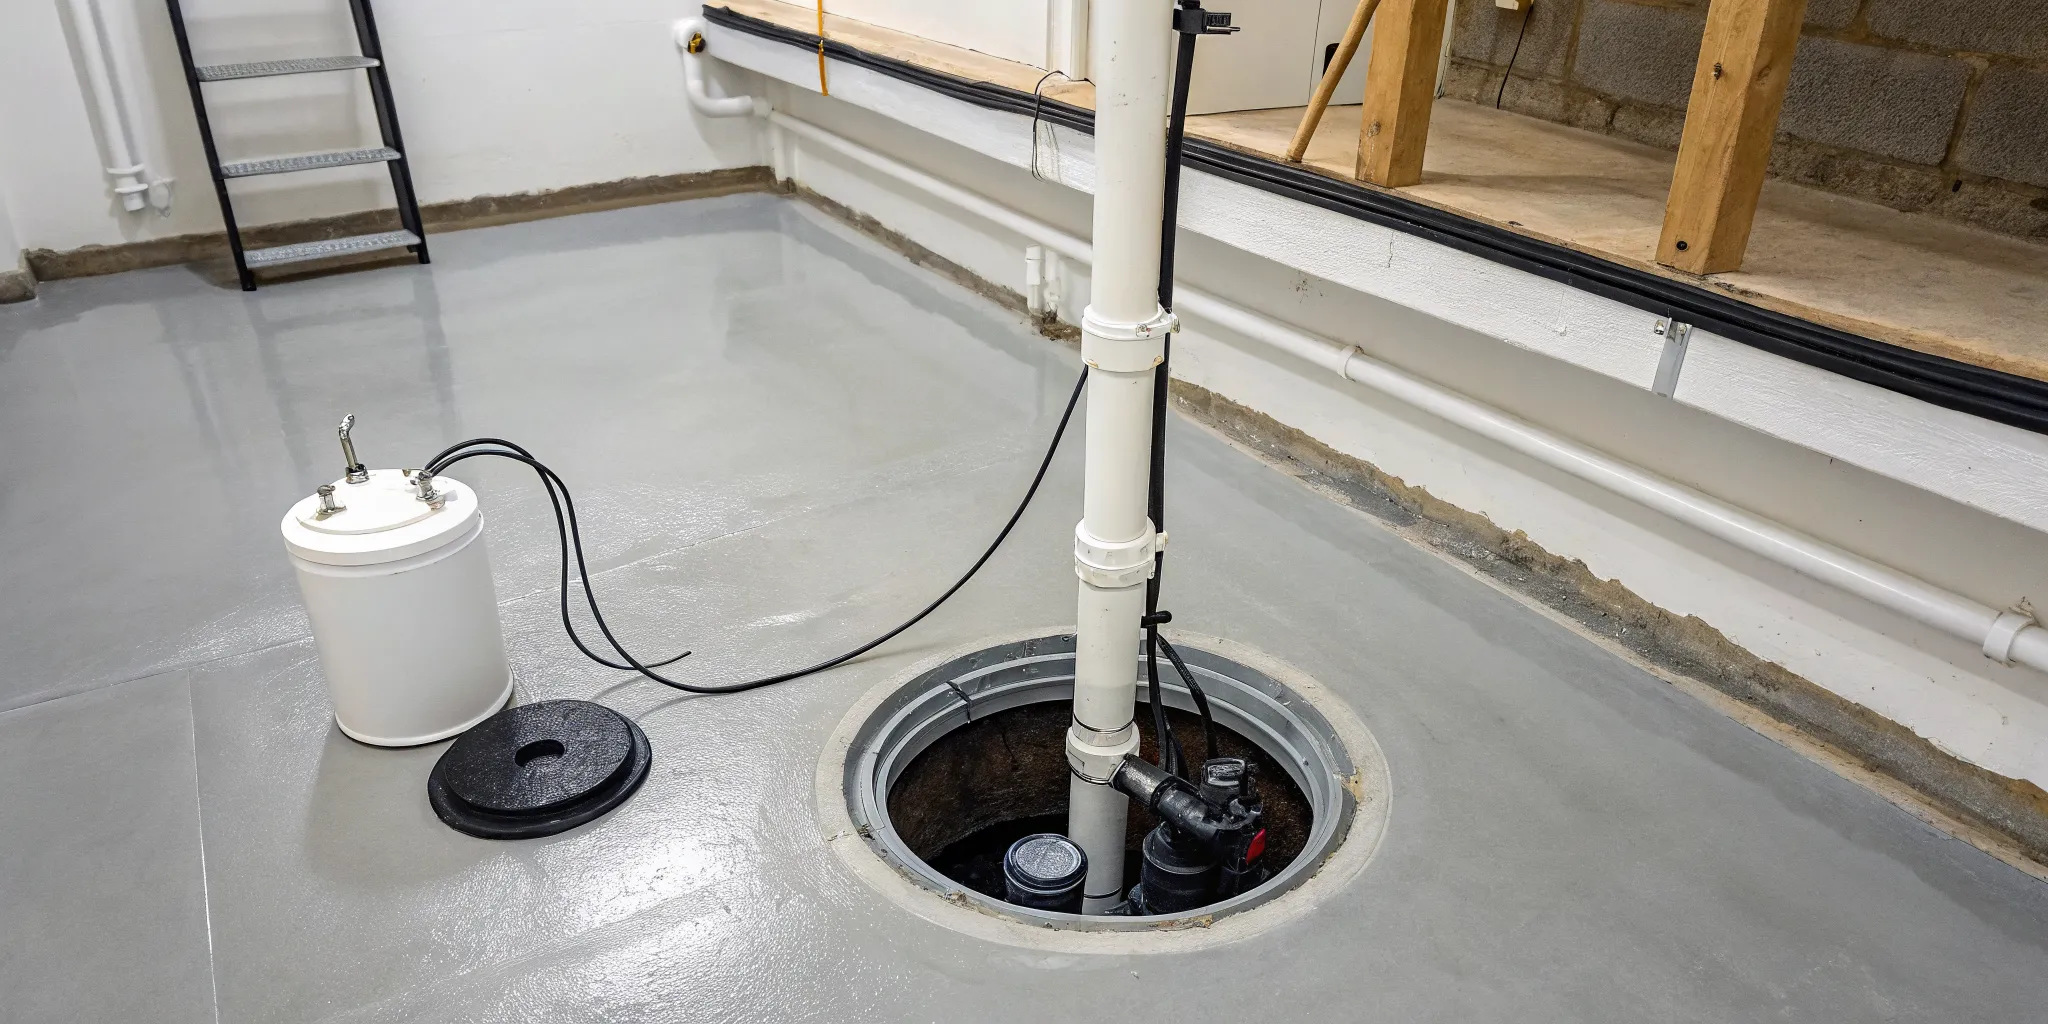
Think of a sump pump as your basement’s personal bodyguard against flooding. It’s a small pump that sits in a specially dug pit, called a sump pit, in the lowest part of your basement or crawlspace. This pit collects excess groundwater that seeps in around your foundation. When the water in the pit reaches a certain level, a float switch activates the pump, which then pushes the water out of the pit and away from your home through a discharge pipe.
A sump pump is a permanent solution to prevent groundwater from flooding your basement. It catches water before it gets above the floor and pumps it outside, keeping the area dry and protecting your home from moisture damage, mold, and mildew. Our expert sump pump services ensure your system is installed correctly for maximum protection.
Managing Water vs. Fixing the Source
It’s helpful to think of a sump pump as a fantastic water management system. It does an excellent job of collecting excess water that finds its way into your basement and pumping it safely outside. However, it’s important to remember that while a sump pump keeps your basement dry, it doesn’t address the original reason water is getting in. It’s a reactive solution that deals with the symptom—water in your basement—rather than the root cause. Depending on your home, you might need to take other steps, like improving your yard’s grading or sealing foundation cracks, to stop water from entering in the first place. These comprehensive plumbing solutions work together to keep your home protected.
Exterior vs. Interior Drainage Solutions
When you’re looking at keeping your basement dry, you’ll often hear about interior and exterior drainage. An exterior French drain is considered the most thorough approach. It involves excavating around your foundation to install a drainage system that stops water before it can even touch your basement walls. On the other hand, an interior drain system is a more common and cost-effective option that collects any water that has already seeped through the walls and channels it directly to your sump pump. This system works hand-in-hand with our sump pump services to effectively manage water that has entered your home, fixing the immediate problem of a wet basement.
Do You Need a Sump Pump? Watch for These Signs
So, how do you know if your home could benefit from a sump pump? The most obvious sign is a history of basement flooding. If you’ve dealt with water in your basement before, installing a sump pump is a critical first step to manage the problem. This is especially true if your house is located downhill or in an area with a high water table and poor drainage.
Other telltale signs include a persistent damp or musty smell in your basement, the appearance of mold or mildew on walls and stored items, or visible water stains on your concrete floors and walls. Even if you haven’t had a full-blown flood, these are clear indicators of a moisture problem that a sump pump can solve.
An Intro to Sump Pump Types
When you start shopping for a sump pump, you’ll quickly realize there isn’t just one type. The two most common options you’ll find are submersible and pedestal pumps. Each has its own set of pros and cons, and the right one for your home really depends on your specific needs, like the size of your basement and how much water you’re dealing with.
Think of it like choosing a car—a sports car is great for some, but an SUV is better for others. Understanding the key differences between these two pumps will help you make a smart decision that keeps your basement dry for years to come. We’ll walk through what makes each type unique so you can figure out which one is the perfect fit for your home. If you ever feel unsure, our team is always ready to provide expert sump pump services and guidance.
Submersible Pumps: The Hidden Workhorse
As the name suggests, submersible pumps are designed to be fully submerged in the water of your sump pit. Because the motor is sealed in a waterproof housing and sits directly in the basin, these pumps are much quieter than their pedestal counterparts—a big plus if your basement is a finished living space. They are also more powerful and efficient at moving large volumes of water, making them an excellent choice for homes in areas with high water tables or frequent heavy rainfall. While they tend to be more expensive, their durability and out-of-sight, out-of-mind design make them a popular option for many homeowners.
Pedestal Pumps: The Above-Ground Option
A pedestal pump is designed with the motor mounted on a column, or pedestal, that sits above the sump pit. Only the intake valve is placed down in the water. This design makes them incredibly easy to access for maintenance and repairs, since you don’t have to pull the entire unit out of the pit. Pedestal pumps are typically less expensive than submersible models and are a great cost-effective solution for smaller basements or areas that only experience minor water issues. Because the motor is exposed, they do tend to be louder, but their longevity and affordability make them a solid choice for many households.
Water-Powered Sump Pumps
What happens when a big storm knocks out your power? Your primary electric sump pump won’t work, leaving your basement vulnerable. This is where a water-powered sump pump comes in as a fantastic backup plan. Instead of relying on electricity or a battery, this type of pump uses your home’s municipal water pressure to create suction and pump water out of the sump pit. As long as your water is running, your basement stays protected. They are incredibly reliable and offer a different kind of security than a battery backup, giving you total peace of mind during power outages. Because they require a specific setup and connection to your plumbing, professional installation is key to ensuring they function correctly when you need them most. Our team can help you explore all your sump pump options to find the perfect fit for your home.
Picking the Perfect Pump for Your Home
So, which pump is right for you? The best sump pump for your home depends on a few key factors: the size of your basement, the amount of water you typically get, and your budget. If you have a large basement or deal with significant water intrusion, a submersible pump is likely your best bet. They are more powerful, have a longer lifespan, and their quiet operation is a huge advantage. On the other hand, if you have a smaller space and are looking for a more budget-friendly option, a pedestal pump is a reliable and cost-effective solution. If you’re still weighing your options, feel free to contact our team for a personalized recommendation.
Choosing the Right Horsepower (HP)
Once you’ve settled on a pump type, the next detail to consider is its horsepower (HP). This rating tells you how powerful the motor is and how quickly it can move water out of your sump pit. If you’re replacing an old pump, a good rule of thumb is to choose a new one with the same or slightly higher horsepower. If you’re starting from scratch or you’re not sure what you need, it’s generally safer to go with a more powerful option. A 1/3 HP pump is often sufficient for average homes, but if your basement is prone to heavy water flow, upgrading to a 1/2 HP model provides extra security. Getting this right is crucial, as an underpowered pump can’t keep up during a storm, leaving your basement vulnerable.
Pump Materials: Cast Iron vs. Thermoplastic
The material your sump pump is made of plays a big role in its durability and lifespan. You’ll want a pump made from materials that can stand up to constant moisture without rusting or breaking down. Cast iron pumps are a fantastic choice because they are incredibly strong and excellent at dissipating heat from the motor, which helps extend the pump’s life. They are a heavy-duty, long-term investment. On the other hand, pumps made from thermoplastic are a more affordable and lightweight alternative. While not as tough as cast iron, a high-quality thermoplastic pump is still a reliable option that resists corrosion well, making it a great choice if you’re working with a tighter budget.
Understanding Float Switch Types
The float switch is the brain of the operation; it’s the part that senses the water level and tells the pump when to turn on and off. There are two main types you’ll encounter: vertical and tethered. A vertical float switch moves straight up and down on a fixed rod, making it ideal for narrow or crowded sump pits where space is limited. A tethered float switch is attached to a cord and swings up in an arc as the water rises. This type needs a wider basin to operate correctly, as it can get snagged on the side of a small pit. A faulty switch is one of the most common causes of pump failure, so choosing the right one for your pit size is essential for reliable sump pump performance.
What You’ll Need for Your Sump Pump Installation
Before you start breaking ground, it’s smart to get all your ducks in a row. Having everything you need on hand makes the installation process much smoother and helps you avoid any last-minute trips to the hardware store. Think of it like prepping your ingredients before you start cooking—it just makes life easier. A little preparation now will save you a lot of headaches later, ensuring your project goes off without a hitch. This step is all about setting yourself up for success so you can focus on the task at hand without any interruptions.
The Essential Tool Checklist
You might have some of these tools in your garage already, but a couple are specialized. Here’s what you’ll need to get the job done right:
- Hammer Drill: This is for breaking through your concrete basement floor. If you don’t own one, most home improvement stores offer them for rent.
- Shovel: A sturdy shovel is essential for digging out the pit for your sump basin.
- Power Drill with a Hole Saw: You’ll use this to create clean holes for the plumbing lines.
- Silicone Sealant: This is key for creating watertight seals around joints and connections, preventing any leaks down the road.
The Complete Materials List
Next, let’s talk materials. The pump itself is the star of the show, but it needs a good supporting cast. Make sure you have these items ready:
- Sump Pump: Whether you chose a submersible or pedestal pump, have it out of the box and ready to go. If you’re still deciding, our team can help you figure out the best fit for your home’s sump pump services.
- Sump Basin: This is the liner that sits in the pit and houses the pump.
- Gravel: You’ll need a layer of gravel at the bottom of the pit to support the basin and help with water drainage.
- PVC Pipes and Fittings: These will carry the water away from your foundation. Most pumps use a 1.5-inch outlet, so get pipes to match.
- Check Valve: This is a non-negotiable part. It’s a one-way valve that stops water from flowing back into the basin after it’s been pumped out.
Safety First: Your Essential Gear
Working with water and electricity requires your full attention to safety. Don’t cut corners here—protecting yourself and your home is the most important step.
- GFI Outlet: Your sump pump must plug into a Ground Fault Interrupter (GFI) outlet. This type of outlet is designed to shut off automatically if it detects an electrical fault, which is critical in a potentially wet environment. Never use an extension cord.
- Plastic Sheeting: Breaking up concrete is a dusty job. Lay down plastic sheets to cover the work area and contain the mess. It will save you a massive cleanup headache later.
- Safety Glasses and Gloves: Protect your eyes from flying debris and your hands from rough materials. If you run into any issues where water and electricity become a concern, it’s always safest to stop and call for emergency plumbing assistance.
Prepping for Your Sump Pump Installation
Before you start connecting pipes or plugging anything in, a little prep work will make the entire installation process go so much smoother. Think of it as the foundation for a dry basement—getting it right from the start saves you from major headaches later. This stage is all about planning and groundwork. You’ll need to pinpoint the perfect spot for your pump, make sure you’re following local regulations, and carefully create the space where the pump will live. This isn’t the most glamorous part of the job, but it’s arguably the most important.
Taking the time to handle these details ensures your sump pump can do its job effectively when the next big Detroit rainstorm hits. It also prevents common mistakes that can lead to pump failure or even damage to your home’s foundation. A poorly placed pump won’t collect water efficiently, and ignoring local codes could cause issues if you ever sell your home. We’ll walk through exactly what you need to do to prepare your space. Getting these three steps right will set you up for a successful installation and give you the peace of mind that comes with knowing your home is protected from water damage. Let’s get started.
Planning Your Project: Cost, Time, and Difficulty
Okay, you know what you need and where it’s going. Now let’s talk about the practical side of things: how much this project will cost, how long it will take, and whether it’s a realistic DIY for you. Getting a clear picture of the investment—in both money and time—will help you decide whether to roll up your sleeves or call in a professional. Every home is different, but these guidelines will give you a solid starting point for making the right choice for your basement and your budget. This is where you weigh the pros and cons to ensure your home is protected without overstretching your comfort zone or your wallet.
DIY vs. Professional Installation Costs
If you’re comfortable with the work, a DIY installation can definitely save you money on labor. You can expect to spend between $300 and $600 on the pump, materials, and any tool rentals. On the other hand, hiring a professional can range from around $300 for a simple replacement to $4,000 for a brand-new system that requires digging a pit and running new plumbing. While the upfront cost is higher, you’re paying for expertise, speed, and the peace of mind that comes with a guarantee. For a precise quote tailored to your Metro Detroit home, getting a professional estimate is the best way to understand your total investment in sump pump services.
How Long Does Installation Take?
The time commitment for this project really depends on what you’re starting with. If you’re just replacing an old pump in an existing pit, a handy homeowner might get it done in about an hour. However, if you’re starting from scratch—meaning you need to break through concrete, dig a pit, and install new plumbing—you should set aside a full day. A first-time installation like this typically takes between four and eight hours. It’s not a quick afternoon task, so be sure to block out enough time to do the job carefully without rushing through the critical steps.
Is This an Advanced DIY Project?
Let’s be direct: installing a new sump pump is an advanced DIY project. It involves breaking concrete, digging, basic plumbing, and ensuring a safe electrical connection—all skills that go beyond a simple home repair. If you read through the steps and feel a knot of uncertainty in your stomach, that’s a good sign to call in an expert. A small mistake can lead to major water damage, which is exactly what you’re trying to prevent. There’s no shame in handing the reins to a professional; it’s the smartest move to protect your home. Our team at Mr. Pipey is always here to help when a project feels too big to tackle alone.
A Note on Homeowner’s Insurance
Here’s something important to consider: your homeowner’s insurance. Most standard policies cover sudden and accidental water damage from an internal source, like a burst pipe. However, they typically do not cover damage from groundwater flooding—the very issue a sump pump is designed to prevent. This makes a properly functioning sump pump a critical line of defense. Furthermore, some policies may deny claims for damage caused by faulty home remodeling. A botched DIY installation could fall into this category, leaving you responsible for the repair costs. It’s always a good idea to review your policy or call your agent to understand your coverage.
Choosing the Right Spot for Your Sump Pump
Location, location, location—it matters for more than just real estate. For your sump pump, the right spot is critical. You’ll want to find the lowest point in your basement, as this is naturally where water will pool first. Take a look around during the next heavy rain, if you can, to see where it collects. The spot also needs to be near a GFCI (ground-fault circuit interrupter) outlet for safe power. Finally, think about the exit route. You’ll need a clear path to run the discharge pipe outside and away from your foundation, so choose a location that makes this as straightforward as possible.
A Quick Check on Local Codes and Permits
This step is easy to overlook, but it’s so important. Before you start digging, take a moment to check your local building codes. Some municipalities in the Metro Detroit area require a permit for sump pump installations, while others have specific rules about where you can discharge the water. A quick call or visit to your local building department’s website can clarify what’s needed. Getting this sorted out beforehand prevents any potential fines or issues down the road. If you’re unsure about the requirements, our team is always familiar with the local regulations for sump pump services.
Electrical Permits and Financial Credits
Let’s talk about the electrical side of things. Your sump pump absolutely must plug into a Ground Fault Interrupter (GFI) outlet. This isn’t just a suggestion—it’s a critical safety feature designed to prevent electric shock in a potentially wet basement. If you don’t have a GFI outlet near your chosen spot, you’ll need to have one installed. This part of the job often requires an electrical permit and the skills of a licensed electrician. While it might feel like an extra hassle, getting the electrical work done correctly is non-negotiable for protecting your home and family. It’s always better to be safe than sorry when you’re dealing with water and electricity.
Now for some good news—you might be able to get some financial help with this project. Before you purchase your pump, it’s worth checking with your local wastewater management office or city hall. Some communities in the Metro Detroit area offer financial credits or assistance programs to homeowners who install sump pumps because it helps manage the local water system. They might have specific requirements, like asking for a couple of professional quotes before they approve the funds. A quick phone call could end up saving you a good amount of money. When you’re ready to get an estimate, our team is here to provide a clear and comprehensive quote for our sump pump services.
How to Dig the Sump Pit
This is where the real work begins. If you have a concrete basement floor, you’ll need a powerful hammer drill to break through it—you can usually rent one from a local hardware store. Your goal is to dig a hole that’s about 2 feet deep and 18 inches wide, which will give the sump basin a snug fit. Once the hole is dug, pour a layer of gravel at the bottom to help with drainage and create a stable base. The final step is to place the basin in the hole, making sure its top edge sits perfectly flush with your basement floor. If you hit unexpected pipes or feel out of your depth, don’t hesitate to call for emergency plumbing assistance.
Getting the Pit Dimensions Right
Precision is your best friend when it comes to the sump pit. You’re not just digging a random hole; you’re creating a custom home for your pump. When digging your sump pit, aim for a hole that’s about 2 feet deep and 18 inches wide. These specific dimensions ensure that the sump basin fits snugly and can function effectively. A pit that’s too shallow won’t collect enough water before the pump kicks on, causing it to cycle too frequently, while a pit that’s too wide can allow the basin to shift. Getting the size just right is a crucial step for a successful basement sump pump installation and long-term performance.
Creating a Solid, Level Base
Once you’ve dug the hole to the right dimensions, your next move is to create a stable foundation for the basin. After you’ve dug the hole, it’s essential to pour a layer of gravel at the bottom. This simple step serves two important purposes: it helps with drainage by allowing water to filter up from underneath, and it provides a solid, level base for the sump basin to rest on. This gravel bed prevents the basin from shifting or settling into the dirt over time, which could throw off the pump’s float switch and keep it from working correctly. A solid base is key to a reliable system and one of the fundamentals of a professional sump pump installation.
How to Install Your Sump Pump, Step by Step
With your tools and materials ready, it’s time to get to work. Installing a sump pump can be a manageable weekend project if you follow the steps carefully. We’ll walk through the process from digging the pit to testing your new system, making sure you have a clear path to a drier basement.
Step 1: Set the Basin and Drainage Lines
First, find the right spot. You’ll want to place the sump basin in the lowest part of your basement, where water naturally pools after a heavy rain. This location should also be close to an exterior wall for the discharge pipe and near a dedicated power outlet. Once you’ve marked your spot, dig a hole that’s a few inches wider and deeper than your sump basin. After clearing the debris, pour a few inches of gravel at the bottom. This creates a stable, level base and helps with water drainage by preventing mud and silt from clogging the pump. Set the basin into the hole, making sure its top is flush with the floor.
Using Gravel to Secure the Basin
Once your basin is in the hole, don’t just backfill it with dirt. You’ll want to surround the basin with more gravel, filling the gap between the basin and the earth. This gravel serves a crucial purpose: it acts as a natural filter, allowing water to flow freely into the basin while holding back mud and sediment that could clog your pump. Gently pack the gravel around the basin to hold it securely in place. This step ensures that your pump has a steady supply of clean water to work with and won’t be damaged by debris, which is a key part of any reliable sump pump service.
Protecting the Basin with a Filter Sock
For an extra layer of protection, consider wrapping your sump basin with a filter sock or geotextile fabric before you place it in the pit and backfill with gravel. This is a simple step that can significantly extend the life of your pump. The fabric acts as a barrier, stopping larger dirt particles and silt from ever reaching the basin. This pre-filtering prevents clogs and ensures your pump operates efficiently, especially in areas with sandy or silty soil. It’s a small detail that makes a big difference in the long-term health of your system, preventing the need for premature repairs.
Patching the Concrete Floor
With the basin securely in place, the final step is to patch the concrete floor around it. Mix a fresh batch of concrete and pour it into the gap, smoothing it with a trowel so it’s level with the rest of your basement floor. For a stronger, more durable patch, some experts recommend using a liquid “water stop” between the old and new concrete to prevent water pressure from creating leaks at the seam. A clean, professional-looking patch not only looks better but also adds structural integrity. If you’re not confident in your concrete skills, this is a great time to contact a professional to ensure a perfect finish.
Step 2: Position the Pump and Attach the Discharge Pipe
Place the sump pump inside the basin, ensuring it’s sitting level on the gravel base. Fill the gaps around the basin with more gravel to hold it securely in place. Next, attach the discharge pipe to the pump, installing a check valve just above the pump. This crucial part prevents water from flowing back into the basin after the pump shuts off. You’ll need to drill a hole through the wall to run the pipe outside. It’s critical to extend this pipe at least 10 feet away from your foundation, with a gentle downward slope, to ensure water drains away from your house and doesn’t seep back in.
Preparing and Gluing PVC Pipes
Once your pump is in place, it’s time to create the exit route for the water. This involves connecting sections of PVC pipe from the pump to the exterior of your home. Before you reach for the glue, do a “dry fit” by assembling all the pipes and fittings without adhesive. This allows you to double-check your measurements and angles, ensuring a smooth path for the water. When you’re confident everything lines up, apply a PVC primer to the ends of the pipes and the inside of the fittings. Follow this immediately with PVC cement and join the pieces with a firm twist to spread the glue evenly. This creates a permanent, watertight bond that can handle the pressure from the pump.
Drilling a Weep Hole
This next step might seem small, but it’s crucial for your pump’s health. You need to drill a tiny “weep hole” in the discharge pipe to prevent something called an air lock. An air lock happens when air gets trapped in the pipe, which can stop the pump from pushing water out and cause the motor to burn out. To prevent this, drill a 3/16-inch hole in the pipe, about two fingers’ width above where it connects to the pump. Make sure to angle the hole downwards so the water sprays back into the pit, not up at the lid. This simple step ensures your pump can always move water freely, extending its lifespan and reliability.
Installing a Check Valve and Gate Valve
A check valve is a non-negotiable part of your sump pump system. This one-way valve ensures that once water is pumped out of the basin, it can’t flow back in when the pump shuts off. This prevents your pump from having to pump the same water over and over again. To install it, cut a section of your PVC discharge pipe and connect the check valve, making sure the arrow on the valve points in the direction of the water flow—away from the pump. While not always required, adding a gate valve above the check valve is also a smart move. It allows you to shut off the line for future pump maintenance or replacement without any backflow issues. Protecting your home from backflow is a key part of plumbing, whether it’s for a sump pump or your main water supply.
Sealing the Exterior Wall Penetration
After you’ve run the discharge pipe through your home’s exterior wall, you need to seal the opening completely. A poor seal can let in moisture, drafts, and even pests, creating a new set of problems. The best way to create a durable, weatherproof seal is by using a high-quality exterior silicone caulk. Apply a generous bead of sealant around the pipe where it exits the wall, both on the inside and the outside. Smooth the caulk to ensure there are no gaps. For an even more secure fit, you can use heavy-duty sleeve gaskets designed for this purpose. This step ensures the hole you created doesn’t compromise your home’s insulation or structural integrity.
Adding an Ice Guard for Cold Climates
For those of us in Metro Detroit, winter brings a unique challenge: freezing temperatures. If the end of your discharge pipe gets blocked by snow or ice, your sump pump can’t get rid of the water, leading to a flooded basement and a burned-out pump. An ice guard is the solution. This special fitting attaches to the end of your exterior pipe and has openings that allow water to escape even if the main outlet is frozen solid. Installing one is a simple but critical step for any home in a cold climate. It’s a small investment that provides huge peace of mind and prevents you from needing emergency frozen pipe repairs when you least expect it.
Step 3: Make the Electrical Connections (Safely!)
Electrical safety is non-negotiable, especially in a damp basement. Your sump pump must be plugged into a ground-fault circuit interrupter (GFCI) outlet. These outlets are designed to shut off power instantly if they detect an imbalance, preventing electric shock. If you don’t have one nearby, it’s essential to have one installed by a qualified electrician. Never, ever use an extension cord to power your sump pump. They aren’t rated for this kind of use and can overheat, creating a serious fire hazard or causing the pump to fail when you need it most. Proper electrical safety is key to a successful and safe installation.
Proper Outlet Location
The outlet you use is just as important as the pump itself. Your sump pump must plug directly into a Ground Fault Circuit Interrupter (GFCI) outlet. This is a special type of outlet with a built-in safety feature that immediately cuts power if it senses any electrical imbalance, which is a critical safeguard in a potentially damp basement. You can identify a GFCI outlet by the “TEST” and “RESET” buttons located between the sockets. Under no circumstances should you use an extension cord. They are not designed for the continuous power a sump pump requires and can create a serious fire hazard or cause the pump to fail. If you don’t have a dedicated GFCI outlet near your chosen location, it’s best to have one professionally installed.
Securing Cords with a Drip Loop
Here’s a simple pro tip that makes a huge difference in safety: create a drip loop with your power cord. This is a low-tech but highly effective way to prevent water from traveling down the cord and into the electrical outlet. To do this, use a zip tie to secure the pump’s power cord to the discharge pipe. Make sure the cord hangs in a gentle “U” shape, with the bottom of the loop positioned lower than the outlet. This way, if any moisture ever runs along the cord, gravity will force it to drip off at the bottom of the loop instead of reaching the electrical socket. It’s a small detail that provides a significant layer of protection for your home and your sump pump system.
Step 4: Give Your New Pump a Test Run
Once everything is connected, it’s time for a test run. Pour a few buckets of water into the sump basin—enough to raise the float switch and trigger the pump. The pump should kick on automatically, pump the water out through the discharge pipe, and then shut off once the water level drops. Watch the whole cycle to make sure it runs smoothly without any strange noises. Check the discharge pipe outside to confirm water is flowing freely away from your home. If the pump doesn’t turn on or off correctly, you may need to adjust the float switch. If you run into any issues, our team is always ready to help with professional sump pump services.
Sump Pump Maintenance and Upgrades
Getting your sump pump installed is a huge step toward a dry basement, but the work doesn’t stop there. Think of your pump like any other important appliance in your home—it needs a little attention to keep running at its best. Regular maintenance is key to making sure it’s ready to spring into action during the next big storm. Simple checks can catch small issues before they turn into big, expensive problems. Beyond basic upkeep, there are also some fantastic upgrades you can consider for an extra layer of protection. These enhancements can give you total peace of mind, knowing your home is safe from water damage, even in the worst-case scenarios.
Essential Maintenance Tasks
You don’t have to be a plumbing expert to handle the basic maintenance your sump pump needs. A few simple, routine tasks can make all the difference in its performance and longevity. Spending just a few minutes on these checks a couple of times a year can save you from the stress and cost of a flooded basement. It’s all about being proactive. These quick inspections ensure your pump is free of obstructions and ready to work when you need it most, giving you confidence that your first line of defense against water damage is in top shape.
Regularly Test Your Pump
It’s a good idea to test your sump pump at least once a year, especially before the spring rainy season hits Metro Detroit. The process is simple: just pour a bucket of water into the sump pit. The water should raise the float switch, which will turn the pump on. Watch to make sure it efficiently pumps the water out and then shuts off automatically once the level drops. This quick test confirms that the pump, the float switch, and the electrical connection are all working correctly. If it doesn’t turn on, it’s much better to find out now than during a downpour.
Clean the Pump’s Intake Screen
Over time, dirt, gravel, and other small debris can find their way into your sump pit. Your pump has an intake screen designed to filter this gunk out, but it can get clogged. A clogged screen restricts water flow, forcing the pump to work harder and eventually causing it to burn out or fail. At least once a year, unplug the pump and check the intake screen. If you see any debris, wipe it away. This simple cleaning task ensures your pump can operate efficiently and helps extend its lifespan, keeping it ready to handle whatever Mother Nature throws its way.
System Enhancements for Extra Protection
A standard sump pump does a great job, but what happens when the power goes out during a severe thunderstorm? Or what if a single pump can’t keep up with a sudden, massive influx of water? For homeowners who want an extra layer of security, there are several system enhancements worth considering. These upgrades are designed to cover the gaps where a basic system might fall short. Investing in one or more of these additions can provide the ultimate protection for your basement, turning it into a fortress against flooding and giving you complete peace of mind.
Battery Backup Systems
A battery backup system is one of the smartest investments you can make for your home. These systems feature a secondary, battery-powered pump that sits in the pit alongside your primary one. If a storm knocks out your power, the backup pump automatically kicks in, ensuring your basement stays dry. This is a lifesaver in Michigan, where heavy rain and power outages often go hand-in-hand. A reliable backup system means you never have to worry about a power failure leading to a flooded basement. Our team at Mr. Pipey can help you choose and install the right sump pump services and backup system for your home.
Dual-Pump Systems
For homes in areas with very high water tables or those that experience extreme rainfall, a dual-pump system offers another level of powerful protection. This setup includes two primary pumps in the same sump pit. One pump handles the normal flow of water, but if the water comes in too fast for it to handle alone, the second pump automatically activates to provide extra pumping power. This redundancy ensures that even during the most intense downpours, your system won’t be overwhelmed. It’s a robust solution for anyone who wants to be absolutely certain their basement is protected from heavy water flow.
Sump Pump Alarms
How would you know if your sump pump failed while you were away from home or asleep? A sump pump alarm is a simple, effective device that answers that question. These alarms monitor the water level in your sump pit and will sound a loud alert if the water rises too high, signaling a potential pump failure or power outage. Some advanced models can even send a notification directly to your smartphone. This early warning gives you a critical head start to address the problem before any water damage occurs, making it an inexpensive but invaluable addition to your home’s defense system.
Common Sump Pump Installation Mistakes to Avoid
Installing a sump pump can feel like a major win for your home’s safety. But a few common missteps can turn that victory into a recurring headache. Getting the details right from the start saves you from dealing with a flooded basement down the road. Let’s walk through the most frequent mistakes so you can be sure your hard work pays off and your pump works perfectly when you need it most.
Safety Reminders Before You Start
Before you do anything else, let’s talk about safety. You’re working with water and electricity in close proximity, which is a combination that demands respect. The single most important safety rule is to always plug your sump pump into a Ground Fault Interrupter (GFI) outlet. This type of outlet is designed to shut off the electrical circuit instantly if it detects a fault, preventing a dangerous shock. Also, never use an extension cord. It’s not a safe, long-term solution and can create a fire hazard. If you don’t have a dedicated GFI outlet nearby, it’s time to call a professional electrician or a trusted plumber for help.
Mistake #1: Getting the Pit Size or Location Wrong
Where you put your sump pump matters—a lot. The goal is to place the sump pit in the lowest part of your basement or crawl space, which is naturally where water will collect first. Digging the pit in the wrong spot means water could pool elsewhere, defeating the pump’s purpose. The pit itself also needs to be the right size. A good rule of thumb is to dig a hole that’s about two feet deep and 18 inches wide. This gives the pump enough space to operate without short-cycling (turning on and off too frequently), which can burn out the motor. Getting this step right is foundational to effective sump pump services.
Mistake #2: Cutting Corners on Electrical Safety
We mentioned it in the safety section, but it’s so important it deserves its own spot. Using an improper electrical connection is one of the most dangerous mistakes you can make. A GFI outlet is non-negotiable. It’s your primary defense against electrical shock in a damp environment. Resisting the urge to grab an extension cord is just as critical. Sump pumps draw a significant amount of power, and a standard extension cord can overheat, creating a serious fire risk. A dedicated, properly grounded circuit is the only safe way to power your pump and protect your home and family.
Mistake #3: Placing the Discharge Pipe Incorrectly
So, your pump is successfully collecting water from the pit. Great! But where is that water going? If the discharge pipe dumps it right next to your foundation, you’ve just created a vicious cycle. The water will seep back into the soil and find its way right back into your basement. The discharge pipe needs to carry water far away from your house—at least 10 feet is a good standard. Make sure the pipe is sloped downward to let gravity help with drainage and prevent water from freezing inside the pipe during Metro Detroit’s cold winters. If you’re unsure about the best route, our team can help you plan a sump pump installation that works.
Know When to Call a Professional
Tackling a home improvement project yourself can be rewarding. But some jobs, especially those involving plumbing and electricity, come with high stakes. A sump pump is your home’s main defense against flooding, and a small installation mistake can lead to thousands of dollars in water damage. Knowing your limits is the smartest thing you can do. If you find yourself feeling unsure at any point, it’s always best to pause and call in a professional. It’s about protecting your home, and sometimes that means letting an expert handle the heavy lifting.
Is This DIY Job Too Big?
Installing a sump pump is more than just digging a hole. The process involves several specialized skills. You’ll be cutting into your basement’s concrete floor, which requires the right tools to avoid damaging your home’s foundation. The job also involves electrical work to safely power the pump and intricate plumbing to connect the discharge lines. Getting any of these steps wrong can lead to major issues, from electrical hazards to a pump that fails when you need it most. A professional has the experience to handle these complexities and ensure every part of the system works together perfectly.
Signs You Need an Expert’s Help
It’s time to call for help if you feel hesitant about any part of the installation. If you’re not 100% confident in your ability to manage the electrical wiring, handle the plumbing connections, or properly dig the sump pit, it’s a clear sign to contact an expert. Other red flags include uncertainty about local building codes or how to install a check valve correctly. Common DIY mistakes, like a clogged intake or a power failure from improper wiring, can render your new pump useless. If the project feels overwhelming, trust your gut and let a professional plumber take over.
How Mr. Pipey Can Help
If you’ve decided a DIY installation isn’t for you, we’re here to help. The team at Mr. Pipey offers expert sump pump services, from installation and maintenance to replacement and repairs. As a family-owned business, we treat your home like our own, ensuring the job is done right the first time. We handle everything—from digging the pit and managing the electrical work to testing the final setup—so you can have peace of mind knowing your basement is protected from flooding. Contact us today to get a reliable solution for your home.
Related Articles
- Sump Pump and Installation Cost: What to Expect
- Sump Pump Installation: Your Guide to a Dry Basement
Frequently Asked Questions
How often should I check on my sump pump? It’s a good habit to test your sump pump every few months, and especially before the start of the rainy season. A quick test is easy—just pour a bucket of water into the sump pit until the float rises and activates the pump. Watch to make sure it turns on, pumps the water out, and shuts off properly. This simple check ensures it’s ready to work when you need it most.
What happens to my sump pump if the power goes out during a storm? This is a great question because most sump pumps run on electricity. If your power goes out, a standard pump will not work. For total protection, many homeowners install a battery backup system. This secondary pump kicks in automatically if the power fails or if the primary pump can’t keep up with heavy water flow, giving you an essential layer of security during a severe storm.
Will a sump pump be really loud in my basement? The noise level really depends on the type of pump you choose. Submersible pumps are known for being very quiet because the motor is housed underwater in the sump pit, which muffles the sound. Pedestal pumps, where the motor sits on a column above the water, tend to be louder. If your basement is a finished living area, a submersible model is likely the better choice for you.
How long can I expect my new sump pump to last? On average, a quality sump pump has a lifespan of about ten years. However, this can vary based on how often it runs, the quality of the pump, and whether it receives regular maintenance. A pump in a very wet area that runs constantly will likely wear out faster than one that only kicks on a few times a year.
Why can’t I just run the discharge pipe into my home’s sewer line? While it might seem like an easy solution, connecting your sump pump discharge to the municipal sewer line is illegal in most areas, including Metro Detroit. This is because the excess storm water can overwhelm the public sewer system, leading to backups in your neighborhood or even in your own home. The water must be discharged outside and at least ten feet away from your foundation.